Very confused..getting frustrated

  • Active since 1995, Hearth.com is THE place on the internet for free information and advice about wood stoves, pellet stoves and other energy saving equipment.

    We strive to provide opinions, articles, discussions and history related to Hearth Products and in a more general sense, energy issues.

    We promote the EFFICIENT, RESPONSIBLE, CLEAN and SAFE use of all fuels, whether renewable or fossil.
Status
Not open for further replies.

Whitman

New Member
Hearth Supporter
Nov 3, 2010
13
Connecticut Shoreline
Hi folks! I've been lurking for several yrs. on this forum and have learned a lot. Well this year I finally pulled the trigger and bought a Woodstock Keystone. I actually drove to the factory for a tour, built my own hearth (learned how to on this forum), split and stacked my own maple and cherry, and had a cord of hardwood delivered.

So here are a few questions which have led to a level of confusion and a bit of frustration:

1. I purchased a moisture meter. My readings are in the 14-18% range. I would like to know if these readings are accurate because I am not sure if the moisture meter probes are supposed to penetrate the wood entirely. Actually, it would be impossible to do this as the wood is so hard. So, I have just pressed the probes against various parts of the splits to get my readings.

2. It has taken me hrs. to get this stove to 250 degrees. I have been consistent with the owner's manual. I just don't understand what I am doing wrong. Newspaper balls, fatwood, smaller pieces, establish hot coal bed, add smaller pieces, and gradually build from there…wife is giving me the look like I don't know what the heck I'm doing…not good…LOL. I have even tried to exclusively use firewood from a bundle purchased at a big box store (to see if perhaps my wood is not season enough and I am not taking accurate readings)

3. Lastly, even the few times I have gotten the stove up to 400 degrees it was a several hrs. project. Soot on glass seems to be an issue as well.

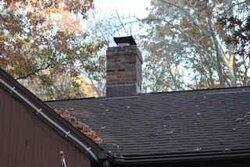
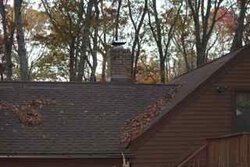
Seems like I'm getting a good draft (stove professionally installed), brick chimney. Please advise….thanks!!!

Last thing I want to do is to use my 6 month return policy on my Woodstock.
 
Where on the wood are you taking your moisture content (MC) readings? I like to take them from the heart of a fresh split (i.e., you grab a piece of wood, resplit it, then take your reading from the center). If you are only taking a reading from the end grain of a piece that's been lying around a while, you'll get a deceptively low reading.

Just last weekend dad handed me a small red oak round (it was maybe 2 or 2.5" across). It was so dry that dust was falling out from under the bark. It had been in the dry for years. He said, "Take that home and split it and see what you get." It read 19-20% in the center. He was very surprised that it would still read that high after all that time in the dry combined with its relatively small size.
 
Hi - I'm wondering what the chimney set up is? I wanted a moisture meter, now I don't. To get a decent reading most folks split a few pieces and measure inside. It's still an approximation. I judge by sound. If splits sound like old baseball bats clunking together thy're good to go. Starting fires I load thebottom half of the stove with splits, add a handful of twigs or kindling/splitter debris, and hit the kindling with a propane torch for 10 seconds or so. I then walk away appearing confident, but do have to relight it once in a while.

If you're getting black soot in the firebox it's to cool in there IMHO. More air & or dryer fuel. Does your dealer have this stove on display? It would be nice for you to see on ein action.

ATB,
Mike
 
Congrats on the stove, I'm sure you will be more than happy once you get the process down. Are you putting enough fuel in the stove to get it going? Any smoke coming coming out the front door?
 
Your splits may be too big to initially reach critical mass. On an established coal bed they'll catch OK if they are seasoned. You have to split the wood then take a MM reading...if you're doing that and still getting those readings, I dunno should be good to go. Once you see a decent fire starting don't be so quick to lock it down, just let it go, see if you can get up to 600°. best of luck
 
Welcome to the forum Whitman.

I understand your frustrations and will help if possible. You did well to visit the factory and take a tour. We were there for the first time in September at the mortgage burning party and we had a grand time plus being able to talk to anyone there at Woodstock was a big help to me.

On the moisture meter, first understand that I have never owned nor used one. Actually I was surprised when I got on this forum to find how many use and rely on them! For us, we usually have plenty of wood on hand and it sits around outdoors (covered with old galvanized roofing) for several years so we know it is dry. A few years of experience also tends to help on knowing when wood is ready to burn or not. However, back to the meter. First, you no doubt understand that when you check with the meter, you must split that wood right then. If it has been split, you simply re-split it so you can check the inside of the wood to get the most true reading. Do not try to get a reading on the ends of the splits either. Read in the middle. Push the probes and if they don't go in far, just take the reading there. Do several and take an average.

Taking hours to reach 250 degrees?!!! Yes, I'd say there is something drastically wrong there. Also, you should not use fatwood in this stove. But just guessing, I'd say you are starting the fire with the bypass set and the draft full, which is correct. But how do you get the stove top temperature up? As soon as you get a decent fire going, start to dial that draft down. Simply put, if you leave that draft full open, it definitely will take hours to get the stove top up to temperature because most of the heat will be going directly up the chimney.

We have a gauge on the stove top and another on the flue. Our flue is horizontal but vertical works the same. When the flue temperature starts rising good is when we start cutting the draft. This can be from 10-20 minutes depending on what wood we've put in the stove. If the flue temperature reaches 500 degrees, and it does quite easy, then we dial the draft down to 1 until the stove top reaches 250. That, of course, is when we engage the cat. When that is done, the temperature of the stove rises rapidly.

Here is basically how I start a fire with a cold stove. In the bottom of the stove I usually place 2 small splits so the flat side is up. This will usually form a slight or sometimes an aggravated V shape. In the center of that V is where I place 1/4 of a Super Cedar. I then light the Super Cedar. Then I place kindling on top of that in sort of a criss-cross fashion. On top of that I place 2 more splits (sometimes only 1 but have done as much as 3). I leave the firebox door open just mabye 1/2 inch or even close the latch and then push the door until the latch makes contact with the stove. This gives you a pretty good draft for starting the fire. We usually do not leave the door open but just a few minutes. Also important at this time is to never leave the stove room while that door is slightly ajar! Stay there and don't take the chance of your mind becoming active with something else and forgetting the stove. Once the fire gets going we shut the firebox door and then wait for the temperature to come up.

It is at this point where we watch the thermometers. As the flue temperature goes up, the draft begins to close some. It is then treated just like a reload. Like this morning. I put in 3 splits, left the door very slightly ajar for a very short time then closed it. In very short order (I already had a big bed of coals) I had to dial the draft down and the stovetop reached 250 in just a really short time. I apologize that I did not keep track of the time or I'd have let you know how long it took. Believe me though that it did not take very long. Our wood is very dry and that is the biggest key to making any stove operate smoothly.

For years I did the newspaper thing and then for several years my wife fell in love with fatwood. We no longer use the fatwood though because Woodstock advises against it and I really did not like it that much either. With newspaper, I built the fires basically the same way with the newspaper taking the place of the Super Cedars.


Soot on the glass. Every fall we do get some even though we know our wood is very dry. Once you have a bigger fire that will go away. Until then, if you must clean it, just crumple some newspaper a little, dampen it (not soak), dip it into the ashes and clean the glass. It works like magic and costs nothing. If you wish to finish off the job so every tiny speck is gone, a damp paper towel with windex works nicely. Just make sure you do this when the stove is at least cool else your fingers and arm might get a bit uncomfortable.


Please do not hesitate with more questions and I think you'll get some very good help from some very knowledgeable folks on this forum. Good luck to you.
 
Wow. I'm a slow typist. There were no answers when I started to type and now look at how many are there ahead of me. Thanks guys! Let's help this fellow.
 
Thanks all -

Talk about a learning curve! Dennis, I have been leaving the bypass open during my cold start, perhaps that's the reasoning behind the long wait. I just ordered some supercedar samples and will try your approach as soon as they arrive. I hope it works...I am trying so hard to love this stove!! LOL

So after I dial down the damper, I should see a faster rise in temp.?
 
Whitman, for sure you do need to leave the bypass open during the cold start until the stove top reaches 250. But the point is that it will reach 250 much, much faster and easier once you dial down the draft. Yes, you will see a faster rise in the temperature. Just remember to get a good flame going. You don't have to rush it, but you don't have to wait an hour either. For example, from a cold stove, we have the cat on in less than 45 minutes. Within an hour we can have 500 degrees stove top with ease.

You will like the super cedars. It's too bad you did not get some samples of them while at the Woodstock factory.....but I gave them all away when I was there. lol Yes, Craig (webmaster) had taken some super cedars up there with him and I was honored to pass out the samples. I even made sure I got a couple of them too. lol


You will love that stove when you get it figured out. The learning curve you will find is actually quite short. A well respected member of this forum, Todd, is also a Woodstock stove owner. He just added a Keystone to his home this summer so we're watching how he does with his too. He still has and burns the Fireview too; a real Woodstock fan indeed. So if Todd posts, pay attention as he has much knowledge and with him also owning the same stove as you have it is a big plus.
 
I just got off the phone with the folks from Woodstock. I explained my situation to them and was told not to close the damper until the stove top reached 250 degrees. The suggestion made was to place the temp gauge on the stove pipe and wait for it to reach 300 degrees or so and then engage the combuster and then damp down.

The person I also spoke to also suggested that I keep the ash pan lever open until it reaches 250. His thinking is that my chimney is not getting warm enough and this will help.

The saga continues....
 
Whitman, although someone told you this, be assured that this keeping the ash pan lever open is normally not recommended by Woodstock or any other company. The reason is that it can be only too easy to forget that the ash pan door is ajar and if there is enough wood in the stove, things can get out of hand super fast.

Also on the flue temperature and engaging the combuster at 300 degrees. That is way too soon to engage the cat and you very well could be setting up that cat for a very short life span. Remember that moisture is the cats worst enemy and when you start a fire, the first part of the fire is evaporating the moisture from the wood. I was once told to go at 500 on the flue; however, our flue is horizontal and on a cold stove I can get to 500 flue temperature quite fast (our flue runs horizontally through the wall) but the stove top won't even be to 200! That would be crazy to engage the cat then. So we have to attempt to apply some common sense to all these things.


All in all, whenever it is stated to do thus and so at a certain temperature or something similar, when it comes to burning wood, there is still nothing better than applying some common sense and trying to learn your own particular situation. There are many of us on this forum who have the same types of stoves; for example, Todd and I both have Fireview stoves. You will also find that Todd and I run our stoves just a bit different. Neither of us are wrong; we just have a different installation and burn different types of wood.

Good luck and stay on top of things.
 
Backwoods Savage said:
On the moisture meter, first understand that I have never owned nor used one. Actually I was surprised when I got on this forum to find how many use and rely on them! For us, we usually have plenty of wood on hand and it sits around outdoors (covered with old galvanized roofing) for several years so we know it is dry. A few years of experience also tends to help on knowing when wood is ready to burn or not. However, back to the meter. First, you no doubt understand that when you check with the meter, you must split that wood right then. If it has been split, you simply re-split it so you can check the inside of the wood to get the most true reading. Do not try to get a reading on the ends of the splits either. Read in the middle. Push the probes and if they don't go in far, just take the reading there. Do several and take an average.
Taking hours to reach 250 degrees?!!! Yes, I'd say there is something drastically wrong there. Also, you should not use fatwood in this stove. But just guessing, I'd say you are starting the fire with the bypass set and the draft full, which is correct. But how do you get the stove top temperature up? As soon as you get a decent fire going, start to dial that draft down. Simply put, if you leave that draft full open, it definitely will take hours to get the stove top up to temperature because most of the heat will be going directly up the chimney.
We have a gauge on the stove top and another on the flue. Our flue is horizontal but vertical works the same. When the flue temperature starts rising good is when we start cutting the draft. This can be from 10-20 minutes depending on what wood we've put in the stove. If the flue temperature reaches 500 degrees, and it does quite easy, then we dial the draft down to 1 until the stove top reaches 250. That, of course, is when we engage the cat. When that is done, the temperature of the stove rises rapidly.
Here is basically how I start a fire with a cold stove. In the bottom of the stove I usually place 2 small splits so the flat side is up. This will usually form a slight or sometimes an aggravated V shape. In the center of that V is where I place 1/4 of a Super Cedar. I then light the Super Cedar. Then I place kindling on top of that in sort of a criss-cross fashion. On top of that I place 2 more splits (sometimes only 1 but have done as much as 3). I leave the firebox door open just mabye 1/2 inch or even close the latch and then push the door until the latch makes contact with the stove. This gives you a pretty good draft for starting the fire. We usually do not leave the door open but just a few minutes. Also important at this time is to never leave the stove room while that door is slightly ajar! Stay there and don't take the chance of your mind becoming active with something else and forgetting the stove. Once the fire gets going we shut the firebox door and then wait for the temperature to come up.
It is at this point where we watch the thermometers. As the flue temperature goes up, the draft begins to close some. It is then treated just like a reload. Like this morning. I put in 3 splits, left the door very slightly ajar for a very short time then closed it. In very short order (I already had a big bed of coals) I had to dial the draft down and the stovetop reached 250 in just a really short time. I apologize that I did not keep track of the time or I'd have let you know how long it took. Believe me though that it did not take very long. Our wood is very dry and that is the biggest key to making any stove operate smoothly.
For years I did the newspaper thing and then for several years my wife fell in love with fatwood. We no longer use the fatwood though because Woodstock advises against it and I really did not like it that much either. With newspaper, I built the fires basically the same way with the newspaper taking the place of the Super Cedars.
Please do not hesitate with more questions and I think you'll get some very good help from some very knowledgeable folks on this forum. Good luck to you.

Hard to top that kind of detail from BS's experience. Re-read it.
There's an art to using any wood stove. It takes a little time to figure it all out and have it become routine and even fun. Your space layout and insulation, draft and flue construct, your experience with an EPA stove, and of course, the wood. Enjoy the ride, we do.

Many of us using wood stoves or furnaces for heating over many years use some tricks learned the hard way. One is to crack a door or ash pan to get a load started, particularly when the wood may be partly green and wet, or low barometric pressure, or cold flue. BE SURE TO MONITOR THE TEMP CAREFULLY AND DO NOT ALLOW AN OVER-FIRE. Our routine for all our wood stoves ( 4 ) is a loud alarm set for say +/-10 minutes when reloading. It's too easy to get involved in calls, office work, play.
No real need for all these tech gadgets here. They're fun, but geeky compulsive. Infrared Gun, Moisture Meter, digital flue monitor, cat probes all become the end game rather than simply enjoying the wood heat. Most have done well without the tech things for all too many years. You can however get a HVAC guy to do a draft check. Enjoy.
 
This is what I found works best to cold start my Keystone. Begin with a good pile of kindling, get it going with full air til the flames are fully engulfing the fire box, about 10 min. This will give you a smokeless start up and warm that chimney up fast. Once it's going good turn down the air to a more controlled burn at about 1.5 -2 and let it burn for 15-20 minutes til it turns into a hot coal bed. The stove top should be close to 200 by now. Now rake the coals forward towards the glass, add your splits but try to keep some air gaps between them, don't pack them tight, shut the door, adjust your air to full again til she takes off good just like the kindling did, then turn it down to 1.5-2, after 10-15 minutes engage the cat. The stove top should be close to 250 but it's not always nessasary to be exact, I will engage at 200 if I have a good coal bed and flames. Don't turn the air down too soon, let the cat adjust and get use to the load. I like to let her go at 1.5 for 30 minutes then turn it down til the flames start to lift off the logs but still keep some red in the coals, Usually just a smidgen over #1 will be my sweet spot.

Your first few fires will blacken the glass some as the moisture in the stone and mortar is still being released and your draft won't be as good as it will later this Winter.

I think Woodstock was talking 300 stove pipe temp to engage if your using single wall because the internal temp will be at least double that or 600 degrees which is fine for engaging the cat but you also need to maintain that temp for awhile not just pop the lever as soon as it hits 300.

It best to get a good coal bed established with this stove before engaging the cat, you have to have patients and it will take some trial and error with air settings and different loading techniques.

Keep us posted and ask questions, we will get it figured out and you will be very happy with this stove.
 
Thanks Todd.

On the 300 degree flue, even if single wall, that is much too soon. I was advised once to do it at 500. I did it a couple of times but the cat started cracking and I went back to 250 stove top, no matter what the flue temperature. It works.
 
If it's not cold enough outside, I used to spend all day trying to get a good fire going.
My chimney is just a few feet short of what's recommended but when the time is right, the fire will burn, very well thank you.
 
Backwoods Savage said:
Thanks Todd.

On the 300 degree flue, even if single wall, that is much too soon. I was advised once to do it at 500. I did it a couple of times but the cat started cracking and I went back to 250 stove top, no matter what the flue temperature. It works.

Yeah, this technique can work but there are many variables. You can reach 500 stove pipe temp very quickly running wide open in the bypass mode, but that doesn't mean it's time to engage. I engage my cat on my Fireview all the time at pipe temps over 300 but it's been there for awhile and I have a good coal bed and flames established. My Keystone has a short 45 degree pipe and thats it, so I need to rely more on stove top and just looking at the fire.
 
The flue is the engine that drives the stove. When it is warm outside draft can be weak, especially with a shorter flue. We need to know more about this chimney and how the stove is connected to this chimney.

Please describe in detail how the stove is connect (single or double-wall pipe, any elbows or tees, etc.) and describe your brick chimney setup. Important information should include the height, liner size, is it fully lined?, is the liner insulated? how high over the roof does it terminate?, is this an interior or exterior chimney?

The other thing to check is that it was done correctly. Unfortunately, sometime a a pro-priced installation does not mean it was done professionally. Examine the flue collar at the stove to make sure there are not large gaps where air could get sucked in. If the stove has a liner going up through a damper throat, make sure it is not crimped or badly squashed there.
 
Todd said:
Backwoods Savage said:
Thanks Todd.

On the 300 degree flue, even if single wall, that is much too soon. I was advised once to do it at 500. I did it a couple of times but the cat started cracking and I went back to 250 stove top, no matter what the flue temperature. It works.

Yeah, this technique can work but there are many variables. You can reach 500 stove pipe temp very quickly running wide open in the bypass mode, but that doesn't mean it's time to engage. I engage my cat on my Fireview all the time at pipe temps over 300 but it's been there for awhile and I have a good coal bed and flames established. My Keystone has a short 45 degree pipe and thats it, so I need to rely more on stove top and just looking at the fire.

Now I don't have a Keystone, but with my FV it is much as others including BS have shared - I'll not get my stove up to temp if I run with the air full open the whole time. I tend to light up and once the fire is well established I back the air down from 4 to around 2 just to keep more fire in the box instead of all rushing up the flue. I engage the cat based on the temperature on the outside of the single wall pipe, not the stove top. I aim for a stable 400*f about 6-8" above the 90* bend that takes it vertical after exit of the stove. For me this is working quite well so far this season.

Clearly there is no one "right" way to build your fire or get the stove up to temp. I prefer to do a top-down fire so I lay a floor of larger splits (this time of year it is more like a puzzle of chunks and cut-offs, but still the larger pieces), then a layer of slightly smaller splits with a slope towards the front of the stove. I then put a handful of kindling (I'm using pine split down to about 1/2" size now) on top of this in the front - the space where the slope is. The reason for this is I like the fire to start mostly in the front of the stove and work it's way back so it heats up the top where the cat is instead of just going right up the flue. Anyway, I then put a piece of SC on top of the kindling and light it off, shut the door and watch the fire burn with the air fully open and cat disengaged for a while. Once the kindling is fully burning and splits are starting their burn well I will turn air down to about 2 and wait/watch until time to engage the cat.

I spent a lot of time at the open house talking to a couple of the guys there about using the flue temps to engage the cat rather than the stove top thermometer. I came away from the discussions with a very different view of things. None of what I was told really matched up with published advice and much of it seems to be in direct conflict with the conventional wisdom shared on this site. I have modified my habits as a result and am seeing how well it works out. Bottom line for me is that I"m engaging much sooner than I did before and I have not had any problems with 'stalling' the cat or failed light-offs. I don't know if there will be any long term negative effects to the cat - I'll inspect it again throughout the season and watch for dramatic changes, but I'm not worried as I have confidence in the testing done at WS and the logic of what was shared with me makes sense.

I will point out the obvious though - obvious for regulars here anyway - that the key to all this working is good dry wood. I have not had any lasting soot on my glass this year. I did have a black spot form at the start of one fire when a split with a knot (pine) rolled toward the glass and was 'jetting' a flame onto the glass leaving a near perfect circle of black for a while, but it burned off sometime shortly after (I didn't see it burn off, just noticed it was gone later). My wood so far this year seems better than last year - I am able to get temps up faster and higher than I recall a year ago. It seems that I'm also getting a more consistent "stove top and sides" heating pattern. I have been burning mostly the pine though which is likely about as dry as I can get things - my MM broke so I can't actually check it though and I don't plan to buy another one since I'm now a couple years ahead.
 
I just installed a Keystone and have only ran it for about 4 days.

On my seasoning burns, my glass blackened-up and pretty much is still that way - if anything, a bit worse. I'm going to clean it tonight as I have given orders to let the fire go out and the living room return to a temperature lower than 80ish degrees....

I am on a learning curve with my stove and have read much here about the operation of Woodstock woodstoves and am encouraged every day.

I too was puzzled about why it took longer than, say 30 minutes, to get the stove top up to 250 degrees - if at all, but am finding it is my technique that is the problem, not the stove design. In the beginning, I was loading the stove with to much wood and to much large diameter wood and rounds - not splits. I also abandoned the top down method for starting the fire as my fire box is just not, IMHO, tall enough for this when using kindling and paper. Perhaps if I used one of the supercedar fire starters, top down might be easier.

What I have found is that using paper on the bottom, small SPLIT kindling is a great fire starter. The cat if turned off, the stove is in full bypass, the damper is at 4 and the door is slightly ajar (just for a bit - for just a few minutes). I light off the paper, one match, and my fire is going. Once I see the kindling has lit, then I add some larger SPLIT kindling and continue to build. The key here is to maintain momentum. I don't do anything with the wood to squash the fire down and I try to cris-cross the kindling as I add it. Also, one of my first problems getting the fire started and making 250 degrees stove top temperature was that I got the 1 and 4 damper positions reversed in what's left of my brain and the second was forgetting the damper was on 2 after a burn! That will really make firing a stove harder than necessary ;)

Now the reason I say SPLIT is that round unsplit wood generally has a smooth surface whereas split wood and especially kindling has a lot of jagged, sharp edges and splinters! More surface area to burn, more spots for fire to ignite.

So now I am adding wood in such a way as not to smother the fire, but build momentum - even when re-kindling the fire after an overnight burn.

Next, once I see the kindling is going and I have added to it and added some larger splits (but still on the small side), I let those catch fire too. All this is going on with the damper at 4 and in full bypass (cat off). When I am confident the wood is burning (and the door has been closed too), I adjust the damper down to 3 and make sure the fire continues to build and then down to 2. As you damper down below 4, more heat stays in the stove instead of going up the chimney and the stove top temperature really begins to build. As soon as it hits 250 degrees, which doesn't take more than 30 - 40 minutes cold and 15 to 20 minutes on a cool reload, I switch out of bypass and into cat mode. It takes only a minute and the cat is glowing and I am really cooking. Sometimes by the time I get to this point, I have fully loaded the fire box. Other times, it is a partial fill.

On full fills and partial fills of the fire box, I use different wood. For daytime/shoulder season, which we are in now, I don't use my best wood - except for kindling. For overnight, I will set a large ROUND against the back of the stove and the smaller/split stuff, including the embers, to the front. I've had my stove up to about 550 for kicks and am waiting for the really cold weather to crank it up to 600-650ish temps. We are running the stove up to about 400 degrees and amazingly enough it will hold there for hours - almost like there is a thermostat.

I'm getting overnight burns and really only re-kindling vs cold starting for now. The only complaint I've got for now is the glass has gotten dirty pretty bad, but we'll see after I clean it tonight how it stays. BTW, I kind of knew going into the Keystone purchase that this cat stove wouldn't have a fire show like a stove with burn tubes and that has been very true, however, in the evenings for I hit the sack for the night, I have been able to get a balance between a small wicking flame off the bottom of the logs, red embers in the bottom, a nice glow on the cat - turn the lights out and it looks like a lightning storm at the top of the fire box. The cat ignites the gasses of the wood and makes nice a show.

Lastly, my Keystone's limit on dampering down is about 1-1/4 to 1-1/2 from the top of the lever to the marks because so far, anything below that seems to make the stove go dark and I think Todd has had the same experience with his Keystone too.

Keep the faith - you have a great stove and once you dial it in, be prepared for some warm weather inside your house.

Bill
 
I didn't read through everything, but just wanted to let you know we started with a woodstock and also had the same problems. I have to play with the stove CONSTANTLY to get to 400. Woodstock was awesome, staying on the phone with me for hours. Even sent me kiln dried wood. The stove just wouldn't gin for me. I finally had to send it back. I don't have a straight line up my chimney, there are 2 curves to go straight up the chimney, but we made them as straight as possible.

I bought a waterford trinity off of craigslist and it runs great for me. Sometimes I think some flues and stoves just don't get a long.
 
Sounds like all three of us new Keystone owners have the same problem with the dirty glass. I haven't been burning mine lately but my first fires all left soot on the lower corners. For me I think the dirty glass was mostly from a single shoulder season evening low burn and also from sucking damp air up through my old ash dump through the OAK. Woodstock also says it can take more than a few fires to drive all the moisture out of the stone. My glass did clear up when I burned it hotter and longer over a 2 day stretch. I figure once it gets colder out and we are all burning 24/7 dirty glass will go away, if it doesn't there may be a draft problem or the gap between the glass and air wash deflector could be off, it's suppose to be a 1/4" gap up there which is adjustable.
 
My set up via pics…
 

Attachments

  • IMG_2351.jpg
    IMG_2351.jpg
    8.9 KB · Views: 820
  • IMG_2356.jpg
    IMG_2356.jpg
    10.4 KB · Views: 807
  • IMG_2352.jpg
    IMG_2352.jpg
    13.5 KB · Views: 786
  • IMG_2357.jpg
    IMG_2357.jpg
    8.3 KB · Views: 810
  • IMG_2358.jpg
    IMG_2358.jpg
    12.2 KB · Views: 791
Whitman, that looks great!
 
That stove looks just like mine! The only difference is that I reduced at the stove from 7 to 6 inch vs at the thimble.

One thing that jumps out to me is - your stove is very cllose to the wall. Does your cat/bypass flip all the way down or does it hit the wall and stop? If not flipping all the way down, that might be your problem.

Thanks,
Bill
 
Status
Not open for further replies.