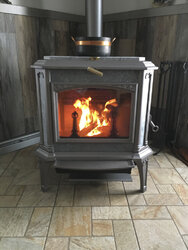
Just ordered a Woodstock Progress stove today!

  • Active since 1995, Hearth.com is THE place on the internet for free information and advice about wood stoves, pellet stoves and other energy saving equipment.

    We strive to provide opinions, articles, discussions and history related to Hearth Products and in a more general sense, energy issues.

    We promote the EFFICIENT, RESPONSIBLE, CLEAN and SAFE use of all fuels, whether renewable or fossil.
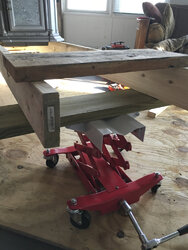
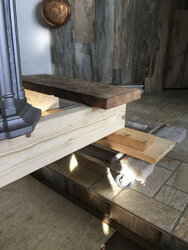
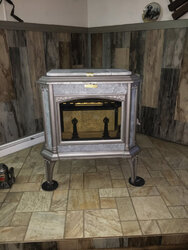
Here are a few photos, I was planning on taking more if the movers were here. I did not get any photos with the stove on the ramp...my heart was in my throat the whole time and did not even think to take a photo. I used a 4 ton come-along to pull it up the steel ramp. If I had to do it over again I would cover the steel ramp with plywood as the ramp has slots in it and the dolly wheels would drop down into those slots. That made it a little rough traveling up the ramp. Once I got it on the deck I could sigh some relief. The hardest part physically for me was getting it through the door, I put some plywood over the threshold and getting it up onto that was tough. Once inside, I had laid plywood down and it was smooth sailing over to the hearth. In the photos you will see that I put a dolly up on the hearth and ran a 2X6 on edge along both sides of the stove. I placed the farthest end on a transmission jack (Harbor Freight). This jack only has a weight load of 450# but I knew most of the weight was going to be up front on the dolly. Once I raised it high enough I just rolled it onto the hearth. Lowered the stove down onto a couple of 4X4's so I could pull the 2X6's out of the way and install the legs. Then just jacked it down onto the hearth. Sounds simple right?

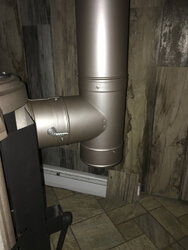
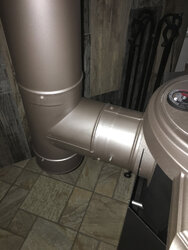
Because my stove is a corner installation and the stove is side load, I wanted to bring the stove into the room more than the last stove. I decided to rear vent, install a Duravent pipe damper section, then a clean out "T" and then up to the chimney. That brought the stove into the room about 8" and still have almost 2' in front of the stove for code requirements.
Woodstock stove-1350.jpg Woodstock stove-1352.jpg Woodstock stove-1354.jpg Woodstock stove-1355.jpg Woodstock stove-1357.jpg Woodstock stove-1359.jpg Woodstock stove-1362.jpg Woodstock stove-1367.jpg Woodstock stove-1369.jpg
 
Last edited by a moderator:
Awesome! I’d be interested in hearing just how you handled that beast by yourself as well. Congratulations! You must be like a kid at Christmas, I know I WOOD be!
Anxiously awaiting those pictures...

Kid at Christmas, yes. I woke up at 2:30am and could not go back to sleep. I got up at 3:45, made coffee and started reading the instruction on how to install the rest of the components. Had it all together by 9:00am
 
  • Like
Reactions: flhpi and au2183
Woodstock seems to be an outstanding company to do business with that tends to underestimate the capabilities of their products if the many user reviews all over the web can be believed.
Yep, it's legit. No hype, just a lot of people who love 'em once they have one in da house. >>
I’d be interested in hearing just how you handled that beast by yourself as well.
Hmmm, Coral Castle technology? ;) My nephew and I snatched the Fireview off the pallet and set it down..still not sure how we did that. New-stove adrenaline, I guess.. ;lol
I got the stove into the house and up on the hearth by myself.
I'd almost rather do that than have some ham-handed movers putting their greasy mitts all over my new baby. ;)
By this afternoon there will be a first fire! The temps are suppose to be in the 40's today so will be able to open windows and doors as needed to rid the paint fumes as they burn off.
Oh, boy, say I gleefully whilst rubbing my hands together. ::-)
Get a box fan out and put it in a window near the stove, blowing out, then open another window on the other side of the room..
 
  • Like
Reactions: Photog200
Very nice! I like your set up! I especially like your pipe set up! Super easy pipe cleaning!
 
  • Like
Reactions: Photog200
Ooooo, FIRE! Everything looks gooood! ::-) I forget, is there a provision for a cat probe. Thought maybe there was a cap bolt plugging the probe hole? My probe really doesn't work..8" is too far for the accurate cat temp to be transmitted to the dial. I'll either have to drill the top of the stove so a shorter probe can drop down to 1/2-3/4" over the face of the cat, or install a thermocouple probe.
Right now, I have my flue meter back about 6" behind the rear-exit flue collar, on the tee snout. I might try it on the flue collar and see how that compares in temp. Sure would be easier to see than it is now, back behind the fireplace lintel..
like your pipe set up! Super easy pipe cleaning!
Yep, I just remove the bottom tee cover, put a small trash bag around the opening with a big rubber band, and if you can easily get on the roof like I can, just brush 'er down into the bag. I don't have quite as good access as Photog does..back of my stove is flush with the fireplace opening so I have to get my arms back in there between the stove and fireplace box.
 
I forget, is there a provision for a cat probe.

I seem to remember reading on Woodstock website that a cat probe was not available for the Progress but it is for the new steel models. But don't quote me on this
 
I seem to remember reading on Woodstock website that a cat probe was not available for the Progress but it is for the new steel models. But don't quote me on this
Did you put in the dampner because of excessive draft?
 
Here are a few photos, I was planning on taking more if the movers were here. I did not get any photos with the stove on the ramp...my heart was in my throat the whole time and did not even think to take a photo. I used a 4 ton come-along to pull it up the steel ramp. If I had to do it over again I would cover the steel ramp with plywood as the ramp has slots in it and the dolly wheels would drop down into those slots. That made it a little rough traveling up the ramp. Once I got it on the deck I could sigh some relief. The hardest part physically for me was getting it through the door, I put some plywood over the threshold and getting it up onto that was tough. Once inside, I had laid plywood down and it was smooth sailing over to the hearth. In the photos you will see that I put a dolly up on the hearth and ran a 2X6 on edge along both sides of the stove. I placed the farthest end on a transmission jack (Harbor Freight). This jack only has a weight load of 450# but I knew most of the weight was going to be up front on the dolly. Once I raised it high enough I just rolled it onto the hearth. Lowered the stove down onto a couple of 4X4's so I could pull the 2X6's out of the way and install the legs. Then just jacked it down onto the hearth. Sounds simple right?

Because my stove is a corner installation and the stove is side load, I wanted to bring the stove into the room more than the last stove. I decided to rear vent, install a Duravent pipe damper section, then a clean out "T" and then up to the chimney. That brought the stove into the room about 8" and still have almost 2' in front of the stove for code requirements.
View attachment 221832 View attachment 221833 View attachment 221834 View attachment 221835 View attachment 221836 View attachment 221837 View attachment 221838 View attachment 221840 View attachment 221841

Absolutely beautiful! Have fun with it. I envy you!
 
  • Like
Reactions: Photog200
I put it in because I sometimes needed it with the Jøtul when the wind got really strong. It would pull most of the heat right up the chimney. I figured it would not hurt the installation to put it in, if I don't need it, I will just leave it open. It also allowed me to bring the stove into the room another 5".
 
I put it in because I sometimes needed it with the Jøtul when the wind got really strong. It would pull most of the heat right up the chimney. I figured it would not hurt the installation to put it in, if I don't need it, I will just leave it open. It also allowed me to bring the stove into the room another 5".
I thought that might be the reason...I like the way you have that set up! It looks very nice!
 
  • Like
Reactions: Photog200
Here are a few photos, I was planning on taking more if the movers were here. I did not get any photos with the stove on the ramp...my heart was in my throat the whole time and did not even think to take a photo. I used a 4 ton come-along to pull it up the steel ramp. If I had to do it over again I would cover the steel ramp with plywood as the ramp has slots in it and the dolly wheels would drop down into those slots. That made it a little rough traveling up the ramp. Once I got it on the deck I could sigh some relief. The hardest part physically for me was getting it through the door, I put some plywood over the threshold and getting it up onto that was tough. Once inside, I had laid plywood down and it was smooth sailing over to the hearth. In the photos you will see that I put a dolly up on the hearth and ran a 2X6 on edge along both sides of the stove. I placed the farthest end on a transmission jack (Harbor Freight). This jack only has a weight load of 450# but I knew most of the weight was going to be up front on the dolly. Once I raised it high enough I just rolled it onto the hearth. Lowered the stove down onto a couple of 4X4's so I could pull the 2X6's out of the way and install the legs. Then just jacked it down onto the hearth. Sounds simple right?

Because my stove is a corner installation and the stove is side load, I wanted to bring the stove into the room more than the last stove. I decided to rear vent, install a Duravent pipe damper section, then a clean out "T" and then up to the chimney. That brought the stove into the room about 8" and still have almost 2' in front of the stove for code requirements.
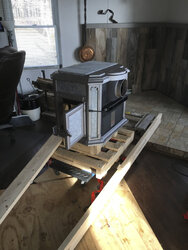
View attachment 221832 View attachment 221833 View attachment 221834 View attachment 221835 View attachment 221836 View attachment 221837 View attachment 221838 View attachment 221840 View attachment 221841

Nice work doing that yourself! Also thanks for sharing the pictures, and explaining what you did. In the first picture, is the new pallet (located between the old pallet and the black banded crating) something that came with the stove, or something you provided to raise it up and work with your dolly?

That looks like a metallic brown stove, same as what we hopefully have coming in about three weeks, sure looks sharp. I can hardly wait! We ordered the painted stovepipe also.
 
  • Like
Reactions: Woody Stover
That looks like a metallic brown stove, same as what we hopefully have coming in about three weeks, sure looks sharp. I can hardly wait! We ordered the painted stovepipe also.
Yeah, we're gonna need a couple panoramic shots from further back in the room...with a nice fire in the box once you have 'er broken in. >>
 
Yeah, we're gonna need a couple panoramic shots from further back in the room...with a nice fire in the box once you have 'er broken in. >>

That means I am gonna have to clean the house...LOL I can do that. I could not believe what a mess this created but it was worth it.
 
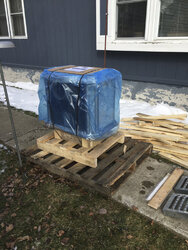
In the first picture, is the new pallet (located between the old pallet and the black banded crating) something that came with the stove, or something you provided to raise it up and work with your dolly?

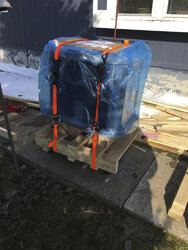
The first photo is how it came from Woodstock, minus the cardboard box and wood crating surrounding it. Both pallets were there and you can see the pile of lumber behind the stove. That was from the crating that surrounded the stove.
 
12-15' 8" SS insulated chimney, reduced down to 6" stove pipe
I guess you ran your setup details by them and they were OK with it? What do you mean by "12-15'?" Is that from stovetop to the top of the chimney? There's quite a difference in draw between 12' and 15', but the PH must be a fairly easy breather (as are the Keystone and Fireview..my BIL is running my old Fireview on about 13.5') if they say it will be OK with 8" chimney at that height.
So I guess the "ash hearth" on the front of the stove is an aesthetic option? What is the stuff we're seeing beneath that?

221865-85622e8fcd13fc50c90502193faddaca.jpg
 
The ash lip for me was aesthetics but in the owners manual it says that it cuts down on the radiant heat right in front of the stove. What you are seeing below that is the ash pan
 
Great install! You are going to love the PH :)
 
  • Like
Reactions: Photog200
Not having too much trouble adjusting to the new stove, it is quite easy to operate. I have been burning wood since I was a teenager and now 61 but never have used a cat stove. I don't consider myself an expert by any means but am going to list a few first impressions of this stove. Take it for what its worth. :)
1. The air control lever is very sensitive, you only have to open it a hair (1/16") and the fire takes off. With it open just this much, the stove operates at about 400℉. This is the one thing that will take some time to get use to on the stove. It would help if there was some kind of scale markings on the stove.

2. The stove makes a lot of noise from expansion and contraction as the fire heats up or dies down. I am sure I will get use to that too, it will also tell me without looking at the stove what is going on.

3. I followed the instructions in the owners manual for long overnight burns and turned the air control all the way down. I did get an all night burn and there were plenty of coals in the morning. The stove was still radiating heat and the house was warm. Outdoor Air Temps (OAT) was 25℉ this morning and 78℉ in the living room where the stove is.

4. The stove quality is top notch and much attention to detail. I am very happy with this purchase.

I am sure that after getting use to the stove and use in some colder weather, I will be able to fine tune the usage.

Thank you to all who helped me make the decision on this stove.

Randy
This is almost exactly what I thought on the first run. I remember being surprised how much clicking it made heating up. You do start running it by ear after a little bit. I think it becomes quieter over time or you get used to it. I’m not sure which it is. I don’t even notice now except when I’m listening for it on a reload.
 
  • Like
Reactions: Photog200
1. The air control lever is very sensitive, you only have to open it a hair (1/16") and the fire takes off. With it open just this much, the stove operates at about 400℉. This is the one thing that will take some time to get use to on the stove. It would help if there was some kind of scale markings on the stove.
Exactly! Sometimes I even close the air control level completely depending upon the temp outside. FYI, you're not the first person to make the comment regarding scale markings on the stove. Glad that you are enjoying the stove.
 
  • Like
Reactions: Photog200