How to Disassemble my VC Dutchwest Stove to Replace the Inner Lid

  • Active since 1995, Hearth.com is THE place on the internet for free information and advice about wood stoves, pellet stoves and other energy saving equipment.

    We strive to provide opinions, articles, discussions and history related to Hearth Products and in a more general sense, energy issues.

    We promote the EFFICIENT, RESPONSIBLE, CLEAN and SAFE use of all fuels, whether renewable or fossil.

toxcrusadr

New Member
Aug 12, 2020
14
Central MO USA
I've had a 2461 catalytic stove since new, and the inner lid (basically the top of the firebox) has sagged from the heat. Amazingly, I found a replacement here:


I am not sure how this cast iron stove is held together, but it looks like I'll have to do some disassembly to replace it. I'm not nervous at all doing it, I'm just not sure how to go about it. Are these things cemented together with refractory cement? Any advice on how to disassemble this thing would be greatly appreciated.
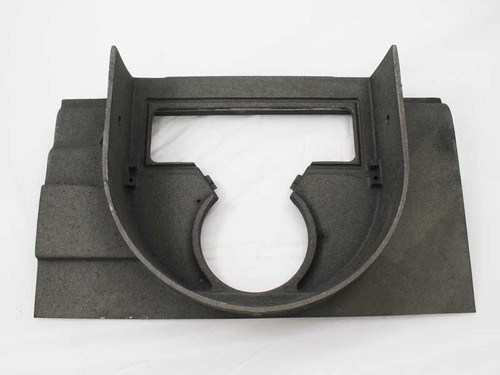
 
Well, that's incredible! Thanks so much. I tried to search but wasn't successful. This is a very detailed account for the same stove.

I dove in last night before even seeing this and pretty much figured out the same sequence. Bolts, then knocking the front off with a mallet. That's where I stopped, weary and dusty, but now I know what parts I do and don't need.

Question:

Cement. Sounds like a quart of hi temp furnace cement is what I need. Is this stuff pretty much all the same or are there cheaper products and better products? Oatey was mentioned in that thread. I can get Imperial at my local Lowe's. Or would it be better to go to a fireplace and stove store (there's one 30 miles away) and see what they have? I'd like to do it right even if it costs a couple extra bucks.
 
I saw something about this warping being caused by overfiring. I've always been pretty careful to keep the stove at a reasonable level. In fact, I have to run the air intake about 90% shut because the draft is really good from 25 ft. of chimney pipe. I've seen the cat converter intake glow orange but we certainly weren't cranking the stove full out. It has been in daily use during the heating season since new so maybe it's just time.
 
Rutland stove and furnace cement is decent. Hearthstone sells a very good one too.
 
I would recommend a full tear down if you are pulling the top. There is a very good chance you will crack the cement in other joints and have leaks if you don't.
 
  • Like
Reactions: Woody Stover
the dreaded inner top on CDW VC stoves! i have a Seneca since new, and have rebuilt it twice due to the inner top (so about every 7-8 years). original top did not have the expansion web. after rebuilding with the web, it eventually warped/decayed. on the third rebuild. put in some new parts last year, noticed the warpage occurring again. worked around it with extra hi temp gaskets and stove cement packed into the openings.

overheating is the contributing factor (also disintegrates the baffle), but to me the original issue is the cast is too thin. can't handle the super high temps generated around the cat.
 
I think you're right, I have never overfired mine, I try to keep it real steady and I'm generally very careful with any kind of equipment. But it gets orange hot on the inner lid sometimes when it's running.
 
yes, and it has been typical that the warpage is greater on the right side of the cat. full rebuild takes about two days, so as long as parts remain available i'll probably keep doing it every 8 years or so. not bad, really.
 

Attachments

  • DSCN0088.JPG
    DSCN0088.JPG
    240 KB · Views: 356
  • DSCN1712.JPG
    DSCN1712.JPG
    226.3 KB · Views: 356
  • DSCN1713.JPG
    DSCN1713.JPG
    245.6 KB · Views: 337
Hi gang, it's me again. I stopped working on this stove in the summer when people said it would be good to light a small fire to help set the cement, and it was 85 degrees out at the time. Fall caught up with me and I've been working for about a week to get it back together. I have a question that other VC owners/rebuilders might know.

The 'expansion web' piece that sits behind the cat unit. between it and the damper. Is there anything that holds this in place? My old one I had ground down because the warping of the rest of the lid made it impossible to flip the damper. There are two screw holes in the new part, but I don't remember any screws being there, or clips or brackets. I have no parts left over. The old part has the screw holes but it doesn't look like anything ever went in there. Yet this part just sits in there and I think it's going to fall into the stove after a few cycles of the damper.

Pic with everything in place. Note I'm using the old damper. It does have a bad bracket on top which I just noticed during reassembly and ordered a new one.
IMG_3350.JPG


Side view with the web in place and the cat holder ring added.
IMG_3351.JPG


View with the web removed. It has tabs molded in that it sits on but I've already had it fall out just moving the damper. BTW I don't have any gasket between damper and the stove lid yet, it disintegrated long ago, but I see there is a groove there. But how would you even seal across the top of that web piece? It's just hanging there and I don't think I should glue a rope gasket across it if it's going to fall out.
 

Attachments

  • IMG_3352.JPG
    IMG_3352.JPG
    75.5 KB · Views: 337
that web is supposed to have bolts and tabs, like the damper, to hold it in place (see the threaded bolt holes?). then just run the gadget through the groove.
 
Ah, OK. They didn't send any with the new part. I can come up with something - I assume they stick out to the sides and not towards the damper, because that would screw up the damper action.
 
i believe there are slots under the inner top to receive the tabs.
 
the tabs are below. might as well use stainless bolt and nut. tab is just like the damper tab. could order them, or try to cut your own.
 
I've confirmed that my new inner lid has no holes near the opening for the web, so if those tabs are supposed to be on the bottom, I'd have to drill some holes. Which would have been easier if I had known before I cemented everything together. I can drill from the top though. The only holes are in the web piece itself, and those will only do anything if the tab is on the top, but that interferes with the damper when it lifts.

Anyway I have drills and taps and all that so I'll make it work. I'll just drill from the top. Just couldn't see how it should work as-is.

Would be great to have a pic from anyone who actually has those tabs under the web piece, but it's not rocket science, I don't think.

I wonder what the holes in the web are if they're not for securing tabs?
 
the bolt goes down through the web holes. the retainer tabs slide on the bolt shaft under the top. tabs extend under the top. nuts then are put on, and the whole thing is tightened to secure the web in place. there should be ridges under the top that guide the tabs into place. they are not holes. very simple.
 
OK. Hard to see how you can keep something from falling down by putting a tab underneath, but maybe it just keeps it from rotating and clamps it to the stickouts on the lid. I'll do as you suggest. Thanks for puttin up with me. >>
 
my understanding is there is only oneway to do this. on my second pic, and one of yours, short stubs are sticking out of the inner top are where the web goes. the web sits on those, and the tabs extend from the web to under those spots.
 
Update and new issues.

I got the beastie all put together, let it sit for at least a day, then started a very small fire just to warm up the iron. That worked fine, so the next day, I started a real one. Some of the cement around the chimney connection got soft, where it was real thick, but it held. After it cooled the next day it was hard so I thought nothing of it.

However, I think I had a leak or leaks. I couldn't get the fire all the way down into 'cruise mode' as well as before. As though too much air was getting in. And, when I opened the side door for loading, smoke would drift out of the vents at the top front, which are supposed to be for room air to circulate through the outer jacket of this double wall stove. It has been burning through fuel a bit fast and running kinda hot, like too much air was getting in.

I decided to pull the top and have a look. There was loose cement holding the front panel of the stove. I had also neglected to put in a couple of bolts at the top that hold the front panel to the side panels. All the cement was cracked and falling off of the joint around this panel. It almost seemed like it hadn't adhered. I pried the whole panel out, cleaned it well, wire brushed it, and wet wiped it, let it dry, and recemented. I'm using SBI Stove and Furnace Cement (2100 F) which I purchased at my stove dealer.

I let the stove sit TWO days this time, a full 48 hrs, then made a very small fire. Had a horrible time with reverse draft (was cold out and my flue is long and was cold for days!). That fire just got the iron warm to the touch, not too hot to keep your hand on it. It probably burned 30 mins or so. I let it go out and waited 18 hours. I just started a full sized fire in it, and 15 mins in, I heard hissing, and it was not coming from the wood. It was coming from several spots in the joint I just cemented. There must have still been water in it. I'm afraid it will not seal and will leak again.

Isn't 48 hours long enough? The cement instructions say nothing about curing. Or should I have made a slightly bigger initial fire, or for longer?

Dadgummit.