Hudson River WestPoint Burn Pot issues?

  • Active since 1995, Hearth.com is THE place on the internet for free information and advice about wood stoves, pellet stoves and other energy saving equipment.

    We strive to provide opinions, articles, discussions and history related to Hearth Products and in a more general sense, energy issues.

    We promote the EFFICIENT, RESPONSIBLE, CLEAN and SAFE use of all fuels, whether renewable or fossil.
Status
Not open for further replies.

Don2222

Minister of Fire
Hearth Supporter
Feb 1, 2010
9,117
Salem NH
Hello

Well, I picked up the US stove 5660s big brother. The Hudson River WestPoint.

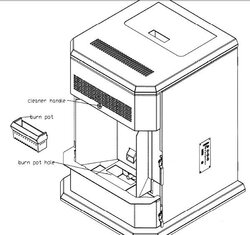
The body is in very good condition. It is a nice charcoal gray color. The room blower and the exhaust blower work fine. The ash pan is on the small side for a stove with a 3 bag hopper. The ignitor works fine. The control panel and the burn pot seem to be the major issues.

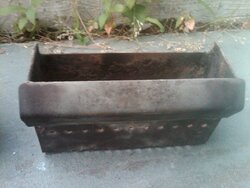
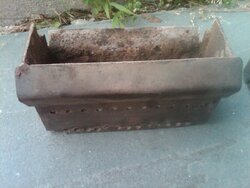
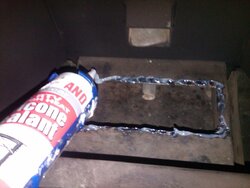
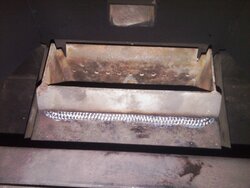
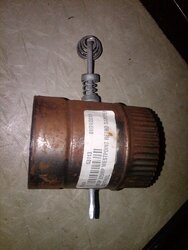
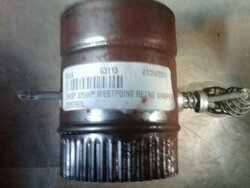
I did get a newer modified burn pot with the slats at the bottom so the ash can drop thru. The back flange is also bent back so the pellet will not fall behind the burn pot. See original and modified pots below.

So is this good enough or is any gasket needed?

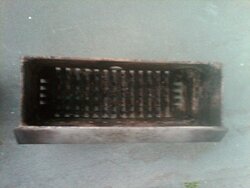
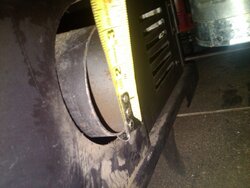
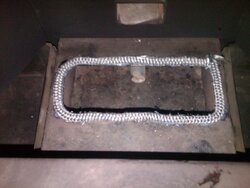
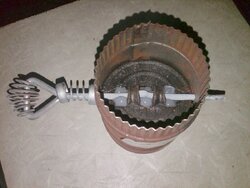
Pic 1 & 2 = Original Burn Pot - xcross pattern on bottom
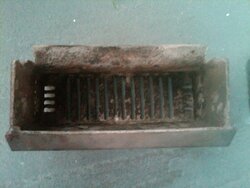
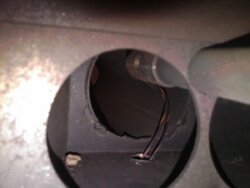
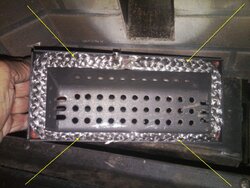
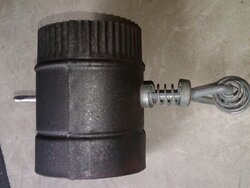
Pic 3 & 4 = Modified Burn Pot - back lip is bent back and slat pattern along bottom
 

Attachments

  • HRBurnpotOrig (1).jpg
    HRBurnpotOrig (1).jpg
    144.2 KB · Views: 455
  • HRBurnpotOrig (2).jpg
    HRBurnpotOrig (2).jpg
    122.7 KB · Views: 432
  • HRBurnpotMod (1).jpg
    HRBurnpotMod (1).jpg
    146.9 KB · Views: 440
  • HRBurnpotMod (2).jpg
    HRBurnpotMod (2).jpg
    140.9 KB · Views: 441
  • HRWPBurnpotDiagram.jpg
    HRWPBurnpotDiagram.jpg
    47.5 KB · Views: 386
Hello

Most wood pellet stoves have a 2" outside air tube coming out of the back of the stove.

This stove has a 3 inch Intake Air tube and NO damper. That may be an issue!

Pic 1 - Back of stove
Pic 2 - Size of Intake Air Pipe
Pic 3 - Air tube coming into burn box below burn pot
 

Attachments

  • HRwpIntakeAir (1).jpg
    HRwpIntakeAir (1).jpg
    123.3 KB · Views: 292
  • HRwpIntakeAir (2).jpg
    HRwpIntakeAir (2).jpg
    136.1 KB · Views: 280
  • HRwpIntakeAir (3).jpg
    HRwpIntakeAir (3).jpg
    79.6 KB · Views: 275
The lack of a damper should not be a real issue. It will help a bit in fine tuning and on low burn after you get the main issues fixed, most of the issues with this line of stoves were lack of air getting to the pellets not too much air.

That air intake size is fairly normal for a high BTU stove.
 
The lack of a damper should not be a real issue. It will help a bit in fine tuning and on low burn after you get the main issues fixed, most of the issues with this line of stoves were lack of air getting to the pellets not too much air.

That air intake size is fairly normal for a high BTU stove.

Well, I guess the new burnpot I got with the stove corrects the lack of air issue and I got a gasket for the pot I will put in today.

I do not have a nice flange for the gasket like this Sarnac Burn Pot! Is your Burn Pot like this Smokey?
Sarnac Stove
http://s422.photobucket.com/albums/pp304/lass442/stove/?action=view&current=DSC03834.jpg#!oZZ1QQcurrentZZhttp://s422.photobucket.com/albums/pp304/lass442/stove/?action=view&current=DSC03834.jpg
 
Hello

Just got some nice graphite impregnated rope gasket for the burn pot.

How does this look?
 

Attachments

  • HRwpBurnPotGasket (1).jpg
    HRwpBurnPotGasket (1).jpg
    122.5 KB · Views: 370
  • HRwpBurnPotGasket (2).jpg
    HRwpBurnPotGasket (2).jpg
    118.9 KB · Views: 403
  • HRwpBurnPotGasket (3).jpg
    HRwpBurnPotGasket (3).jpg
    126.1 KB · Views: 412
That looks pretty good.....it doesn't interfere with how it sits in regards to the igniter does it? If not I think you will be very pleased with how it burns.
 
That looks pretty good.....it doesn't interfere with how it sits in regards to the igniter does it? If not I think you will be very pleased with how it burns.

The gasket is above the metal lip of the cradle and the ignitor is below the metal lip. So it should be fine! Cannot wait to try it! Is that how your gasket is?
 
I have it the same way with the exception of fastening it in place. I actually just wedge it in the small space. I almost did the exact same thing as you but was afraid it would not adhere very well. Let me know how it lasts....if it does I will so the same to mine.
 
I have it the same way with the exception of fastening it in place. I actually just wedge it in the small space. I almost did the exact same thing as you but was afraid it would not adhere very well. Let me know how it lasts....if it does I will so the same to mine.

I did not hesitate to use CLEAR high temp 500 Deg F RTV. It holds well but can always be scraped off if needed. The RTV should hold it tight so there is not air leaks. I will see and let you know how it holds up. I used the graphite rope gasket so it blends in better for looks. :)

Thanks Ihatepropane for all your help and comments.
 
Hello Ihatepropane

Also cleaned out the Exhaust Fan and cut a new Lytherm Gasket.
Since it looks like the original gasket, I am not sure if this was done in the 1st 4 years?

See pics below.

How does yours look Ihatepropane?
Have you done your combustion blower yearly cleaning yet?
 

Attachments

  • HRwpCombustionBlower (1).jpg
    HRwpCombustionBlower (1).jpg
    85.5 KB · Views: 324
  • HRwpCombustionBlower (2).jpg
    HRwpCombustionBlower (2).jpg
    111.6 KB · Views: 308
  • HRwpCombustionBlower (3).jpg
    HRwpCombustionBlower (3).jpg
    123.4 KB · Views: 289
  • HRwpCombustionBlower (4).jpg
    HRwpCombustionBlower (4).jpg
    101.7 KB · Views: 294
  • HRwpCombustionBlower (5).jpg
    HRwpCombustionBlower (5).jpg
    95.8 KB · Views: 298
I did the same thing on my new CPM. I used a Flat/Tape gasket amd secured it with 500° High temp silicone.

I have over 40 hrs of burn on it how with testing and the gasket shows no sign of loosening up. 2012-04-14_17-58-58_725.jpg
 
I did the same thing on my new CPM. I used a Flat/Tape gasket amd secured it with 500° High temp silicone.

I have over 40 hrs of burn on it how with testing and the gasket shows no sign of loosening up.

Good work Dexter!

Did you notice the difference in burning? Should I do that to my Astoria too?
 
Yeah. There is a difference.

If your pot is even slightly loose, its a good idea. IMO......

All Quadrafire models have there burn pots bolted down with lytherm to seal them up. To ensure there is no burn pot bypass there. All air should be used for combustion. Period.
 
  • Like
Reactions: smoke show
Well, I guess the new burnpot I got with the stove corrects the lack of air issue and I got a gasket for the pot I will put in today.

I do not have a nice flange for the gasket like this Sarnac Burn Pot! Is your Burn Pot like this Smokey?
Sarnac Stove
http://s422.photobucket.com/albums/pp304/lass442/stove/?action=view&current=DSC03834.jpg#!oZZ1QQcurrentZZhttp://s422.photobucket.com/albums/pp304/lass442/stove/?action=view&current=DSC03834.jpg


Sort of, the one I have has the gasket filling the all of the space under the lip, not just up next to the burn pot.
 
I did the same thing on my new CPM. I used a Flat/Tape gasket amd secured it with 500° High temp silicone.

I have over 40 hrs of burn on it how with testing and the gasket shows no sign of loosening up. View attachment 69967


You lucked out in that the sealant is under the gasket and below the burn pot lip, don't try that with 500::F 
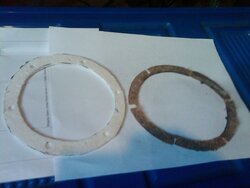
stuff on a gasket that you use it to attach the gasket to the burn pot. I got treated to what happens when that is basically done. That sealant actually burns under the correct conditions.
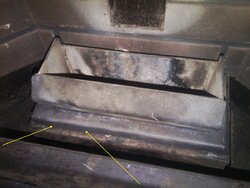
 
Sort of, the one I have has the gasket filling the all of the space under the lip, not just up next to the burn pot.

Smokey

Do you have the burn Pot with the Flange and Grove for the gasket like my US Stove 5660?

This is one of the very best designs I have seen for the rectangular burnpots! See yellow Arrows in pics Below.

No wonder quads heat so well Dexter! You are right all the air should go thru the pot and get heated otherwise you are diluting the nice hot air with not very hot air!
 

Attachments

  • USStove5660BurnPot (1)ya.jpg
    USStove5660BurnPot (1)ya.jpg
    107.7 KB · Views: 333
  • USStove5660BurnPot (2)ya.jpg
    USStove5660BurnPot (2)ya.jpg
    146.5 KB · Views: 317
Smokey

Do you have the burn Pot with the Flange and Grove for the gasket like my US Stove 5660?

This is one of the very best designs I have seen for the rectangular burnpots! See yellow Arrows in pics Below.

No wonder quads heat so well Dexter! You are right all the air should go thru the pot and get heated otherwise you are diluting the nice hot air with not very hot air!

Bingo.
 
Hello

I just got the 3" diameter damper that goes on the back for $10.00 plus shipping.
Amanda's Fireplaces has it. You can order by phone.
518-828-9337​
http://www.amandasfireplaces.com/

This should fix the popcorn effect on Lo heat settings!

It could use some paint but for $10 it is a very strong damper!

See pics
 

Attachments

  • HRwpOEMDamper (1).jpg
    HRwpOEMDamper (1).jpg
    120.1 KB · Views: 277
  • HRwpOEMDamper (2).jpg
    HRwpOEMDamper (2).jpg
    162.4 KB · Views: 259
  • HRwpOEMDamper (4).jpg
    HRwpOEMDamper (4).jpg
    149.6 KB · Views: 260
Are you going to install it and try running on low? I am interested in your reults

Yes, I had just enough charcoal paint left so now it matches the stove!

I had to scrape off the label and then use Acetone to get the adhesive off.
Looks like something they made up but I think it will work really good!

So for $20 it came the next day!
 

Attachments

  • HRwpOEMDamper (5).jpg
    HRwpOEMDamper (5).jpg
    171 KB · Views: 268
They sell those little 3" dampers for $3.00 at the Hardware store. Then another $4 for the 3" gas vent adapter. Drill a hole and put damper in.. Wa-La ;)

You can build your own for less than $10 at the local hardware store. If you really wanted...
 
  • Like
Reactions: smoke show
They sell those little 3" dampers for $3.00 at the Hardware store. Then another $4 for the 3" gas vent adapter. Drill a hole and put damper in.. Wa-La ;)

You can build your own for less than $10 at the local hardware store. If you really wanted...

You are right Dexter! Just at this time of year it is had to find those parts in the stores near me. :-(
 
Status
Not open for further replies.