Insert install questions

  • Active since 1995, Hearth.com is THE place on the internet for free information and advice about wood stoves, pellet stoves and other energy saving equipment.

    We strive to provide opinions, articles, discussions and history related to Hearth Products and in a more general sense, energy issues.

    We promote the EFFICIENT, RESPONSIBLE, CLEAN and SAFE use of all fuels, whether renewable or fossil.
Status
Not open for further replies.

Mike49024

Member
Nov 6, 2010
35
SW Michigan
Hello all,

I'm new to this but mechanically inclined. I bought the harmon p35i today and it will be delivered on Wednesday.

The insert will go into a factory built fireplace (metal chimney). I want to draw the outside air from the chimney. The dealer said I can just use 3pvp flex pipe for both the intake and the exhaust. Is this correct? I saw alot of double wall vent pipes on the internet. Is there a benefit to running the rigid vent pipe over the flex pipe? It will be about a 15' vertical rise to the top of my chimney.

My understanding is that both intake and exhaust pipes need to go through a piece of sheetmetal that is sealed and insulated at the bottom of the chimney (near the damper). But then the intake only has to extend a few feet into the chimney above the sheetmetal. And the Exhaust will run to the top. Then I imagine I have to cap the chimney.

Thanks in advance for the help!

ps. My dealer that I purchased the stove from does not do installs and seems to have a total lack of knowledge about proper installation, as they gave me a lot of wrong information. Also I would love to ask these questions personally to Harmon, but it appears they do not have a tech line. Frustration is building, but I'm hoping you guys and your wealth of knowledge can help that out : )
 
Is the stove going into a manufactured home, by any chance? If it is, then the installed fireplace was required to have a source of external air this is usually drawn from the crawl space. If so, you might be able to tap into that. If it isn't going into a manufactured home then you should really read the installation instructions that should show several variations of the install. I have two inserts that both have about 17' of vertical flex going up the chimney which is then sealed, as you say, with a sheet metal plate through which the pipe goes and is terminated with a rain collar and a cap. The 17' was more than was recommended for my stoves so I have no outside air. If you run your outside air pipe past the smoke shelf and seal the shelf off, as you suggest, and then seal the chimney at the top, you created a dead space that you can't draw air from. You either run it all the way up and out or forget it. If you run it out the top you should put two 90's on it so that it turns down and is well below your exhaust. I've read some of the installation guides for various stoves before I bought mine and on some, the max outside air run should be less than 5'.
 
Hi,

Wow, I read your post and it was like deja vu of all my questions as I just purchased and installed my own P35i insert. I bought the stove in the last week of September, ordered my own chimney liner system and installed the whole thing myself with a friend to help me run the liner down the chimney. I just fired it up today 11/6/10 for the first time.

Here's what I did... I ordered a stainless steel chimney liner kit from Woodland Direct ( 
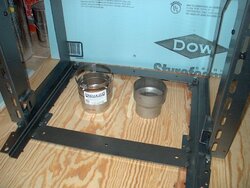
http://www.woodlanddirect.com ) I got the 316Ti 4" liner with the deluxe terracotta flue cap and the appliance connector (which was 4" to 4" not really what I needed). What I soon realized was that the flue stub on the P35i inserts mounting frame is an odd size. What I also soon realized is that there are no standards in the fireplace industry. Soooo... the appliance connector I got with the chimney liner kit was too big to fit inside the flue stub. What I did next was throw the mounting frame into my car and bring it around to a few different stove shops and ask them how I could adapt the flue stub on the cage to my 4" flex liner. We tried several adaptors like a 4" to 3" but that was too small. Finally what I ended up doing was calling back my salesman at Woodland Direct, sending him a digital photo of the mounting frame flue stub with the inside dimension which on mine measures 3-5/16". They then made me a custom adaptor that went from the 3-5/16" flue stub to then fit the end of the original appliance connector they sent me.

So then I had the following: 4" flex pipe to 4" O.D. to 4" I.D. appliance connector to 4" appliance connector to 3-5/16" flue stub. One more connection than I would have liked, but it's pretty clean just the same. Then I had a friend drop a tape measure down the chimney with the mounting frame in place and the custom adaptor inserted in the flue stub and I measured from the top of the terracotta liner to the custom adaptor. We added a few inches to be sure, then cut the liner to length with a hack saw. Next, I siliconed the appliance connector to the chimney liner with Red High Temp 600 degree F silicone, and used the band clamp to secure the connector to the liner.

In Massachusetts we are required to run the liner the full length of the chimney. I had to remove my damper plate to get the 4" flex liner through the damper opening. I just pulled the cotter pin from the damper handle and removed the handle. Then I just lifted the damper plate out of the opening. I tied one end of a rope to the damper handle that I removed, and secured the other end of the rope to the appliance connector that I had previously siliconed to the flex liner. I then had my friend lower the rope from the top of the chimney and I grabbed it from inside. As he fed the liner down the chimney I kept some tension on the rope to help the liner down the chimney.

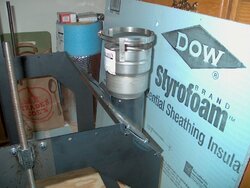
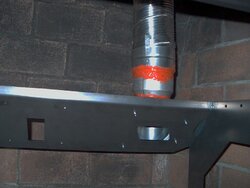
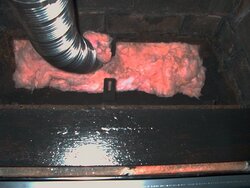
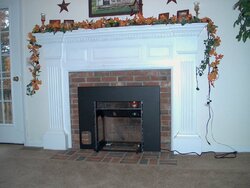
I then siliconed the custom adaptor to the flue stub on the mounting frame and secured it with two stainless steel screws through the holes in the flue stub. Next I attached the surround panels to the mounting frame and set the mounting frame in the fireplace opening and leveled it side to side and front to back with the leveling bolts, making sure none of the weight was resting on the surround panels. Once in place I secured the frame into the fireplace opening by tightening the threaded rods up onto the lintel bar in the top of the fireplace opening. Then I smeared the outside of the appliance connector with high temp silicone and slipped it into the custom adaptor on the mounting frame. Finally I stuffed R19 pink fiberglass into the damper opening around the liner to seal off the bottom of the chimney. At this point I left the bottom connection alone and waited for the silicone to dry on the joints.

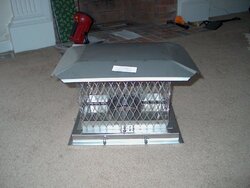
Now I went and worked on finishing the connection at the top of the chimney. First I centered the liner in the terra cotta liner as best I could and then stuffed pink fiberglass around it about 1 foot down inside the terra cotta liner. Then I slipped the liner through the opening in the chimney cap and then set the chimeny cap down on the terra cotta and secured it with the screws. Finally I tightened the band clamp screw to secure the liner to the cap. When the silicone had dried the next day, I ran another heavy bead around the outside of the three seams on the pipe at the connections near the flue stub. I then gave that a few days to dry.

I asked my dealer about the outside air kit and they assured me that it was not necessary. I guess that if your house isn't super tight, or super small, drawing combustion air from the room is acceptable. I have mixed feelings about this and plan to do some more investigating on the subject, as I can always add it later. I had my building inspector come up at this point before I slide the stove into the mounting frame and connected the electronics and fired it up. He passed it without requiring the outside air kit as well.

The idea of using the fiberglass insulation at the top and bottom of the chimney helps to keep the warm air in the chimney around the stainless steel liner to help with the draft and prevent condensation. Probably not the best setup if you are going to try the outside air kit with the flex tube 1/2 way up the chimney. You would also want to use a chimney cap with slotted holes in the side to allow air to be drawn in.

I had questions about the steel plate they recommend to use to seal the damper plate opening off, but then after reading it several times, I believe that is only necessary if you are not going to run the liner to the top of the chimney like I did. If you are only going to run the liner a short distance into the first terra cotta liner as you mentioned, then the steel plate is required.

I have some great pictures I took of the flue stub custom adaptor and how I connected the liner and installed the frame into the fireplace opening if you'd like to see them. I will post them tomorrow if your interested. Hope that helps... Go slow, and take your time, and you'll figure it out.
 

Attachments

  • Flue_Stub_Adaptors.jpg
    Flue_Stub_Adaptors.jpg
    89.8 KB · Views: 667
  • Flue_Stub_Adaptors_&_Mounting_Frame.jpg
    Flue_Stub_Adaptors_&_Mounting_Frame.jpg
    82.1 KB · Views: 674
  • Liner_Connection_To_Frame.jpg
    Liner_Connection_To_Frame.jpg
    64.8 KB · Views: 664
  • View_Up_Chimney.jpg
    View_Up_Chimney.jpg
    77.6 KB · Views: 659
  • Frame_Liner_&_Surround_Installed.jpg
    Frame_Liner_&_Surround_Installed.jpg
    80.1 KB · Views: 667
  • Chimney_Cap.jpg
    Chimney_Cap.jpg
    89.4 KB · Views: 639
Great. Thank you both for the responses. After your comments and talking with some other folks, I think I know what I need to. Or atleast I know what my options are. I will install it in a couple weeks, so I have some time to work out the details.

My last question is... What is the going rate for 3" Stainless flex pipe?

From what i see on the internet, it looks like about $10 a foot.

My dealer sold me pipe, which I have not seen yet, for $1.50 a foot. I asked him if it was stainless and he said yes. Does that sound right?
 
Check out the prices here: www.woodlanddirect.com This is where I bought my chimney liner system. They are a reputable, established dealer with competetive prices. I used the larger 4" 316Ti... my dealer recommended using the 4" instead of the 3" because they say it is easier to clean and doesn't clog as easy as the smaller 3". If you look at Woodland Direct's website for chimney liners, they sell them by fuel type. You really should select one that is especially designated for use as pellet stove vent pipe. I bought a chimney liner kit which included the chimney cap, 25 feet of 4" 316Ti pellet vent pipe, and the appliance connector for $446. This included upgrading the chimney cap to the deluxe terracotta unit. In addition I ended up buying a custom connector for $73.94 (including shipping) to make it fit the flue stub on the mounting frame as I described above.

The 3" stainless steel flex pipe is cheaper than the 4", but the price you state above sounds too low to me. Like I say, go to the website above and configure a chimney liner kit for your installation by selecting the proper components and see what the total comes to. I highly recommend calling them at their toll free number shown on the website also. They were really knowledgable and helped me find a solution for my liner system. Stainless Steel is expensive, but it last for years. Don't make the mistake of using a liner that is not designed for the job, or you will be pulling it out and redoing the installation, or have other serious problems. I wouldn't trust that pipe that the dealer is selling you, especially as you say, the dealer has a total lack of knowledge about installations. Remember, we are dealing with fire here...
 
Mike...Go to the Harman website and download the installation instructions for your stove and user manual and print them out. Read these items from front to back and when your done re-read them! It's vital that you know what to do since the stove shop isn't knowledgable. I would recommend that you look into a 4" pipe rather then the 3". Especially with a 15' run up the chimney. When you have a question...Jump on the forum and just ask. We're all here to help. Good luck.
 
When you are reading the manual, look for the part with the formula to determine whether you need 3 or 4" pipe which involves 90 and 45 degree angle changes adding so many extra 'simulated' feet to the overall run. If you can use 3" as I could, it will make life a LOT easier getting past the smoke shelf and what's left of the damper, not to mention the price for the pipe, and termination apparatus. Also the smaller pipe, if allowable, will hold more heat and induce more draft. IMHO of course.

bigger is not always better.......................... my wife doesn't believe it either............... %-P
 
Status
Not open for further replies.