Install (Jøtul F45) through Heatilator - aesthetic issue

  • Active since 1995, Hearth.com is THE place on the internet for free information and advice about wood stoves, pellet stoves and other energy saving equipment.

    We strive to provide opinions, articles, discussions and history related to Hearth Products and in a more general sense, energy issues.

    We promote the EFFICIENT, RESPONSIBLE, CLEAN and SAFE use of all fuels, whether renewable or fossil.
  • Hope everyone has a wonderful and warm Thanksgiving!
  • Super Cedar firestarters 30% discount Use code Hearth2024 Click here

firenightdance

New Member
Nov 8, 2023
26
Berkshires, MA
Well @begreen you mentioned a F45 Greenville V2 for my situation and I ended up getting one. We're on our third "break-in" burn and looking forward to using.

The stove went into our brick/masonry fireplace that had a Heatilator in it. A hole was cut through the top and back of the firebox by the installers, stove slid in, then they slid the SS chimney liner down our masonry chimney into the top of the stove. Now, when you sit in front of the stove (meaning eye level with the top) you can see the whole nasty, silver-and-rust interior of the heatform in back of the chimney liner.

[Hearth.com] Install (Jøtul F45) through Heatilator - aesthetic issue

I wish I knew about this so I could have solved it before install...the installers even cut the hole the day before installing, so I would have had time had I known this was going to bug me! Any suggestions?
  • Can I paint the inside of the Heatilator with heat-resistant spray paint, obviously once it's warmer? Seems like it should be OK no?
  • Considering the tight space, any suggestions for painting? Nozzle extender with fan pattern and a Hail Mary?
  • Do you think I can just paint over that surface without prepping it? Tight access will make sanding difficult.
Obviously we could just move the stove, too, but it's just two of us here and we'd need to hire help. Trying to avoid spending more money and jut work around the installation, but maybe that's the only way. Any advice is appreciated, thanks.

PS: If still reading, you can see the liner is very slightly tilting to the left. Is this hard to adjust to make totally vertical? Yes I have OCD.
 
Yes, you can paint the interior of the heatilator with a high temp black paint. This can be brushed on, but to do a good job it would be better to pull the stove and wirebrush down, wipe clean with alcohol, then paint. That said, if it's just the rust showing through, may be use a rust convertor like Loctite Naval Jelly. That will turn the red oxide black.

If you use a good high temp paint like Stove Brite flat black, I would also spray or brush the shiny stainless steel adapter and bottom of the liner.
 
  • Like
Reactions: firenightdance
PS: If still reading, you can see the liner is very slightly tilting to the left. Is this hard to adjust to make totally vertical? Yes I have OCD.
Yes, I noticed this too. It looks like they could have used a 15º adapter elbow instead of a straight connector. But there probably wasn't one on the truck.

[Hearth.com] Install (Jøtul F45) through Heatilator - aesthetic issue
 
Thank you @begreen. The installers are good guys but they have a landline and were not super easy to access with questions, so maybe they'll do me a solid and help me move it and put it back. I don't want to screw up their hard work. I suspect they won't want to do this, as they were already griping about the F45 V2 cleaning process and trying to find ways around removing the top, but who knows.
 
Did they put in a block-off plate to seal off the damper area? Does the stove have a blower?
 
Yes, I noticed this too. It looks like they could have used a 15º adapter elbow instead of a straight connector. But there probably wasn't one on the truck.

View attachment 322193
It's pretty minor degree, so I can't tell if it's a lack of a 15 or just sloppy install. Is that a safety issue or just aesthetics? Stove seems to work well and I don't smell anything that I can detect other than when opening door.

I'm afraid of being annoying with my OCD, but this installation was not cheap so I should probably be less self-conscious about being picky.
If the appliance adapter is fully seated and attached to the stove's flue collar and sealing well then it's ok. If it was painted black it would not draw the eye as much. Right now everything is new so it's easy to hyperfocus on details.
 
  • Like
Reactions: firenightdance
Did they put in a block-off plate to seal off the damper area? Does the stove have a blower?
No blower. This is probably a lot of stove for the room it's in until we put in fan registers to the adjacent room or knock out the wall.

Sorry to be dense, but do you mean block-off to seal the former damper area of the Heatilator? Here is a view sliding my phone onto the top of the stove and looking up...I was actually wondering how/if it's sealed. The receipt does say "stainless steal top plate, storm collar, rain cap" but that's it.

[Hearth.com] Install (Jøtul F45) through Heatilator - aesthetic issue
 
A blower on the stove would help convect the heat out of the fireplace. I would not put in a freestanding stove in a fireplace with the damper area open. You want the heat in the room, not up the chimney. It's an extra expense, but worth it.
 
Well @begreen you mentioned a F45 Greenville V2 for my situation and I ended up getting one. We're on our third "break-in" burn and looking forward to using.

The stove went into our brick/masonry fireplace that had a Heatilator in it. A hole was cut through the top and back of the firebox by the installers, stove slid in, then they slid the SS chimney liner down our masonry chimney into the top of the stove. Now, when you sit in front of the stove (meaning eye level with the top) you can see the whole nasty, silver-and-rust interior of the heatform in back of the chimney liner.


I wish I knew about this so I could have solved it before install...the installers even cut the hole the day before installing, so I would have had time had I known this was going to bug me! Any suggestions?
  • Can I paint the inside of the Heatilator with heat-resistant spray paint, obviously once it's warmer? Seems like it should be OK no?
  • Considering the tight space, any suggestions for painting? Nozzle extender with fan pattern and a Hail Mary?
  • Do you think I can just paint over that surface without prepping it? Tight access will make sanding difficult.
Obviously we could just move the stove, too, but it's just two of us here and we'd need to hire help. Trying to avoid spending more money and jut work around the installation, but maybe that's the only way. Any advice is appreciated, thanks.

PS: If still reading, you can see the liner is very slightly tilting to the left. Is this hard to adjust to make totally vertical? Yes I have OCD.
If you can't get the liner straight or prefer a smooth clean look like me, you can get a short piece of 8 inch black stove pipe and rap the liner. It just sits on top of the stove and hides the adapter and liner. Got mine at tractor supply for less than 10 bucks.

[Hearth.com] Install (Jøtul F45) through Heatilator - aesthetic issue
 
If you can't get the liner straight or prefer a smooth clean look like me, you can get a short piece of 8 inch black stove pipe and rap the liner. It just sits on top of the stove and hides the adapter and liner. Got mine at tractor supply for less than 10 bucks.

View attachment 322202
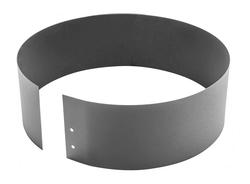
That is a good suggestion. My first thought was using a "finishing band", if the finishing band is tall enough to hide what is exposed.

 
  • Like
Reactions: Bobbob
A blower on the stove would help convect the heat out of the fireplace. I would not put in a freestanding stove in a fireplace with the damper area open. You want the heat in the room, not up the chimney. It's an extra expense, but worth it.

I just read up on the blocking plates. Looks like it would have to be fabricated; I'll ask them about it.

@begreen I should note this is a masonry chimney that is in the middle of the house, a huge thing (two flues) going through the attic with a little bit of a stack outside above the roof. I know that doesn't obviate the need to block the area, but I am hoping until we put a plate in, it's still better than having this going to through external chimney? Also, about 7"+ of the F45 sticks out in front of the breast and into the room. It's not like the little Farringdon we were looking at where the entire stove would be in the firebox.

It's cold today, so we'll see. About to do the 400 degree break-in burn.

@Bobbob and @MongoMongoson thanks for those suggestions!
 
Last edited:
  • Like
Reactions: Bobbob
The central fireplace chimney helps, so does the fact that you don't need a lot of heat right now until distribution is worked out. But unless the attic is heated, why waste the heat?

This is a steel stove at heart. You can let it burn hotter now. It's primarily for baking in the paint. Getting it over 500º will be needed for that.
 
  • Like
Reactions: firenightdance
The central fireplace chimney helps, so does the fact that you don't need a lot of heat right now until distribution is worked out. But unless the attic is heated, why waste the heat?

This is a steel stove at heart. You can let it burn hotter now. It's primarily for baking in the paint. Getting it over 500º will be needed for that.
^^ Agreed. As you said we'll really feel this when we work out some distribution into the next room, which really needs it (1 baseboard heater for a lot of sqft)

Aforementioned OCD has me sitting there with a laser thermometer for these first 3 break-in burns (200, 300, 400 as per manual) and modulating the air flow and adding wood as needed to maintain those temps. The manual says after it cools from this 400 one we can let 'er rip. You definitely smell the paint even at these lower temps!

I'm now totally off-topic but Jøtul needs to add some detail to their procedures for personalities like mine. I've seen this elsewhere on the forum: it doesn't say where to monitor the temp on top (there is a pretty huge difference from the center slightly aft, which is always hottest, and the sides/front, which can be 50-75 degrees less).

Looking forward to a "real" burn. Seeing the secondary combustion on this final break-in is wild. My respect for firemen (fire-people?) has skyrocketed in the last days...fire is crazy.
 
Last edited:
  • Like
Reactions: Todd
Unfortunately, a lot of manuals just copy and paste procedures for other stove models in the product line. The slow break-in process is good for a pure cast iron stove like many Jotul stoves, but the F35, 45, & 55 are steel stoves at heart. The cast iron is an outer jacket with an air gap. It's totally separate from the steel stove within.

By now you should have had the full burn. Enjoy the light show.
 
I stick my thermometer at the center of the stove, that seems to be the hottest spot I’ve seen. I think the manual states just off center to the side, not sure why since it would be a tad cooler.

Some installers stuff rock wool insulation up in that throat or damper area and call it good. I would do that as well as a sheet metal plate.

Don’t be surprised to get hints of paint curing every time you have a hotter fire for the first couple weeks of burning, it’s normal.

With your install it will be hard to monitor flue temps like I do but you should be able to watch the stove top temps and fire with a little trial and error you should be fine. The manual states once stove top temp reaches 400 you can set the air to desired setting. I would start adjusting the air well before that 400 mark. Start off with full air till the load gets going good then set it to half air. The flames will subside at first then come back and start to grow again then it’s time to adjust the air down further.

Some here have installed Auber thermocouple thermometers into their liners with similar installs like yours.
 
  • Like
Reactions: firenightdance
^^ Agreed. As you said we'll really feel this when we work out some distribution into the next room, which really needs it (1 baseboard heater for a lot of sqft)

Aforementioned OCD has me sitting there with a laser thermometer for these first 3 break-in burns (200, 300, 400 as per manual) and modulating the air flow and adding wood as needed to maintain those temps. The manual says after it cools from this 400 one we can let 'er rip. You definitely smell the paint even at these lower temps!

I'm now totally off-topic but Jøtul needs to add some detail to their procedures for personalities like mine. I've seen this elsewhere on the forum: it doesn't say where to monitor the temp on top (there is a pretty huge difference from the center slightly aft, which is always hottest, and the sides/front, which can be 50-75 degrees less).

Looking forward to a "real" burn. Seeing the secondary combustion on this final break-in is wild. My respect for firemen (fire-people?) has skyrocketed in the last days...fire is crazy.
If it helps, I have ocd tendencies as well. When the break in period of my steel stove was a mess. Got way hotter than I was going for. Later that night after not letting it cool down much, it got up to 800 degrees, simply bc it ran so much different than my other stove.
The stove is fine to this day in spite of my screwing up the break in fire process.
 
  • Like
Reactions: firenightdance
I stick my thermometer at the center of the stove, that seems to be the hottest spot I’ve seen. I think the manual states just off center to the side, not sure why since it would be a tad cooler.

Some installers stuff rock wool insulation up in that throat or damper area and call it good. I would do that as well as a sheet metal plate.

Don’t be surprised to get hints of paint curing every time you have a hotter fire for the first couple weeks of burning, it’s normal.

With your install it will be hard to monitor flue temps like I do but you should be able to watch the stove top temps and fire with a little trial and error you should be fine. The manual states once stove top temp reaches 400 you can set the air to desired setting. I would start adjusting the air well before that 400 mark. Start off with full air till the load gets going good then set it to half air. The flames will subside at first then come back and start to grow again then it’s time to adjust the air down further.

Some here have installed Auber thermocouple thermometers into their liners with similar installs like yours.

@Todd, thanks for all your feedback on this board with the F45 including this post.
Anyone burning a F45 (especially beginner like me) should search his posts on this board.

And yes for me hottest point is top of stove maybe a towards the top exit in back, but as I may have mentioned I'm just using a laser right now and it's hard to be precise. I learned by experience that angle of laser introduces significant variation in temperature reading.
 
  • Like
Reactions: Todd
If it helps, I have ocd tendencies as well. When the break in period of my steel stove was a mess. Got way hotter than I was going for. Later that night after not letting it cool down much, it got up to 800 degrees, simply bc it ran so much different than my other stove.
The stove is fine to this day in spite of my screwing up the break in fire process.
Good to know @Ctwoodtick...I figure these are pretty tough and @begreen saying it's really a clad stove makes me feel better. If anything I was overcautious and it took forever to get a 550-ish (center reading) burn.

No the weather's warm again, so we haven't yet had a proper burn with a full firebox. All my burns have just been a few loosely-assembled top-downs that didn't get too hot. Maybe it's the lower burn temps but we were never baked out of the room, not even close...I guess a lot of our heat is going up the chimney.
 
You will get your chance very soon...
Haha you said it. F'ing freezing here by our wimpy standards. I know midwesterners would laugh at this.
Finally burning a full-ish (2/3?) load of wood and it's working nicely.

To follow up on the original questions in this thread with installer comments, in case useful for any users in the future:
  • He said to just spray in thin coats (2-3) of high temp paint on the exposed inside of the Heatilator and it should be fine. I found that a wee bit weird not not prep the surface, esp. since there is light surface rust, but he was firm in his opinion that it should be OK. Dunno how I'll get my arms/hands around the damn stove and flue liner, but we shall see. He's a good dude but I can't say I didn't wonder if this advice might have been informed by his not wanting to have to move a 450+ lb. stove again...
  • Also he mentioned (besides it being tight to install in my particular setup) that putting stovepipe or finishing bands around the bottom of flue/flue collar can sometimes result in rattling as the stove heats up. I assume those who suggested it here do not have that problem.
  • We have light-colored firebricks under the back two legs of the stove and when I said I might want to switch them for black ones (they look like pieces of wood currently) he said I could spray those too (!) - I guess I'll try it, but wondering if it'll look sh!t or not.
Loving this thing. I have read/heard about ppl having air control issues with the F45 but so far this one seems pretty controllable, at least from a temperature perspective. Maybe we got lucky with our stove/chimney combo? We do go through wood a bit faster than I thought we might, so maybe we actually are dealing with that issue and don't know it yet.
 
Last edited:
Forgot to mention: I bought up the blocking plate at the base. Installer said there's a plate at the top of the chimney and fiberglass insulation stuffed under it. He thought a bottom plate was not needed. "Yes, some heat will go up the chimney, but it's not going out of it." I expect his assessment will not be popular here haha. I also wondered about it - it's a big masonry chimney, that seems like a lot of potential for heat loss. I'll burn this season and see how it performs vis a vis our space, then assess if we need additional blocking.
 
  • Like
Reactions: Todd