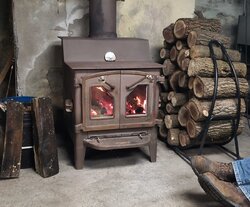
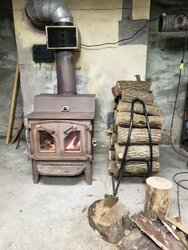
Looking for help with Grandma lll stove

  • Active since 1995, Hearth.com is THE place on the internet for free information and advice about wood stoves, pellet stoves and other energy saving equipment.

    We strive to provide opinions, articles, discussions and history related to Hearth Products and in a more general sense, energy issues.

    We promote the EFFICIENT, RESPONSIBLE, CLEAN and SAFE use of all fuels, whether renewable or fossil.

Fisherman221

New Member
Jan 20, 2019
32
Bethlehem Pa
Hello, i have been doing some research on this forum and am really glad to see there are people out there soo interested in this, i collect and restore old chainsaws so i can defintely relate so some degree and appreciate most anything vintage and of good build quality, i am by no means a chevy over ford kind of guy, i find appreciation and beauty in everything, anyway i recently bought a fisher grandma bear version 3 brass and glass i guess its referred to as, I am in love with this stove! I bought it to heat my shop so i could work as i just refused to continue purchasing oil for my furnace, i am soo glad I made this investment and honestly have been finding myself sitting in front of this beautiful stove rather than being productive in my shop for which it was originally intended for.

So to get to the point i have a 8x8 terracotta chimney, approx 25' straight up, its in great shape and pulls a good draft, I have the stove hooked up with 8" flu pipe as intended with draft control and a vogelzang heat reclaimer, approx 20 inches above the stove, i understand these are a tabu subject however i will say it is currently doimg a great job and i prefer this deshn to the magic heater design because it is much less restrictive and still works well, the stove does have a baffle plate and seems to work great, however i am always looking for ways to maximize efficiency with anything and would really like some insight on what i can do to maximize burn time/efficiency with this wonderful new stove that i now own as far as creating a secondary burn and maximizing the baffle inside, i am tradesman and can make whatever i need in my shop any help would be greatly appreciated and look forward to talking and maybe making new friends with other stove owners, thanks!
 
  • Like
Reactions: Todd67
Welcome to the forum, and congrats on your "new" Fisher stove! You've come to the right place. Some experts will probably be along soon to answer your questions.

In the meantime, we love stove pictures, so feel free to post a few:)
 
  • Like
Reactions: Fisherman221
20190119_211248.jpg
 
Thank you! I will definitely get a few pictures posted of my stove, i really can't say enough good things about it, its currently keeping my 1400sq ft shop under my house a comfortable 66 degrees and the upstairs is around 68 to 70, i have turned off my electric heat upstairs and this is my only source currently and its doing a wonderful job, right now its approximately 17 degrees out and very windy with wind chill near or below zero.
 
  • Like
Reactions: Todd67
Heres some more photos, funny thing is it came with flu pipe and i was able to use everything in the pic that came with it and it fit perfectly, i only had to trim 1 section of pipe that was cut uneven, i added the heat reclaimer which i picked up from someone for $40 and it was never used, i had to purchase a piece of glass for the stove and make a new flat metal piece that holds the glass in which was easy enough, i purchased the stove for $200 and paid $40 for the glass from a local place that actually cut it from a previously broken piece of stove glass which saved me alot of money, my totoal investment installed came to around $300 i really couldnt be happier right now.
 

Attachments

  • 20190119_170920.jpg
    20190119_170920.jpg
    182.9 KB · Views: 208
  • Like
Reactions: Todd67
One thing i would like to know is what size door seal i need to get, the channel on the stove seems rather wide and currently i am running the stove without one, seems to be good to me however i have no basis for comparison, i would like to get the correct seal to make it right.
 
  • Like
Reactions: Todd67
You would be better off extending the factory baffle plate to a 64 square inch opening above fire (the smoke space the flue gasses travel through) and eliminating the heat reclaimer. This will remove more heat from the stove, although the blower I'm sure moves heat away from the stove as well. Does this stove have the rear shield that curls at the top for a blower to push air across the back and forward? That is better than stealing heat from the exhaust.
Plenty of reasons for their bad rap, other than cooling the flue gasses too much and creating more creosote; the cooler the flue gas, the less temperature differential you have from inside the chimney flue to outside the flue. Temperature differential is what increases draft, which allows more oxygen into the stove. A hotter firebox, more oxygen and more turbulent air creates a better air / fuel mix so you have less smoke particles to begin with. If you have an IR thermometer, check the flue temperature inside near the top. This will show if the heat reclaimer is removing too much. Mid burn, with a touch of smoke present is the time to test. Put a thermometer on the pipe below the reclaimer so you know what temp you're putting into the stack (a surface thermometer reads about 1/2 the actual flue gas temp) Make a chart showing your temp inside at the top vs. the inside thermometer .By keeping the flue 250* f. or above at the top, you will know how hot to run the stove as well as if the box is removing too much, and what the larger baffle does. Without these measurements your guessing. Since you probably don't use this stove for constant heating, you may not create an excessive amount of creosote, just check it frequently until you know how much you create.

Other factors for baffle plate size and secondary burn possibilities is your pipe configuration, rear vent or top vent, spark screen or other restrictions.
There are simple ways to put a secondary burn system in without modifying the stove. Does the factory baffle plate set on angle iron and remove easily?
 
Hello thank you very much for your response, i have been doing some research throughout your postings and quite honetly you can take credit for leading me to making this purchase, i was previously looking at a all nighter little moe and also a kodiak stove, i am glad i purchased this! There is a removable baffle plate inside setting on angle iron currently i would assume its the factory baffle plate
 
There was no rear heat shield or blower on this stove when i purchased it, i am unsure as to whether they were an option or not but it appears there was not ever one installed, however i could be wrong, it just doesnt look like anything was removed from the stove
 
You did real good for $300! Thanks for the additional pics.

By the way, is your username created from a boat model, maybe a StarCraft?
 
I see you don't have the rear shield, it should have mounts on the back for one.......
Wow, not only Brass and Glass but a Metallic Brown one as well. I've been watching craigslist for years for that stove at that kind of deal. The highest priced one I ever saw went on eBay years ago for $1400 close to me in Tannersville!

With the top vent, a larger baffle is the first thing I would do. For secondary air, I made two baffle plates. Space them about 1/2 inch apart and drill 1/8" holes 1 inch apart across the bottom plate facing glass. A second row or even third across the plate staying away from the center. The top plate can have an opening in the center for a pipe flange to mount on the plate facing upward. A 45* elbow (I used 3/4 black iron pipe) points up the outlet and elbow out the side of the connector pipe towards the rear. That preheats the intake air and the hottest part of the stove, the baffle preheats the incoming air before it rushes through the holes igniting smoke below the baffle. I reduced to insulated 6, and find with a straight up connector pipe configuration and chimney the secondary air worked fine.

The front air intake controls are air wash over glass. See how it burns with primary air on sides closed, using only air wash. That will give you an idea of how strong the draft is. A weak to no flame is too much restriction in the flue pipe.

You can also use your pipe thermometer as a test below and above the heat reclaimer to see how much it cools flue temp. Also check temp just before it dumps into chimney. Record all these so you know how changes you make affect temps.
 
With a surface thermometer on the side of flue pipe exiting into the wall i am currently reading 250 degrees, i can easily get a ir thermometer i have one in my toolbox at work i rarely use it there anyway
 
  • Like
Reactions: Todd67
Heres some more photos, funny thing is it came with flu pipe and i was able to use everything in the pic that came with it and it fit perfectly, i only had to trim 1 section of pipe that was cut uneven, i added the heat reclaimer which i picked up from someone for $40 and it was never used, i had to purchase a piece of glass for the stove and make a new flat metal piece that holds the glass in which was easy enough, i purchased the stove for $200 and paid $40 for the glass from a local place that actually cut it from a previously broken piece of stove glass which saved me alot of money, my totoal investment installed came to around $300 i really couldnt be happier right now.

Is that galvanized heat duct elbows ???
Big no no if so. They get hot enough to emit toxic fumes inside.
 
  • Like
Reactions: Todd67
I created that username becuase i love to fish and also love my new fisher stove, i felt it was fitting, the 221 is my birthday i was born february 21st 1985

That's a good enough reason, right there!

Look up a StarCraft Fisherman. I think the made a model 221 for the Great Lakes. I've never owned one, but I seem to remember seeing one listed for sale.
 
  • Like
Reactions: Fisherman221
It appears that one of the adjustable elbows may be galvanized, i can change that out or even both, the other one looks like its just metal but i could be wrong, i just installed this stove on friday and its my second full day burning with it, i was just trying to make due with what i had at the time, tannerville is only roughly 45 minutes north of me as i live in the lehigh valley, i purchased this stove from facebook marketplace, i'm not a fan of social media but i am a fan of good deals on the marketplace
 
So figure 500* flue gas temp there, cooling to whatever before exiting. That should be fine as far as creosote accumulation, but I guessed right about a larger baffle. You can retain more heat than you are in the stove with a larger plate and still have plenty to keep above 250* to the top.
When baffled close to perfect, I find the flue gas temp about 1/2 the stove top temp on the bend.
The factory couldn't baffle them as much as you can when you fine tune it to your chimney. They didn't know if these were being connected to a much taller chimney, or larger diameter from an existing fireplace, so erred on the side of caution allowing more heat than necessary out.

You will use that IR thermometer now.
 
With the primary air vents closed on the side and the air wash vents fully open the fire died down pretty hard, the flames got rather large and lazy, i am currently runnig with airwash vents open halfway and primary air vents open 1 full turn, fire is kind of lazy but seems to be ok, but what to i know this is just my second day with this stove
 
Time will tell if the glass stays clean. The more you open the side vents, the less "vacuum" in the stove for atmospheric pressure to push into the air wash vents. You'll figure out how to balance it out.
 
Closing the damper a bit tonight may be fine, but normally you should have it open. When as cold as it is tonight, 10* f. here now, the draft is very strong. The damper is a variable resistance that slows velocity of rising flue gasses. Slowing them SLOWS the oxygen coming into the stove, so it is a chimney control which affects the stove. The warmer it is outside, the more open it needs to be. Again, you will learn how much creosote you create using it. I thought when first learning stoves that closing the damper would help hold heat in the stove as well, until I took temp reading below and above the damper. It was the same temp. It just slows the draft, throttling the stove back. The baffle inside adds restriction directly inside the firebox, so the larger the baffle, the less restriction needed in the pipe to equal the same draft.
Atmospheric conditions will change the damper setting required as well. Low pressure area coming over you have less pressure pushing into the stove, so you need it open more. Those days the stove will seem sluggish and if the chimney isn't good to start with, they just don't go.