New Timber Ridge (Englands) 30NC

  • Active since 1995, Hearth.com is THE place on the internet for free information and advice about wood stoves, pellet stoves and other energy saving equipment.

    We strive to provide opinions, articles, discussions and history related to Hearth Products and in a more general sense, energy issues.

    We promote the EFFICIENT, RESPONSIBLE, CLEAN and SAFE use of all fuels, whether renewable or fossil.

blacksmithden

New Member
Aug 14, 2017
30
Edmonton Alberta Canada
I saw that Canadian Tire had the upgrade blower for the 30NC on sale...regular $169 Canadian pesos, now $100 pesos. Well....Id already decided to buy that stove, so I wasnt going to let that deal go. Off I went with Junior to pick one up. I figured If wait until either the weather was cooler or until I saw the stove on sale.

At any rate, I remembered seeing the stove on for $200 pesos off a few weeks back, but hadnt done my research yet. I figured Id missed out on the price, but at least I could have a good look at the stove. Wouldnt you know...the floor demo model that I glanced at was still there AND it's now $300 cdn pesos off the regular price of $1399 !!! SOLD !!!! So its got a few scuffs and finger prints on it....who cares. Anybody whos seen me man handle things around knows it was going to get a few of those anyway. Lol.

Id like to thank EVERYONE whos helped me with advice these past few weeks....especially anyone who warned about how much the paint smokes on the initial burn. I also bought 6 ft of single wall chimney pipe to put on it so I could do that initial burn out in the yard. Holy crap !!! Im really glad I didnt try it in the basement. Heres a little video.

 
....and, Ive learned something. The blower is an essential part of this stove when burning very dry pine. I couldnt keep the stove top temperature out of the screaming hot red zone without killing the air....which made it smoke a fair bit. I installed the blower and the temp came right down into the optimal burn zone....air is about 1/2 way open, and no smoke. Hummmm....this will be a learning curve for sure.
 
  • Like
Reactions: ill_make_you_famous
1/2 open is a lot of air.
 
Should be somewhere in the neighborhood as follows:
Cold start / new load on a bed of coals....Air wide open
As fire establishes and temp increases, lower air intake in increments, some use 25%, then 50% then whatever is needed to lower as far as can without smouldering.

New stoves air control do not close all the way. Many find the air intake can be closed all the way, and burn continues as should, and cleanly. Such is the case at my home. Others have to keep a minimal amount of air open, 25% or less. Stack height makes a big difference in needed air also, as a taller stack drafts more/harder than a shorter stack. Experimentation and time will tell you what you need.

The last thing you want to do, is get it up to the goal temp you have in mind, and then cut the air back. You must realize that the temp continues to rise after you cut the air back, and cutting back too late will not level it off at cruising temp. It will continue to rise, then slowly level off, then drop down to cruising temp. As an example, I cut air back completely at around 300-400. After then the stove takes over, and she will rise to 700 or so during the burn of nasty gases, then settle down at around 600-650. If I cut the air back at 500, it would go nuclear until the gases burned off, then drop back down, but during this time there is no controlling, and I don't want, nor need it super high. This is too easy to get to overfiring area.
 
Good luck with the new stove, its been established as a proven heater by many people.
 
Should be somewhere in the neighborhood as follows:
Cold start / new load on a bed of coals....Air wide open
As fire establishes and temp increases, lower air intake in increments, some use 25%, then 50% then whatever is needed to lower as far as can without smouldering.

New stoves air control do not close all the way. Many find the air intake can be closed all the way, and burn continues as should, and cleanly. Such is the case at my home. Others have to keep a minimal amount of air open, 25% or less. Stack height makes a big difference in needed air also, as a taller stack drafts more/harder than a shorter stack. Experimentation and time will tell you what you need.

The last thing you want to do, is get it up to the goal temp you have in mind, and then cut the air back. You must realize that the temp continues to rise after you cut the air back, and cutting back too late will not level it off at cruising temp. It will continue to rise, then slowly level off, then drop down to cruising temp. As an example, I cut air back completely at around 300-400. After then the stove takes over, and she will rise to 700 or so during the burn of nasty gases, then settle down at around 600-650. If I cut the air back at 500, it would go nuclear until the gases burned off, then drop back down, but during this time there is no controlling, and I don't want, nor need it super high. This is too easy to get to overfiring area.
All very true...I have the same stove.

The only thing I will add is the obvious..really dry wood will take off on you in a hurry. Be aware what quality of wood you are adding to the firebox before you go take a shower or make a cup of coffee.

Coal bed also plays a large factor.
 
I couldnt keep the stove top temperature out of the screaming hot red zone without killing the air....
The stove will run quite differently when connected to a proper chimney. It's hard to get proper secondary combustion without sufficient draft. What temperature were you seeing with this break-in burn?
 
The stove will run quite differently when connected to a proper chimney. It's hard to get proper secondary combustion without sufficient draft. What temperature were you seeing with this break-in burn?

Oh....it hit 750F once. It just kept wanting to run away on me. I managed to get it down into the basement last night and got old smokey out of there and into the garage. I went to connect it up and it turns out its 3" shorter than my first one. Due to clearance issues, Im going to have to do a little woodworking tonight and will be installing a new flue. Im seriously considering just calling in the fireplace shop gang to install and certify the pipe. Id normally do the install myself, but my motivation level just isnt there. If there was a place close by that sold double wall pipe, Id go at it. The closest place that has any REAL stock is over an hour round trip. Do that a couple of times to get just the right pieces, and any money I save is out the window. Meh...we'll see how I feel tomorrow night.
 
Set the stove on concrete blocks to get the 3" back. Pavers. It can look decent.
 
  • Like
Reactions: Chuck the Canuck
Set the stove on concrete blocks to get the 3" back. Pavers. It can look decent.

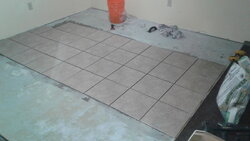
They wont pass it on the wett inspection. The nonsense regulation specifically states that whatever your non combustable surface under the stove is, it cant have gaps. If you lay tile...like I just finished doing, it must have grout in the joints or it fails. The excuse is that sparks can get in there and start a fire. Its the part about not being able to call a poured cement floor a non combustable surface is the one that grinds my gears. It must be finished and free of any gaps. Yes...our regulations were written by a 2 year old whos never even seen a wood stove....and Im not going to permanently lay paving stones down just so I dont have to change some pipe. :)
 

Attachments

  • xmO1gjt.jpg
    xmO1gjt.jpg
    79.6 KB · Views: 71
Last edited:
They wont pass it on the wett inspection. The nonsense regulation specifically states that whatever your non combustable surface under the stove is, it cant have gaps. If you lay tile...like I just finished doing, it must have grout in the joints or it fails. The excuse is that sparks can get in there and start a fire. Its the part about not being able to call a poured cement floor a non combustable surface is the one that grinds my gears. It must be finished and free of any gaps. Yes...our regulations were written by a 2 year old whos never even seen a wood stove....and Im not going to permanently lay paving stones down just so I dont have to change some pipe. :)

You gotta do what you gotta do. Hard to believe that they make you place a separate non-combustible layer on top of a concrete slab.
 
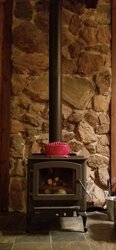
Congrats, the NC30 is hard to beat! I had one in my last home and was one of the first purchases for our new house.

Draft control will take some practice. Depending on load size and wood density, I rarely drop it below 25% open in our new home (8,500 ft) whereas our previous home (6,300ft) the "sweet spot" was around 10% open.

Chimney stack is around 8 ft of internal vertical run. Excellent draft.

One other bit of advice is to be really careful loading it full as it can hold so much wood. She'll go nuclear quickly. We generally load 5 decent sized splits of something hard (locust, elm, etc.) for the overnight burn which is around 30-40% or so of its volume assuming a relatively clean box.

Normal morning/day load is 3-5 splits of pine, Doug fir or similar. We rarely run the blower except on days below 0.

Enjoy the stove!
 

Attachments

  • 20170916_204410.jpg
    20170916_204410.jpg
    77.3 KB · Views: 92
  • Like
Reactions: blacksmithden