
So i was just going to pull stove out to clean but decided to at least repaint the heat exchanger covers, flame guide and center medallion.
Started trying to clean heat exchangers and having a hard time getting them to like new clean. Was using imperial clear flame 2in1 glass and masonry cleaner so probably need a better product. The stove always gets a ton of ash on the heat exchangers and efficiency drops dramatically. Not sure that can be fixed but getting them as smooth as possible seems like best way to help make it so when clean i am able to remove as much build-up as possible. So thinking I may work on that but we ill see how far I get.
Next the burn pot could use some paint so may also remove that to paint. At that point may also see if can remove auger. Can't afford a new one as assume a bit worn as its noisy but think cleaning it could be beneficial.
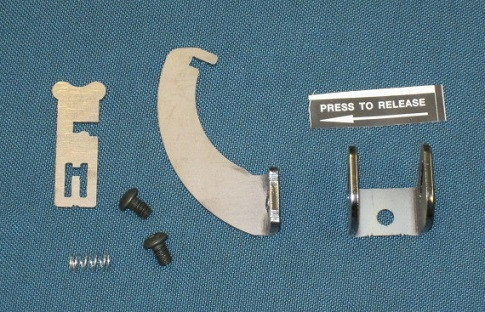
Next the hopper lid stopped staying open a while back so may remove that to try and fix locking hinge but have just been using a butter knife to hold open without much difficulty so may not be worth it.
Most of the exterior paint still looks good so will see how well can clean up but may have to paint the bottom lip and possibly hopper. If matches then the rest of it should be ok. We will see...
Here is original build thred when moved and had to install where wood stove was:
 www.hearth.com
Started trying to clean heat exchangers and having a hard time getting them to like new clean. Was using imperial clear flame 2in1 glass and masonry cleaner so probably need a better product. The stove always gets a ton of ash on the heat exchangers and efficiency drops dramatically. Not sure that can be fixed but getting them as smooth as possible seems like best way to help make it so when clean i am able to remove as much build-up as possible. So thinking I may work on that but we ill see how far I get.
Next the burn pot could use some paint so may also remove that to paint. At that point may also see if can remove auger. Can't afford a new one as assume a bit worn as its noisy but think cleaning it could be beneficial.
Next the hopper lid stopped staying open a while back so may remove that to try and fix locking hinge but have just been using a butter knife to hold open without much difficulty so may not be worth it.
Most of the exterior paint still looks good so will see how well can clean up but may have to paint the bottom lip and possibly hopper. If matches then the rest of it should be ok. We will see...
Here is original build thred when moved and had to install where wood stove was:
Install Harman insert in place of wood stove
I took the flex as being his 4" and the class A as double wall that the flex is running up into, no ? From the early photos, that nasty crumpled flex appears to have been there right after he removed the old wood stove. I could be wrong. It happens once a year............ ;em:ZZZ;sick
Attachments
![[Hearth.com] Repaint, clean and repair harman accentra inert](/talk/data/attachments/264/264949-e9070823061665d7437f6075e12007c8.jpg?hash=muogwwMg7b)
![[Hearth.com] Repaint, clean and repair harman accentra inert](/talk/data/attachments/264/264950-be7181de49a553f56daec8f91d152d1d.jpg?hash=SfPR8EgFvQ)
![[Hearth.com] Repaint, clean and repair harman accentra inert](/talk/data/attachments/264/264951-2c4095b06c5f261e4ba50eb516ce24dd.jpg?hash=N8l6p_YEgc)
![[Hearth.com] Repaint, clean and repair harman accentra inert](/talk/data/attachments/264/264952-63e78b4ca3ee8cc607de1fb0f384e2f7.jpg?hash=fWjb6E8mRF)
Last edited:
![[Hearth.com] Repaint, clean and repair harman accentra inert](/talk/data/attachments/264/264959-c15fce35dd29346dc7f0a78185313cf9.jpg?hash=aAM45mdG2x)
![[Hearth.com] Repaint, clean and repair harman accentra inert](/talk/data/attachments/264/264960-a0f1f84cd8b487a774e211783a6b2655.jpg?hash=CVbDqmd7lZ)
![[Hearth.com] Repaint, clean and repair harman accentra inert](/talk/data/attachments/264/264961-e9b7c8a50ff3fc85a453ac09a4a8c399.jpg?hash=25r2B49J9F)
![[Hearth.com] Repaint, clean and repair harman accentra inert](/talk/data/attachments/264/264962-c4628427ce35ff5fb35ec8a2a5c55cb4.jpg?hash=2Dy3g43VbM)
![[Hearth.com] Repaint, clean and repair harman accentra inert](/talk/data/attachments/264/264963-0cd2397c6c871efcc1bf995073da71af.jpg?hash=OI1ZU9FI-T)
![[Hearth.com] Repaint, clean and repair harman accentra inert](/talk/data/attachments/264/264970-1bc18022dfeea051b8f16f17bd6c6111.jpg?hash=7seGap644f)
![[Hearth.com] Repaint, clean and repair harman accentra inert](/talk/data/attachments/264/264971-571cf1c30f387bbf3faa015b143eda50.jpg?hash=dXP9Q4TfIw)
![[Hearth.com] Repaint, clean and repair harman accentra inert](/talk/data/attachments/264/264976-8ee439bff4b982b7c8145ba18d0acfd9.jpg?hash=2bcjo2sL-I)
![[Hearth.com] Repaint, clean and repair harman accentra inert](/talk/data/attachments/264/264977-a08979bee7cc315419be1a53ada85093.jpg?hash=uthc31eqx4)
![[Hearth.com] Repaint, clean and repair harman accentra inert](/talk/data/attachments/264/264978-24e9eb139cf126080ddd8cb308bc5585.jpg?hash=jc6P3m0j6_)
![[Hearth.com] Repaint, clean and repair harman accentra inert](/talk/data/attachments/265/265031-c05e50e6b707b7e1aedd104bf4fe0e95.jpg?hash=B3DawBCQjU)
![[Hearth.com] Repaint, clean and repair harman accentra inert](/talk/data/attachments/265/265032-3eb195656def6b2db80b0749fe2d58cb.jpg?hash=Wzf4_dXFA6)
![[Hearth.com] Repaint, clean and repair harman accentra inert](/talk/data/attachments/265/265033-0ed5d39ada21fff0d3a58287441bbc9f.jpg?hash=BtvtH7SvLJ)
![[Hearth.com] Repaint, clean and repair harman accentra inert](/talk/data/attachments/265/265034-53ca9e0182d67fccc176899a1a283eea.jpg?hash=lzU7SUyMEy)
![[Hearth.com] Repaint, clean and repair harman accentra inert](/talk/data/attachments/265/265035-f8d93bda980372a93a8a9abeeecb8946.jpg?hash=UDeYq7MEnM)

![[Hearth.com] Repaint, clean and repair harman accentra inert](/talk/data/attachments/265/265153-16bb3560770213b002d67b1e2af98700.jpg?hash=nmrXs73Z7A)
![[Hearth.com] Repaint, clean and repair harman accentra inert](/talk/data/attachments/265/265154-a94fdbd1b3f5e337c756a79deaa02ed3.jpg?hash=6jVSNFarX3)
![[Hearth.com] Repaint, clean and repair harman accentra inert](/talk/data/attachments/265/265161-cc1f4e221e32323b403176489d5f0ba8.jpg?hash=Lff4J5j72S)
![[Hearth.com] Repaint, clean and repair harman accentra inert](/talk/data/attachments/265/265162-c75d3b10df53ea4ed97f571e58ba9b9c.jpg?hash=enNsXgUj4b)
![[Hearth.com] Repaint, clean and repair harman accentra inert](/talk/data/attachments/265/265163-8e0034a61b59226c8254066cf50cb112.jpg?hash=0gDZpf6z22)
![[Hearth.com] Repaint, clean and repair harman accentra inert](/talk/data/attachments/265/265164-fbedeb78c3e72a331cff3b8ee35f14c4.jpg?hash=UkZibEuqMJ)

![[Hearth.com] Repaint, clean and repair harman accentra inert](/talk/data/attachments/265/265411-f7b7873f47c3b6537cce36137dd38a7f.jpg?hash=z11SdlnKXz)
![[Hearth.com] Repaint, clean and repair harman accentra inert](/talk/data/attachments/265/265412-f7b7873f47c3b6537cce36137dd38a7f.jpg?hash=z11SdlnKXz)
![[Hearth.com] Repaint, clean and repair harman accentra inert](/talk/data/attachments/265/265487-fd60a1cf7673f086ef7647cd87a8b79f.jpg?hash=5hQWGvWAeB)
![[Hearth.com] Repaint, clean and repair harman accentra inert](/talk/data/attachments/265/265488-6efbf89f7f70136e9c000851aac3a73e.jpg?hash=NwqMH70nnn)
![[Hearth.com] Repaint, clean and repair harman accentra inert](/talk/data/attachments/265/265489-7568e23588e7dc52d026d22323da0234.jpg?hash=rsaHGPG59Q)
![[Hearth.com] Repaint, clean and repair harman accentra inert](/talk/data/attachments/265/265490-196fb29d38c9162fe277f11921848e8c.jpg?hash=iYfbpIz256)
![[Hearth.com] Repaint, clean and repair harman accentra inert](/talk/data/attachments/265/265491-4754cf361d26d27ed3f8858d97dc2871.jpg?hash=BRY8nglpV5)
![[Hearth.com] Repaint, clean and repair harman accentra inert](/talk/data/attachments/265/265492-0f5caaa3132e1f8a6777b3a16ae8a14a.jpg?hash=EZH-g1oKUU)
![[Hearth.com] Repaint, clean and repair harman accentra inert](/talk/data/attachments/265/265630-750f33f71320d28a8c7a740d0aad7562.jpg?hash=acXDjDkkhg)
![[Hearth.com] Repaint, clean and repair harman accentra inert](/talk/data/attachments/265/265631-7e90f77d2a84ea26c6a66d30160bc39d.jpg?hash=IMbmz4W2Fo)
![[Hearth.com] Repaint, clean and repair harman accentra inert](/talk/data/attachments/265/265648-f97d2fd55b64d2a78300dc9cec7cf66b.jpg?hash=3S8y6FFhRy)
![[Hearth.com] Repaint, clean and repair harman accentra inert](/talk/data/attachments/265/265650-17591a59ade8befc1cedc6f7695634f4.jpg?hash=VlLPDQGW1s)
![[Hearth.com] Repaint, clean and repair harman accentra inert](/talk/data/attachments/265/265651-0ac4400c74bf24100bfbac701b7dc7b0.jpg?hash=2daginoruw)
![[Hearth.com] Repaint, clean and repair harman accentra inert](/talk/data/attachments/265/265652-6b570ecf75844ca7fa4dc78e8ce7efeb.jpg?hash=ZOvFro6Ze2)
![[Hearth.com] Repaint, clean and repair harman accentra inert](/talk/data/attachments/265/265653-cd1952271afc6d3abe630dd2568503b8.jpg?hash=V3OveE7An3)

![[Hearth.com] Repaint, clean and repair harman accentra inert](/talk/data/attachments/269/269618-fd236f7e065b68296aa86ccb99eb7506.jpg?hash=qAflfXxIxI)
![[Hearth.com] Repaint, clean and repair harman accentra inert](/talk/data/attachments/269/269619-ec0f28b7565e77bae6620fb9767a6479.jpg?hash=oD5t98msUc)
![[Hearth.com] Repaint, clean and repair harman accentra inert](/talk/data/attachments/269/269620-6686856d45adf5cb3ae2267b602146ee.jpg?hash=bfBhylZ8b3)
![[Hearth.com] Repaint, clean and repair harman accentra inert](/talk/data/attachments/269/269642-7ae8a556ad5067224b7f203d388fcdf1.jpg?hash=WtTdwqOqHF)