
Insulating Greenwood, Greenfire, Steaton,
- Thread starter Trzebs13
- Start date
-
Active since 1995, Hearth.com is THE place on the internet for free information and advice about wood stoves, pellet stoves and other energy saving equipment.
We strive to provide opinions, articles, discussions and history related to Hearth Products and in a more general sense, energy issues.
We promote the EFFICIENT, RESPONSIBLE, CLEAN and SAFE use of all fuels, whether renewable or fossil. -
Super Cedar firestarters 30% discount Use code Hearth2024 Click here
You are using an out of date browser. It may not display this or other websites correctly.
You should upgrade or use an alternative browser.
You should upgrade or use an alternative browser.
- Status
- Not open for further replies.
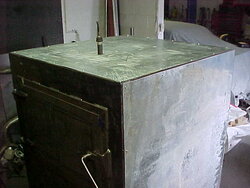
I'm pretty fond of the fab work. it's something I really enjoy and save me a boat load of money. The metal is 16ga except for the top....it's 14ga....cross broke and will get interior stiffeners as well. I'm not worried about the sides or back withstanding the heat, but the top will either get a ceramic coating or some sort of refractory lining. Other than the fact that I couldn't stand seeing the insulation that way at the end of the season....I want to slow up or stop the deterioration associated with it. The insulation thickness will remain the same as I was using before....3" top, 2.75" sides and 2" back and front.
Will it work without complications.........My thought is .........don't know until you try.
Will it work without complications.........My thought is .........don't know until you try.
It is 2" thick high temp fiber board. It comes 1'x3'Pat53 said:snowman49820 said:I used refractory board to line the inside of my boiler. It works great, doesn't sag or collect creosote.sparke said:Regarding the top of the unit. I had the idea a long time ago to line the sides and top with refractory. I called Mark and talked to him about it. (This was a few years ago). He said he had already tried it and the issue was the refractory did not hold up, it cracked and fell apart. He said he had the ss needles in the mix of refractory. Seems to me if we line the unit over the hex tubes there will need to be a steel frame to support it. I am considering building a frame and lining the sides and top above hex with fire brick. Do you guys think this would make enough of a difference in performance to bother with? I am curious more then anything. My unit runs clean, my goals would be to decrease wood consumption, I would think the HEX would perform better with some type of refractory above it? Not sure if I have the ambition this year...
Bought my refractory and board from GM Refractories in Brighton, MI http://gmrefractories.com/index.htm
snowman, when you say "refractory board", do you mean firebrick, or an actual sheet of material? Also, how thick is this board?
thx, Pat
Jesse said:
Just an update...Got the top inner skin done the way I wanted it, and got it back together.
Jesse,
Great work, I can't wait till you get that puppy up and runnin. I wish Greenwood put half the thought in R&D as you did.
Great work, I can't wait till you get that puppy up and runnin. I wish Greenwood put half the thought in R&D as you did.
I wonder how this stuff would work? Looks like you can cut it and drill into it no problem.
http://www.fiberfrax.com/files/Fiberfrax-Duraboard.pdf
http://www.fiberfrax.com/files/Fiberfrax-Duraboard.pdf
Seems strange that I have never had the dripping issue that is discussed. Sometimes I have perfect wood but most times I do burn some wood that is still green or moist. I do run full out fires most of the time. 90% of my wood is birch, a little poplar and some spruce is all I can find around here within a thousand miles?!
Steve
Steve
tigermaple said:Jesse,
Great work, I can't wait till you get that puppy up and runnin. I wish Greenwood put half the thought in R&D as you did.
I will be firing it this weekend, hopefully all goes well....already feel more comfortable with the new setup.
I would agree that the dripping/condensation issue is due to idling. My unit runs full out and I have never had this issue...
Jesse keep us posted on the upgrades. I have fired my unit several times now. I notice a small difference with the refractory overhead but not huge. I am not sure I would do it again, I don't notice that much of a difference. The one really good thing about it - I can clean the hex real good with out snagging insulation...
Jesse keep us posted on the upgrades. I have fired my unit several times now. I notice a small difference with the refractory overhead but not huge. I am not sure I would do it again, I don't notice that much of a difference. The one really good thing about it - I can clean the hex real good with out snagging insulation...
I
ISeeDeadBTUs
Guest
Sparke - keep us posted also ")
What is the distance between the top of the HX and your new refractory? I ask because I am thinking that the refractory will eliminate the need for any mid-season HX cleaning.
What is the distance between the top of the HX and your new refractory? I ask because I am thinking that the refractory will eliminate the need for any mid-season HX cleaning.
What is the distance between the top of the HX and your new refractory? I ask because I am thinking that the refractory will eliminate the need for any mid-season HX cleaning.
Approx. 1" , hopefully one of the benefits will indeed be a cleaner/self cleaning HX. I have not looked at it (HX) or had extended burns yet so there may be benefits I have not noticed yet. If I notice anything interesting I will let y'all know.
my boiler acted like this when i first got it ( seton w200 ). i called fred seton and told him my issue. he asked how tall my chimney was. at that time it was at 18 feet. he said to add 3 feet. i thought he was crazy but i did it anyways. sure enough the dripping stopped. i do feel that green wood is going to give issues regardless of chimney height but the wood your burning should be plenty dry enough.Trzebs13 said:Well I finally had to scratch my itch and light a fire. And the resuls are less than stunning. I fired it with 2.5 yr seasond oak splits and some construction scraps. And even after having it fire wide open for at least 4 hrs the thing is still dripping. I'm really puzzled where this comes from. On a good note the back (outside) of the unit seems to be much cooler on the skins. And I can't really measure it but It did seem like I got less tempature drop when the infloor kicked in. But not like it's that cold out.
Well that's what experamenting is about. If you don't make many mistakes then, you must not do much.
20 feet, Holy cow! I guess I've never heard that one but I guess more draw would move that air faster. Mine is 15' and it already seems like it is half way to heaven compaired to my roof line. The funny thing is is that when I posted that it was sitll drippin. Was Just after that first fire. Ever since that first couple days it hasn'e dripped a drop. In fact you can't even smell the beast is even in there. I think it heard me swearing at it, and took the threats to heart.
The first 2 seasons I did burn allot more rounds and the wood was only seasoned for about 12 mths. I do agree that these will burn green rounds but I do mot buy into the fact that it is the best way to go. I split all my big stuff at least in half. I have took moisture readings on large rounds and oak does not dry much if it is 9" or bigger unsplit.
The first 2 seasons I did burn allot more rounds and the wood was only seasoned for about 12 mths. I do agree that these will burn green rounds but I do mot buy into the fact that it is the best way to go. I split all my big stuff at least in half. I have took moisture readings on large rounds and oak does not dry much if it is 9" or bigger unsplit.
have you ever measured your draft? ive done alot adjusting to mine to get it right. just a little bit of change makes a big difference on how it runs. obviously lower is better but to low you'll get problems like smell slow starting fires and the nasty drip.
No I have never measued the draft or the exhaust temps. But I think by insulating and plating the secondary chamber the my exhaust temps must be higher since the skinks on the back are probably at least 50 deg cooler. Now even with a big fire you can put your hand anywhere along the back. So that heat must be going either in the Hx or up the chimney.
Have to drag up an old thread to up date the progress of my inner panels.
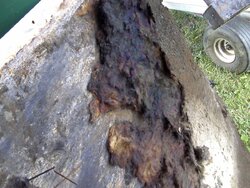
During the season I was very happy with the new updates. I had no dripping around the unit at all. I also feel like the pressure vessel stayed a bit cleaner than usual. ( could be my imagination ) And most important of all.....I wasn't worried about my insulation. I don't remember if I ever posted it, but the first season I had an issue with my top piece becoming saturated with creosote, smoldering hot enough to deform my top skin and liquefying the galvanized coating.
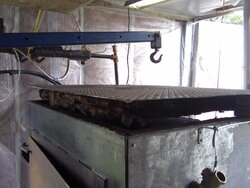
I finally got around to taking the back off the other day to clean it up for this season and was happy with what I saw.....
The outer skin off

The backside of the inner skin......no warp-age or deform-age

The condition of my pressure vessel after the season ( normal for me )

The top inner skin with patented space shuttle asbestos panels didn't warp or move a bit

Even the insulation I wrapped in aluminum foil to fill the corner gaps held up great

I was also able to view the side panels and they looked good as well.
Keep in mind that I finished the season with slow, little, shoulder season burns witch cause the HX and panels to look the way they do in the pics. In the middle of winter they are white and chalky.
One final shot after cleaning

During the season I was very happy with the new updates. I had no dripping around the unit at all. I also feel like the pressure vessel stayed a bit cleaner than usual. ( could be my imagination ) And most important of all.....I wasn't worried about my insulation. I don't remember if I ever posted it, but the first season I had an issue with my top piece becoming saturated with creosote, smoldering hot enough to deform my top skin and liquefying the galvanized coating.
I finally got around to taking the back off the other day to clean it up for this season and was happy with what I saw.....
The outer skin off
The backside of the inner skin......no warp-age or deform-age
The condition of my pressure vessel after the season ( normal for me )
The top inner skin with patented space shuttle asbestos panels didn't warp or move a bit
Even the insulation I wrapped in aluminum foil to fill the corner gaps held up great
I was also able to view the side panels and they looked good as well.
Keep in mind that I finished the season with slow, little, shoulder season burns witch cause the HX and panels to look the way they do in the pics. In the middle of winter they are white and chalky.
One final shot after cleaning
"issue"? I call that friggin' scary. Did you have yer custom made skins at that time? On the lid too?Jesse said:first season I had an issue with my top piece becoming saturated with creosote, smoldering hot enough to deform my top skin and liquefying the galvanized coating.
2.beans said:did you build storage this year?
No I didn't.....maybe some day.
trailhound68 said:"issue"? I call that friggin' scary. Did you have yer custom made skins at that time? On the lid too?Jesse said:first season I had an issue with my top piece becoming saturated with creosote, smoldering hot enough to deform my top skin and liquefying the galvanized coating.
My original build top was 16ga with support braces, weld on .25" bolts with fender washers holding the rock wool up. After awhile the insulation sagged a little and left a gap between the skin. Once that became saturated with creosote....it made for a nice little burn area.
The top now has the inner liner, insulation, and .25" plate.
My first top
Attachments
I
ISeeDeadBTUs
Guest
Looking Good
Reminds me I need to clean/inspect/repair the Green beast soon. I may have a line on a slightly used GW. If I can get it for the right price I may use that one as a basis for a whole new unit.
I just need to find someone looking to trade a decent stick/TIG machine for a ZZR1200 rocket.
Reminds me I need to clean/inspect/repair the Green beast soon. I may have a line on a slightly used GW. If I can get it for the right price I may use that one as a basis for a whole new unit.
I just need to find someone looking to trade a decent stick/TIG machine for a ZZR1200 rocket.
Jesse, Great to hear that it seems to be workin out. You went the extra mile and looks like it's paying off.
The changes seem to be holding up good for me as well. The only dripping I got this year is that first time it fires up. nothing since.
Had to break down and light it up this week. Oh well here we go!!
The changes seem to be holding up good for me as well. The only dripping I got this year is that first time it fires up. nothing since.
Had to break down and light it up this week. Oh well here we go!!
Trzebs13 said:Had to break down and light it up this week. Oh well here we go!!
As hard as I tried to wait longer.......I fired it up this week also.
Did i hear that the company in ohio is no longer making the setons? Did not want to pay the cost of the epa test?
- Status
- Not open for further replies.
Similar threads
- Replies
- 10
- Views
- 1K
- Replies
- 5
- Views
- 1K
- Replies
- 4
- Views
- 296