NC-13 Install Thread (ENGLANDER CUSTOMER SERVICE IS #1!!!!!!!!!!) UPDATED 12.19.11 w/PICS

  • Active since 1995, Hearth.com is THE place on the internet for free information and advice about wood stoves, pellet stoves and other energy saving equipment.

    We strive to provide opinions, articles, discussions and history related to Hearth Products and in a more general sense, energy issues.

    We promote the EFFICIENT, RESPONSIBLE, CLEAN and SAFE use of all fuels, whether renewable or fossil.
Status
Not open for further replies.

Ramcononer

New Member
Nov 17, 2011
125
Long Island, NY
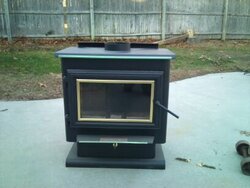
So here we go. Thanks to all the advice on this forum, this stove will be throwing heat by Saturday evening. The stove arrived yesterday via LTL carrier. Box looked good, all set. I open the stove to find a cracked fire brick. I call Englander and within minutes they have one on the way to me. My gasket looked a little "rough" at one end and he explained it may be a little fraying as they are cut to length when installed and it should be fine. I felt around the rough area and it seems to be in decent shape.

I have to say that I was impressed with their customer service and the guy on the phone was very helpful....

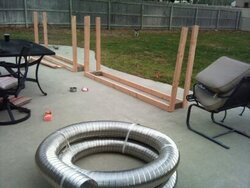
So now I have a stove, have my liner, top plate, appliance adapter, raincap, etc. I am ready to do this.

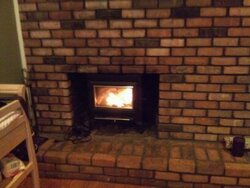
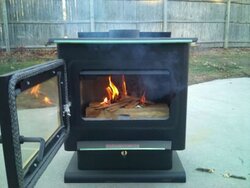
I was so excited I had to build a nice fire outside, which Englander said would be fine and a good place to break in the stove.

I couldn't really shut the door all the way because it would put the fire out, but I assume that is because there was no chimney pipe to create draft??? Either way I was able to shut it down, sort of, and I really think I was able to get secondaries...


I am not sure of what secondaries are supposed to look like but here is what I saw, a lazy flame and the bars at the top of the unit with the holes in them (similar to a bbq burner) looked as if they were connected to propane and was pushing flames out...is that secondary combustion???

Anyway, thanks everyone for the help and here are some pics...I will update this thread as the install progresses..
 

Attachments

  • FP.jpg
    FP.jpg
    21.3 KB · Views: 657
New Stove!!
 

Attachments

  • NC.jpg
    NC.jpg
    20.4 KB · Views: 781
First Burn
 

Attachments

  • NC1.jpg
    NC1.jpg
    21 KB · Views: 839
Nice! Keep us posted on the install. You going legs or pedestal?
 
FireAnt said:
Nice! Keep us posted on the install. You going legs or pedestal?

Per Englander, the height does not change with legs or pedestal. Getting this thing in my hearth I will only have 1/2 in clearance before the top bricks. If I am having a hard time, I might reduce the leg height by an inch to give me more flexibility. but we shall see. Ideally, I would love to have 7" inches sticking out of the front of the fire place to allow more radiant heat into the room, then use an extender plate to line up with the new SS flue pipe....If not I can fit the whole unit inside the fireplace with room to spare.... See drawing pic...

The area of concern is the part where bricks come low...after I get past that it opens up to more than enough room but I want to leave some stove sticking out if possible....

I am wondering if a 45 deg adapter might work and let the flex liner do the rest of the bends?? Obv, this is not to scale and the bend wouldn't be that tight...it has a lot more room/height to work with..
 

Attachments

  • cross section.jpg
    cross section.jpg
    38.4 KB · Views: 642
I know the height doesn't change. Just wondering what look you were going for. I almost went with an offset box but in the end didn't want to extend my hearth. Good luck with the 1/2 inch. I had a fun time getting mine lined up and set with 3 1/2 inches.
 
FireAnt said:
I know the height doesn't change. Just wondering what look you were going for. I almost went with an offset box but in the end didn't want to extend my hearth. Good luck with the 1/2 inch. I had a fun time getting mine lined up and set with 3 1/2 inches.

As far as looks, I like the Pedestal...
Yea, looks like im in for a hell of a time lining up the liner...at least I have over a foot width wise to work in...Unless I bust out the brick a bit, then reface the entire fireplace......
 
I was lucky. I had a BIL that could squeeze in and still muscle the adapter over.
 
Im guessing I couldn't close the door on the unit because I had no chimney attached...no draft? I would have put the fire out. I was able to leave the door slightly cracked.....
 
Ramcononer said:
Im guessing I couldn't close the door on the unit because I had no chimney attached...no draft? I would have put the fire out. I was able to leave the door slightly cracked.....

Yep. Gotta have that long pipe to get a draft going. It will be fine hooked to a real chimney. Having to keep the door cracked open for an outside burnin is usual.
 
BrotherBart said:
Ramcononer said:
Im guessing I couldn't close the door on the unit because I had no chimney attached...no draft? I would have put the fire out. I was able to leave the door slightly cracked.....

Yep. Gotta have that long pipe to get a draft going. It will be fine hooked to a real chimney. Having to keep the door cracked open for an outside burnin is usual.

What I expected to hear. Was a little nervous for a second but figured as much. I hope I got it hot enought to bake in the paint...trying to avoid the smell inside the house...had a real good fire going for a couple of hours...

I did a top down start, put two 2x4's and placed paper in the middle and built a tee pee of kindling on top with small dry branches and some old door shims....surprised at how the bottom 2x4s lit off...smoked out the door and chimney outlet but I suspect once a chimney is set up, the draft will pull it outside so I won't spill the smoke inside on cold starts....

Thanks for the feedback/advice
 
UPDATE 12.16.11

Picked up my 20' of Stainless Steel Flex pipe, My top plate and my Stove adapter. The flex pipe was lighter than I expected. Tomorrow is install day. Pics to Follow....I am going to try and take as many photos as possible in order to help someone else out if they decide to do their own install....
 
ram-total agreement on the customer service dept. of new englander stoves. very helpful. i had a couple bad welds, fire bricks and some missing brass handles that was taken care of. i sent pics of the welds, and had it repaired locally, and was re-imbursed by new englander.

as far as the pedestal vs. legs...c'mon man-go with the legs! looks a lot better!
 
yooperdave said:
as far as the pedestal vs. legs...c'mon man-go with the legs! looks a lot better!

Didn't want to say it but since you did...+1
 
FireAnt said:
yooperdave said:
as far as the pedestal vs. legs...c'mon man-go with the legs! looks a lot better!

Didn't want to say it but since you did...+1

I agree..and had no choice...the legs are around 3/4 inch shorter than pedestal (overall height of unit) Needed to use legs to fit in and it does look good!!
 
So the install is COMPLETE!!!
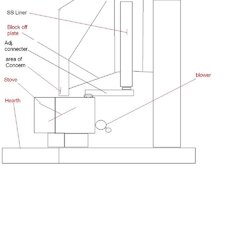
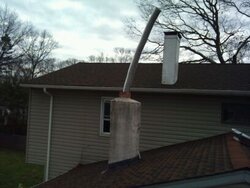
! In the next few posts Ill detail what I did and then I have a few questions for the pro's.....Again, a big thanks to everyone on this forum who has helped directly or posted questions of their own that have helped. I hope doing this install I might be able to help someone else along with what I have learned....


Liner on the ground....ready to get in the chimney
 

Attachments

  • liner ground.jpg
    liner ground.jpg
    24.5 KB · Views: 433
Here I am installing the liner in the Chimney. Definately recommend as a two person job...especially getting through the damper area...Luckily the terra cotta chimeny is nice, clean and smooth...was able to push the liner down in no time at all. Getting throught the damper opening, well that took an extra minute....
 

Attachments

  • liner outside chim.jpg
    liner outside chim.jpg
    22.7 KB · Views: 424
Just curious but take a magnet to that liner and see if it sticks... Im a lil curious about something!!
 
Here is the liner passing the damper. I removed the damper plate and arm which was only held on by one cotter pin. The liner would have fit with a little "muscle" but I wanted to make the process easier in the long run and give myself some working room for when the stove was in. I used a sawzall with a NEW Dewalt BIMetal blade and made two vertical cuts towards the back of the damper assembly. I then used a pair of channel lock pliers and was able to snap it off. This gave me room to move the liner as needed...the pic will show one side of the cut..
 

Attachments

  • liner in chim.jpg
    liner in chim.jpg
    18.9 KB · Views: 419
TheHeatElement said:
Just curious but take a magnet to that liner and see if it sticks... Im a lil curious about something!!

Are you thinking it's aluminum? I purchased it from a reputable chimney supply company locally? I never thought to even check...it is pretty strong stuff...I was not plyable really unless I put a pry bar on it...
Now you got me thinking....It wasn't very heavy......Ill have to call the wife and have her check..
 
Here is the liner in stalled into the adapter to fit to the stove...I secured it with 4 sheet metal screws.
 

Attachments

  • flange.jpg
    flange.jpg
    14.6 KB · Views: 432
The next part of the process before I put the stove in place was to build a block off plate. I don't have any pics of it but I used the exact same method as described in the "Poor mans block off plate II" thread. Here is some plain metal stock that was used for the supports...I stuffed a bunch of Roxul up in the chimney and sealed her off with the sheet metal. It cuts very easy with a sawzall. Just doing that alone fixed a big draft I had in my old fireplace.
 

Attachments

  • Stock.jpg
    Stock.jpg
    17.3 KB · Views: 412
Last but not least...HEAT!! Getting her in was a little tough but we managed. I used furnace cement around the collar of the stove and let her dry over night. I don't have much clearance height wise so I can't pull the stove out further unless I modify the legs. Because of that, I couldn't fit the blower. BUT, I can lay the blower in front of the stove off to the side and let her run. It moves a lot of air out of the fireplace. Yesterday it was 26f outside and 73f in the stove room, NO OIL BEING USED!!!
 

Attachments

  • final.jpg
    final.jpg
    21.8 KB · Views: 471
Awesome man! Congrats you are up and running! Enjoy the heat!
 
Now for the questions: Please bear with me...

Smoke out of the chimney: On start up, it smokes for a bit. Also when the primary burn is done and im pretty much at a coal stage with the stove closed fully down...it will smoke some... Is this normal? I have been getting good secondary action, does this mean I am burning clean?

Reloading: When reloading, I try to not get too much smoke out of the chimney..to achieve this I close the door but don't really tighten it...this lets air rush in creating a hot fire....once I get a decent fire rolling (5 mins) I shut the door adn leavy the air control full open for another 10 minutes or so...then shut about 1/2 way down...then pretty much closed....sometimes in doing this I will get some smoke out of the chimney...its a "lighter" Whiter smoke and not very "thick".... Am I closing down too soon? Need to get hotter first??

Lastly, since yesterday was my first burn (except for the few breakins I did outside) I was excited to see what she could do...I still haven't loaded her up full yet because I am concerned with the above smoke issues on reloading, starting a new fire....anyway...I put in a 1/3 - 3/4 load last night around 9pm.....shut her completely down at 10:45 ish.....6:30 am (today 12/19/11) there was a nice bed of coals...I had a light smoke coming out of the chimney.....I raked them foward, threw on 3 medium splits and within 5 minutes the firebox was blazing again...I had the door slightly cracked to get it going.......brought stove room from 62-69 degrees within 30 minutes....

Thanks again for everyones help!!!
 
Status
Not open for further replies.