Seal those secondary manifolds!

  • Active since 1995, Hearth.com is THE place on the internet for free information and advice about wood stoves, pellet stoves and other energy saving equipment.

    We strive to provide opinions, articles, discussions and history related to Hearth Products and in a more general sense, energy issues.

    We promote the EFFICIENT, RESPONSIBLE, CLEAN and SAFE use of all fuels, whether renewable or fossil.
Status
Not open for further replies.
ok , so its not there all the time, sholdnt be an issue then, didnt know if you had that consistantly, the secondaries leave a pattern where the flame paths run against the plate , just looked like they werent as clear there, might even change from fire to fire depending on how wood is arranged, i get it now, kool
 
precaud,

My 3CB has similar baffles, and I also tried to cement in the front seam when I noticed a gap. My cement dropped out before too long passed, although I have seen nothing to suspect I'm having air escape from there. I get pretty good secondary burn out my holes. I don't know what is behind my leading edge seam though.
 
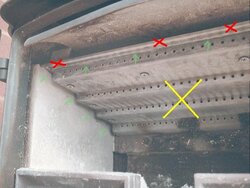
I guess I'll ask ........... Is the yellow X part of the secondary burn chamber the same unit as the red XXX part ? Is the red XXX part of the stove ? Is the screws in the yellow X part what holds in the secondary burn chamber ? Can you take the yellow X and the red XXX part out as a whole ?

I see how it works as a burn chamber but was wondering how it all fit together.
 

Attachments

  • 2ndary.jpg
    2ndary.jpg
    50.9 KB · Views: 286
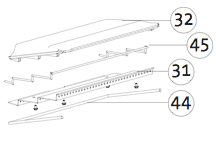
Can't speak for other Jotuls, but the C450 insert's baffle/secondary setup looks like the pic below. The chamber is gasketed on the sides and front, between the baffle and manifold with 1/4" rope gasket material (same stuff that's used between the 'glass' and the doors). That whole assembly is gasketed between it and the shelf it sits on with 3/8" rope.

I imagine the other Jotuls have similar exploded views if anyone's curious.

-Hal
 

Attachments

  • Picture 1.png
    Picture 1.png
    3.8 KB · Views: 256
Roospike said:
I guess I'll ask ........... Is the yellow X part of the secondary burn chamber the same unit as the red XXX part ?
No, the perforated plate (the manifold) is separate from the cast piece it attaches to.

Is the red XXX part of the stove?
Huh? It's the top plate of the secondary baffle system.

Is the screws in the yellow X part what holds in the secondary burn chamber ?
They hold the manifold to the top plate.

Can you take the yellow X and the red XXX part out as a whole ?
Not without a nearly complete disassembly of the stove.
 
HalJason said:
I imagine the other Jotuls have similar exploded views if anyone's curious.
-Hal
Thanks for that info. My F602 doesn't have gasket there.
 
wahoowad said:
My 3CB has similar baffles, and I also tried to cement in the front seam when I noticed a gap. My cement dropped out before too long passed, although I have seen nothing to suspect I'm having air escape from there.
wahoo, if it's leaking at the front seam, by sealing it you'd notice more flame in the firebox and less in the chamber above the firebox.

I get pretty good secondary burn out my holes. I don't know what is behind my leading edge seam though.
According to the F3 parts diagram, it's constructed just like the Morso's and does not have a gasket there. I'd bet my boots it's leaking at the front and along the sides too.
 
precaud said:
HalJason said:
I imagine the other Jotuls have similar exploded views if anyone's curious.
-Hal
Thanks for that info. My F602 doesn't have gasket there.

No problem. Poke me once the heating season ends, and I'll open things up and take some pics of the innards after 2 seasons of burning. Planning on opening it up anyhow after reading this thread, and it'll be interesting to see how the gasket held up.

-Hal
 
How do you bank the stove for overnight burns with the sloping top? Would like to see a pic of one loaded to the max.
 
precaud said:
wrenchmonster said:
The lack of gaskets or means to create a proper seal seems like a gross oversight in my opinion, which frankly is surprising taking into account the excellent reputation of Morso.
I don't know about that. That part of the stove is constantly in direct contact with the flame, and may well be the hottest piece in the stove. I just can't imagine gasket lasting very long there. I think cement would be the better choice.

I think this is an issue, not because of the longevity, but because of repetitive failures. I am now seeing, for the fourth time in different location, the gasket coming out from under the secondary manifold. This is starting to bug me. It's as if the gasket is spring loaded when the manifold heats up and expands several times, the gasket just pops out. I am seeing this on both sides of the manifold and it's getting old real fast.
 
Gunner said:
How do you bank the stove for overnight burns with the sloping top? Would like to see a pic of one loaded to the max.
My Hearthstone Heritage's has a sloped baffle with exit in front. It took a while to get use to. It is sloped for the rear vent option that I use. I pile the coals to the rear of center keeping the front air inlet clear. Then I stuff in a large single usually square split of oak pushed to the back. If it is big enough I will load oak splits in front higher, if not on top also. Fire loves to go up so I get a back to fount, top down burn going . When the secondary is burning good I shut the primary off and go to bed.
 
BeGreen said:
I think this is an issue, not because of the longevity, but because of repetitive failures. I am now seeing, for the fourth time in different location, the gasket coming out from under the secondary manifold. This is starting to bug me. It's as if the gasket is spring loaded when the manifold heats up and expands several times, the gasket just pops out. I am seeing this on both sides of the manifold and it's getting old real fast.
Interesting, BG. It's quite possible that it's literally being sucked out of the gap that forms when it heats up and expands.

Overall, I'm with you, and I don't like these large secondary manifolds. They impress me as a "first generation" design. I think the system with stainless tubes and insulation above perform better, are more problem-free, and will be less expensive to replace when that time comes. And given that that area is the hottest place in the stove, that time will come sooner or later...
 
stoveguy2esw said:
step top reburn grate
Mike, these are interesting words you used referring to, I believe, the secondary air manifold. Can you explain, please?

I let the Morso cool down today, and cleaned and recemented the infamous front gap, trying to work it more into the gap this time. Not having secondary burn in the back of the stove was driving me nuts! And not that it;s fired up again, I can say with certainty that the stove burns hotter with the gap sealed. Is that a 'no, duh' ?
 
i didnt really know what to call it , the grate in the top of the unit with the seondaty holes in it appears to be serrated with the holes oriented to "blow" forward ( i know the air is sucked through them but...) kinda looks like steps from underneath. so thats why i called it a step top. as it looks like steps in the phote (reinterating that im not familiar with that model lol)

EDIT: the section we refer to in our units as a manifold is the welded channels that supply air to the secondary tubes we use, they are welded into the back and sides of the firebox. we weld them out for 2 reasons, one, they will not warp and leak, and 2 they provide an extreme amount of structural integrity to the sides of the firebox, which should significantly lengthen the lifespan of the unit. as well as help protect from warpage in the event of overfire. your units manufacturer and its manual may use different terminology than we do so im sure linguistic differences would be expected between models.
 
BG, the tag ends on my showroom floor castine are loose. There is about a half inch sticking out, and can be wiggled in and out. So its not the heat causing this, its the way there put together. I would think some black rutland gasket cement and a screwdriver would fix the problem.
 
precaud,

You've convinced me to re-cement my front edge even though my reburn seems to be OK. Who knows, maybe it will improve and I don't know what I'm missing! It can't hurt.

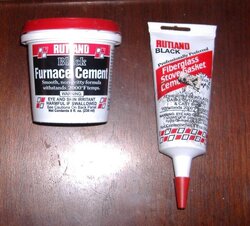
Which product do you recommend? I believe the "furnace cement" in the small tub is what I used before, but it dried, cracked and fell out after a few fires. I also have that tube of "stove gasket cement" which someone suggested might be more lasting as it has some fiberglass in it? Both were kinda messy to try and force up in the seam.
 

Attachments

  • cement.jpg
    cement.jpg
    91.7 KB · Views: 211
Wahoo,
Either of those products will work fine, they're essentially identical. The squeeze tube might be helpful in applying it.

The first time I did mine, I don't think I did it correctly. This time I:
: Let the stove cool completely
: Removed all the old cement, wirebrushed and thoroughly cleaned the whole area
: Masked off the front holes
: Moistened the area with water and a small paintbrush. The moisture really helps the stuff adhere.

Then I squeezed the cement in, worked it into the gap with a finger, and smoothed the surface. And then let it cure for a couple hours before firing it up. No signs of cracking so far.

Let us know how yours goes. You should see a more lively fire in the firebox, more heat thrown out the front glass, and lower stack temps. All signs of a more efficient burn...
 
precaud said:
Wahoo,
Either of those products will work fine, they're essentially identical. The squeeze tube might be helpful in applying it.

The first time I did mine, I don't think I did it correctly. This time I:
: Let the stove cool completely
: Removed all the old cement, wirebrushed and thoroughly cleaned the whole area
: Masked off the front holes
: Moistened the area with water and a small paintbrush. The moisture really helps the stuff adhere.

Then I squeezed the cement in, worked it into the gap with a finger, and smoothed the surface. And then let it cure for a couple hours before firing it up. No signs of cracking so far.

Let us know how yours goes. You should see a more lively fire in the firebox, more heat thrown out the front glass, and lower stack temps. All signs of a more efficient burn...

you know , i cant see how big the gap is from here , but if the stuff is falling out , could you layer in some rock wool , or somthiing to help hold it together? just a thought
 
stoveguy2esw said:
you know , i cant see how big the gap is from here , but if the stuff is falling out , could you layer in some rock wool , or somthiing to help hold it together? just a thought
Yeah, that crossed my mind too, but then I thought, how much will that help if the cement isn't adhering to the surface well? I dunno.
 
MountainStoveGuy said:
BG, the tag ends on my showroom floor castine are loose. There is about a half inch sticking out, and can be wiggled in and out. So its not the heat causing this, its the way there put together. I would think some black rutland gasket cement and a screwdriver would fix the problem.

Right you are MSG. This is where I am having the problem. I have had as much as 2" hanging out at times. Can try some gasket cement, though the user really shouldn't have to do this. They need a small shoulder on the manifold or the manifold ledge to prevent this from happening. Minor point, I suppose. I haven't seen any major burning change when I poke the gasket back in with a flat blade.
 
BeGreen said:
Right you are MSG. This is where I am having the problem. I have had as much as 2" hanging out at times. Can try some gasket cement, though the user really shouldn't have to do this. They need a small shoulder on the manifold or the manifold ledge to prevent this from happening. Minor point, I suppose. I haven't seen any major burning change when I poke the gasket back in with a flat blade.
BG, may I point out.. if it's loose enough that you can move the gasket in and out, it's definitely leaking air...
 
i pulled the baffle out to check out the way it works. and it does appear if that gasket is no in there it will pull hot air from the firbox, not the maifold if it leaks. I dont know what effecit this would have, but when i pulled the baffle out and re seated the gasket it didnt move. Granted, you should not have to make these kind of adjustments, but if it were me, i would just pack some more gasket in there.
 
Status
Not open for further replies.