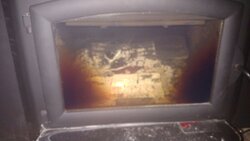
I can see what the controls do now. Yes on this build I did close one side and the flame went to the rear of the stove. I closed the right and opened the left and the flames perked up in the front. I built the fire with out the help from the shotgun hole. I can see letting the burn go down to ashes and I'm going to do that with some practice. Thanks all!
Buck stove shot gun control
- Thread starter Crank shaft
- Start date
-
Active since 1995, Hearth.com is THE place on the internet for free information and advice about wood stoves, pellet stoves and other energy saving equipment.
We strive to provide opinions, articles, discussions and history related to Hearth Products and in a more general sense, energy issues.
We promote the EFFICIENT, RESPONSIBLE, CLEAN and SAFE use of all fuels, whether renewable or fossil.
You are using an out of date browser. It may not display this or other websites correctly.
You should upgrade or use an alternative browser.
You should upgrade or use an alternative browser.
- Status
- Not open for further replies.
Just that cat is getting hot . I have had it up to about 1600 degrees. I could see the cat was red looking above the shield. That's what ruined me and that's when I discover this site...I got real nervous at that point. That's when I asked the question about the ghost flames at the top of the stove. I don't know if I suffered damage to the cat at that point. I have truly learned alot from everyone here! I'm really glad to be apart of this site. Its hard for me to answer everyone but I just want to say I have read every post and will continue. Thank you for all of the adviceWhat do you think is getting too hot, the stove, the liner or the cat? Have you got a stove meter? I have one on the front of the stove next to the bypass rod, about where I think the top of the fire box intersects the front of the stove. I estimate that if I could get a meter flat on the stove top, it might read maybe a couple hundred degrees hotter than the readings I'm getting on the front of the stove. I have seen up to 550 on the front of the stove in the past when it was running hot but now that I have better control of the air, it might hit 500, max. I don't have a flue meter but I can tell when the liner is getting hot (when I have too much flame in the box at startup) because I will hear the liner expanding at the flue collar, making a sharp popping sound, distinct from the normal "stove heating up" sounds.
View attachment 186768
 I'll post this weekend and let you know how it goes!
Woody Stover
Minister of Fire
When I was loading at 12 hrs, the stove had often cooled to where that cat thermo was showing 400 or less, so you have to get it back up before it will light off. The manual says 700-900...I had better luck at 900 or more. I want the cat to light off as quickly as possible once I shut the bypass. I usually got the stove back up to temp by burning a few smaller splits in the front of the fire box, then loading the box full once I was up to temp (using the loading method I laid out in posts #40 and #68.) If you load full but have a long way to go to get up to temp, you are most likely going to have too much of that big load gassing by the time you get up to temp. Anyway, after loading full, yes I would leave the bypass open a while, get that new load burning with some flame, and get the cat meter up to about 1000. Then I would close the bypass and light the cat.Am I supposed to leave the bypass open awhile after reloading?
Now, some other 91 users reported in other threads that they closed the bypass much earlier, like 600 degrees. They must have really had big flame in the box for the cat to light with only 600 on the probe...I didn't have much luck, with my more moderate fires, until I got to 900 or better.
You probably didn't hurt the cat, but yeah, I generally like the cat to be 1000-1500. How much wood you have gassing is going to determine how active the cat gets. You need enough wood gassing for the cat to light, but don't go overboard and get the entire load gassing, or the cat temp is going to go high. When the cat went high on me, it was hard to slow it down without opening the bypass and stopping it from burning. It may be that with your different stove and air controls, you will be able to slow the cat down just using you controls.Just that cat is getting hot . I have had it up to about 1600 degrees.....I don't know if I suffered damage to the cat at that point....I'll post this weekend and let you know how it goes!
Have fun, and let us know how it goes this weekend.

Woody Stover
Minister of Fire
Ok, only had 1 chilly day to build a fire. I think it went really well. I started with the tunnel and now I see how easy it is to build a fire. I did play with the controls and yes the right controls the rear and the left controls the front. I did put to large of a log in via as bad just about killed the fire. Today I went outside and made some small split's. I live in Cleveland Ohio and it's 70 degrees outside now. Go figure. New stove and warm weather. Can you tell me how to attach pics?Hopefully, you can find the time to take and post some pics!

Picture posting tips:
https://www.hearth.com/talk/threads/putting-images-into-your-forums-posts.87212/
https://www.hearth.com/talk/threads/putting-images-into-your-forums-posts.87212/
Woody Stover
Minister of Fire
[I mostly make splits that are medium (6" on a side) and med-small (4".) Those sizes seems to work pretty well in my cat stoves. With bigger splits you might have to get them burning more, then leave your final air setting more open, since they gas slower. If I had a tube stove I would probably split bigger since you can't cut the air down as far and you don't want the stove to take off, as it might with smaller splits.I did put to large of a log in via as bad just about killed the fire. Today I went outside and made some small split's.
Yeah, only one burn here so far. I know you want to play with your new stove...I would too.it's 70 degrees outside now. Go figure. New stove and warm weather.
 But now that you have the air controls figured out, you are well on your way to being in control of your burns. Be patient, save your wood.
I'm running Windows 10. I load pics from my point-and-shoot camera (resolution set at 2 or 3 megapixels) to my computer, saving them in the Pictures folder, in my Stoves or Wood folder, what-have-you. When I want to post a pic, I find the picture, then hold down a left-click to drag and copy it into the reply box where I'm writing my post. Then I select "thumbnail" so it doesn't hog space in the thread. I have a mid-grade smartie phone but I don't think it takes as good of pics as my camera, so I haven't messed with learning how to manipulate and save pics with the phone yet.Can you tell me how to attach pics?
Woody Stover
Minister of Fire
Loading E-W will burn slower than N-S as a rule, but using more back air may get a quicker E-W burn, if that's the only way your wood will fit. I usually burn pretty slow. As long as the cat is working with no smoke out of the stack, I'm happy.it's going. Seems like a slow burn
You can hit the edit button in the lower left corner of your post, hold down a left-click to highlight one of the pics (attachments) then hit delete on your keyboard. Or put the cursor after the pic you want to remove, and use 'backspace' on the keyboard.Sorry some how I posted it twice!
Excellent, I'll have to try the N-S method, I have various sizes of wood. Weather is supposed to start getting cooler after today. Thank you!Loading E-W will burn slower than N-S as a rule, but using more back air may get a quicker E-W burn, if that's the only way your wood will fit. I usually burn pretty slow. As long as the cat is working with no smoke out of the stack, I'm happy.
You can hit the edit button in the lower left corner of your post, hold down a left-click to highlight one of the pics (attachments) then hit delete on your keyboard. Or put the cursor after the pic you want to remove, and use 'backspace' on the keyboard.
Handsonautotech
Burning Hunk
Looks like a 91 in the vid that JA600L posted, so no help with the 80 air controls there.
It's possible that you talked to an customer service person that didn't have a full understanding of the controls on your particular stove. I've had good luck talking to Buck, but it wasn't about air controls. Call back and tell them you still don't understand exactly what they do, and ask specifically what each air control feeds. And ask how they should be used, from startup through final settings. Running the stove on only shotgun air, and not the air wash, doesn't sound right to me.
Right, but they still don't tell you too much about how to use the controls. I use a small amount of shotgun (doghouse) air at the beginning to fan the base of my starter pile that I burn down to make a coal bed and raise stove temp for the cat light-off.
Hey, Colt.Nice that you could chime in with first-hand experience of the 80. My guess is that the right control is the air wash, and the left control may go to a channel across the top of the firebox further back, like what the 91 has (I think the right slider on the 91 feeds both the air wash and the channel.) Unless the left and right controls on the 80 do different things, two wouldn't be necessary. I just happened to be working on the 91 yesterday....and accidentally got a pic of rear air channel across the top of the box:
View attachment 186488
Is that a stove that fell through a floor?
Woody Stover
Minister of Fire
No, but it will go thru the roof if you don't maintain control.Is that a stove that fell through a floor?
 Actually, what I'm doing there is lowering the cast iron cat frame.
The holes in the top?Is that a stove that fell through a floor?
I thought I would get some practice before reposting. I took everyone's advice and rolled it into one. I have the feel of the controls and see how they work. I even pulled the shield and saw the upper vents. So far so good. Only problem I have is my overnight burns. I always have a log or part of a log left over in the morning. Normal? I have expiramented (spelling) with various types of wood and have the same results. Can someone post a pic on how a firebox should be loaded for a overnight burn. I did try E-W and N-S stacking the logs for faster coals. (Works great) I did find part of my problem was the shot gun hole. The valve was to loose and it caused a major air leak. ( Uncontrollable burn) I know all of this was posted to help me out and I thank everyone for me taking the time to teach me how to run this beast.
Woody Stover
Minister of Fire
I always loaded the 91 N-S. I didn't have independent control of the air wash and rear channel like you do, though; The right slider feeds both the air wash and channel at the same time. I would load a couple soft Maple splits against the walls on either side, figuring that they would burn faster at the end, and leave no unburned wood, like I might have with a large Oak split there. You could also put some smaller splits against the side walls, if that's where your unburned wood is. In any case, I never had much unburned wood, just like maybe part of a split. If I did have that partial split left over, I would use it along with a couple other small splits when getting the stove temp back up before re-loading.Only problem I have is my overnight burns. I always have a log or part of a log left over in the morning. Normal? I have expiramented (spelling) with various types of wood and have the same results.
What are your final air settings for an overnight burn? I.E. how much air wash vs. how much channel air? Have you varied those final setting for the overnight burn, but still have wood left? How much wood is left?
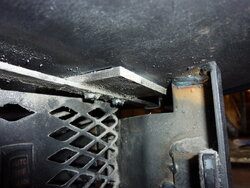
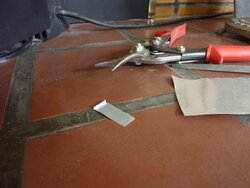
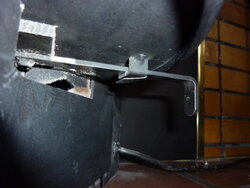
My right slider rod has two plates on it, each one covers an air hole. I tweaked the rod up with a shim to pull the plate on one side up a little closer to the hole. I didn't close it off completely, just matched it up closer to the gap that the plate on the other side had when closed.I did find part of my problem was the shot gun hole. The valve was to loose and it caused a major air leak. ( Uncontrollable burn)
In the first pic you can see the original gap of the right plate when the slider was all the way in. The shim I made lifted the rod and plate slightly, closing the gap a bit, but not all the way. I didn't want to overdo it to where the cat would crash if someone closed the air all the way.
Last edited:
Excellent idea! I'm still a little weary on over night burns, just worried about what the cat may do. I put 2 split's in E-W and set both air controls about 1/8 of the way opened from the closed position. I will try N-S loading tonight and post the outcome. Thank you!I always loaded the 91 N-S. I didn't have independent control of the air wash and rear channel like you do, though; The right slider feeds both the air wash and channel at the same time. I would load a couple soft Maple splits against the walls on either side, figuring that they would burn faster at the end, and leave no unburned wood, like I might have with a large Oak split there. You could also put some smaller splits against the side walls, if that's where your unburned wood is. In any case, I never had much unburned wood, just like maybe part of a split. If I did have that partial split left over, I would use it along with a couple other small splits when getting the stove temp back up before re-loading.
What are your final air settings for an overnight burn? I.E. how much air wash vs. how much channel air? Have you varied those final setting for the overnight burn, but still have wood left? How much wood is left?My right slider rod has two plates on it, each one covers an air hole. I tweaked the rod up with a shim to pull the plate on one side up a little closer to the hole. I didn't close it off completely, just matched it up closer to the gap that the plate on the other side had when closed.
In the first pic you can see the original gap of the right plate when the slider was all the way in. The shim I made lifted the rod slightly, closing the gap a bit, but not all the way. I didn't want to overdo it to where the cat would crash if someone closed the air all the way.
View attachment 187743 View attachment 187744 View attachment 187745
Woody Stover
Minister of Fire
What has the cat probe shown when you have loaded up, cut the air, and let 'er cruise? I'm happy when I see 1500 or below. When it would push over 1600 or higher, I would slow it down. Now that you have better control over the air entering the stove, you'll hopefully have control over how hot the cat burns as well. With your independent controls over the air wash, shotgun and channel, I think you should be able to find settings that will keep the load burning until all the wood is gone. I would enjoy running your stove to see how different it is from the 91.I'm still a little weary on over night burns, just worried about what the cat may do.

It seems to sit at between 1000 and 1600. Stacking the wood N-S seemed to really help. I will give it a fee days and repost to let you know how it goes. I live north eastern Ohio if you want to come over and practices. Lol
What has the cat probe shown when you have loaded up, cut the air, and let 'er cruise? I'm happy when I see 1500 or below. When it would push over 1600 or higher, I would slow it down. Now that you have better control over the air entering the stove, you'll hopefully have control over how hot the cat burns as well. With your independent controls over the air wash, shotgun and channel, I think you should be able to find settings that will keep the load burning until all the wood is gone. I would enjoy running your stove to see how different it is from the 91.
How much wood do you put in your stove when you reload? I just cover the bottom. Is this correct?
Woody Stover
Minister of Fire
Are you burning 24/7, or starting a fire in a cold stove in the evening, or what?How much wood do you put in your stove when you reload? I just cover the bottom. Is this correct?
Once winter arrived, I was burning the 91 24/7, two loads a day. I loaded as much wood as I could get in the box. That's where controlling the burn/gassing after the reload comes into play. Look at the linked posts again where I explain how I got a cold stove back up to temp, and how I kept from gassing too much wood when loading the box full. In a nutshell, I would burn a few smaller splits E-W in the front to get stove temp up and create some coals to work with. If I had a ton of coals still in the stove, I would pull them forward and open the air wash to get them glowing, and helping to heat the box up, while burning the coals down to make more room in the box. Then when the cat probe was showing 700-900, I would pull the coals to the center, N-S, and load the box N-S, loading the wood on the sides with no coals underneath. Then I would use shotgun air to get the center of the load burning. If you give a lot of air wash at this point, the fire will spread wide and get a lot of wood gassing....that's when the cat can go high. When temp recovered from having the door open when loading, I then closed the bypass and added a little air wash to keep some flame going in the box, to launch the cat. Once the cat got going well (either glowing, or cat temp rising quickly) I cut the shotgun and set the air wash where I wanted to run the stove.
I know it sounds complicated, and @coltfever probably rolls his eyes when he reads my long-winded descriptions, but you will get the hang of it as you play with the stove and try different things. Colt has a good idea about running both stoves, maybe there are notable differences running the 80 vs. the 91. I'd like to hear his take on these stoves. Also, it's quite possible I may be too picky and too much of a control freak when I run a stove.

Keep playing with partial loads on the weekends, gradually increasing the size of the loads as you learn how to control the variables.
That would be a lot of fun, but I try to avoid going any further north at this time of year!I live north eastern Ohio if you want to come over and practices. Lol

https://www.hearth.com/talk/threads/buck-stove-shot-gun-control.157184/page-3#post-2110580
https://www.hearth.com/talk/threads/buck-stove-shot-gun-control.157184/page-4#post-2110931
You can see here how I've mainly got this fresh N-S load burning in the center, and the sides won't get involved until later in the burn. This is how I control the amount of wood gassing, and consequently the cat temp.
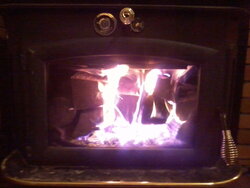
Now I see exactly what you are talking about. I try to keep a fire going and keep the furnace from coming on. I did what you said and had some really nice embers to get the fire going in the morning. I loaded E-W yesterday and found it hard to control the fire just like you pointed out with the out gassing. Thank you! I will practice. Are you afraid to go to bed with that much wood in the fire box?
Woody Stover
Minister of Fire
I bought the 91 used, and had it at my MIL's house. I would usually just load twice a day so I would put in a full load, get 'er cruising, and leave. With the marker on the cat probe, I could tell how high the cat had gone during the previous burn when I got back to reload. Once I got the hang of the stove, and got better control of the air going into the stove, it seemed to be running the way I wanted it to and I wasn't concerned when leaving with a full load in the stove. You have the advantage of being there, trying different things, and noting the results, so I think you will get comfortable with it quicker than I did.Are you afraid to go to bed with that much wood in the fire box?
The only time I would be worried would be if I were to load the box full with small splits. Then it's conceivable that you would get too much wood gassing. But I have a range of split sizes so I always have some bigger ones in there, and the bigger ones burn in a more controlled, even manner. You can see in the above pic that I had some smaller ones in the middle, on the coals, to kick off the burn and light the cat. Then I had some larger ones to the sides, with no coals under them. They don't really get going until later in the burn.
Every stove and every setup is different, so with time you'll find what works for you in your situation. Keep us updated.

Thank you Woody, I see what you mean about smaller split's. And the difference in woods. My old Lopi liked beech, maple, and oak but hated to burn cherry,this stove seems to burn the cherry slower and the rest real quick. I put 4 small peices of ash on the bottom and over heated the cat. The thing that was weird is that i shut down all of the air inlets and the fire didn't care. It still seemed to blaze away. I opened the bypass and kicked the blower up to high to cool it down. I really did get nervous on that one. Lol
- Status
- Not open for further replies.
Similar threads
- Replies
- 1
- Views
- 888
- Replies
- 32
- Views
- 3K
- Replies
- 3
- Views
- 903
- Replies
- 25
- Views
- 955


