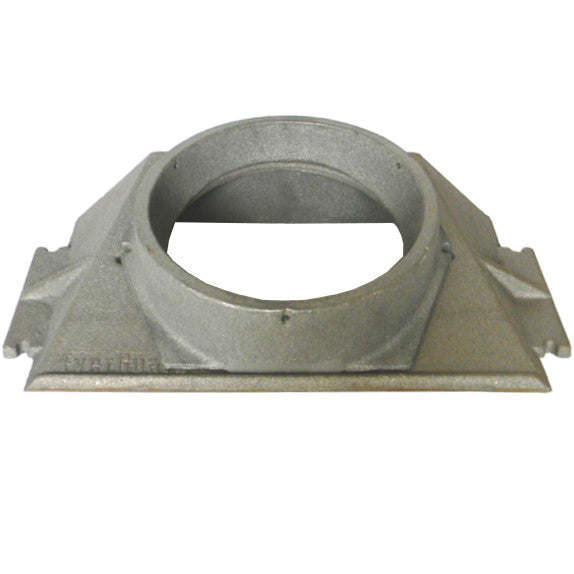
Buck Stove 27000 Installation

  • Active since 1995, Hearth.com is THE place on the internet for free information and advice about wood stoves, pellet stoves and other energy saving equipment.

    We strive to provide opinions, articles, discussions and history related to Hearth Products and in a more general sense, energy issues.

    We promote the EFFICIENT, RESPONSIBLE, CLEAN and SAFE use of all fuels, whether renewable or fossil.
  • Hope everyone has a wonderful and warm Thanksgiving!
  • Super Cedar firestarters 30% discount Use code Hearth2024 Click here

Zdavis89

New Member
Jan 3, 2024
3
Oakland, Tn
Hello, new to the forum. I have inherited an old buck stove 27000 insert from my childhood neighbors. They were the original owners of the unit and used it as a slammer. She made a post on fb asking if anyone wanted this stove and of course the week prior to seeing this, I’ve was really wanting to do a wood stove insert to help supplement our heat pump during those cold nights. Now the unit would fit in my fireplace but with only an inch or so to spare between top of fireplace opening and the top of insert. I need an idea on how to get a smoke stack installed on this unit and secured to liner with minimal to almost no room at all. I just don’t see how it’s possible. Is there a way to install through the damper? Am I wasting my time? Should I just save for a newer unit?

[Hearth.com] Buck Stove 27000 Installation [Hearth.com] Buck Stove 27000 Installation [Hearth.com] Buck Stove 27000 Installation
 
That boot adapter will require you to drill and tap to screw it down, not a fun job if you don't have the right tools.

I would pass on that unit since you will have to get 8" liner on top of everything else. If you get a newer unit you can use 6" liner.

When I did mine years ago I busted out the brick on the back side of my exterior chimney and installed a large cleanout door so I could access the insert while it was in the fireplace to hook up the liner.
 
The dimensions for the smoke stack is 15”x4 1/2” rectangular opening. Opening on insert is 14”x 3 1/2”
The boot ID is 14.75" wide x 9.25" deep x 5" tall. I agree with Mellow. A modern insert is going to take a less expensive 6" liner which should be insulated.
 
The boot ID is 14.75" wide x 9.25" deep x 5" tall. I agree with Mellow. A modern insert is going to take a less expensive 6" liner which should be insulated.
$100-$200 difference in liner price vs me shelling out another $3k for an insert. Trying to utilize this one. Spent $2600 on fireplace work last year already. Ive read 6” newer inserts are fine with larger 8” liners so when I upgrade , shouldn’t be an issue .
 
$100-$200 difference in liner price vs me shelling out another $3k for an insert. Trying to utilize this one. Spent $2600 on fireplace work last year already. Ive read 6” newer inserts are fine with larger 8” liners so when I upgrade , shouldn’t be an issue .
Not true at all in many cases. Many new inserts won't run well on 8"
 
I'm working through something like that right now. I'm waiting for my 8" insulated liner to arrive and this is my plan that will require an extra person.
1) Drop the liner down the chimney, have that one person secure it or hold it.
2) use a dab of stove cement to keep the gasket attached to the bottom of the buck stack.
3) attach/mount stack to the appliance connector and attach to the liner. Secure everything and double check.
4) lift the liner to approximate height
5) push the stove in and get to approximately where you want it.
6) go through the stove and looking though the stack opening start fishing for the stack with magnet/long pick or coat hanger.
7) bring stack to the opening and pull it in and attach with provided T brackets.

Once stack/liner is secured to the stove you can finish pushing stove back all the way and adjusting as needed since the liner is flexible. Top person will have to adjust a little and cut the liner to length at the top.
The problem is I have never worked on a fireplace that had enough room for that big adapter buck makes to fit in there straight
 
I see. I do have to remove part (or maybe a whole) smoke shelf out of my fireplace.
In most cases there is simply no way it will fit. Old bucks are a real pita to install. Then you need to pull them out to work on the stupid rear fan
 
In most cases there is simply no way it will fit. Old bucks are a real pita to install. Then you need to pull them out to work on the stupid rear fan
I'm going to replace my fan and also replace wiring with new thermocouples so I don't have to get tin there for a while..... I hope.
The plan sounds really good in my head. I really hope it's going to be as easy as it sounds ;)