I'm Through the Wall! And the Roof! Woodstove install begins...

  • Active since 1995, Hearth.com is THE place on the internet for free information and advice about wood stoves, pellet stoves and other energy saving equipment.

    We strive to provide opinions, articles, discussions and history related to Hearth Products and in a more general sense, energy issues.

    We promote the EFFICIENT, RESPONSIBLE, CLEAN and SAFE use of all fuels, whether renewable or fossil.
Status
Not open for further replies.

Jonsered

Member
Feb 7, 2010
120
Woodstock CT
Hello Everyone,

I have been shopping for a small stove for my two story cabin built on a slab of concrete. I was looking at Jotul 602 as well as F100 but could not find one that lasted long enough on craigslist for me to purchase. If they did last long enough they were out of my price range. I finally stumbled across a nice little "Energy Harvesters" stove and after reading the add I did some searching online and found that a few people on this forum have them and I find them very neat.

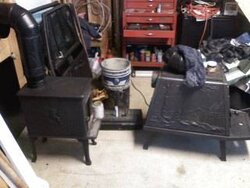
I picked up my Harvester from an elderly gentleman in my area for $190.00. The man I purchased it from had fully disassembled the stove and rebuilt it replacing all gaskets etc. The stove had some slight surface rusting giving it a orange tint but besides that it was in terrific shape. The inside looked like it had not seen much use at all!

After much debate and weighing to pros and cons between a single Flu masonry chimney I decided to go with a stainless steel "Type A" chimney. One of the major benefits of this style chimney compared to a small exterior masonry chimney is the danger of cracking the masonry when starting a fire when the chimney is cold is eliminated. Since this is a cabin and many fires will be started in the winter when the chimney is ice cold this is a somewhat major factor in the decision.

I started planning my chimney and unfortunately I have to go through my wall and then through the roof where it overhangs the side of my building...I was hoping to get away with only 1 wall framing penetration.

So I went with the Lowes 6 inch insulated stainless chimney system but I do not have enough money to buy it all at once so I started with the through the wall kit and a few sections of chimney (1 36 inch and 2 12 inch sections).

Here you can see that I trimmed out around the thimble and I ran vertical trim due to the uneven surface which the cedar shakes offer for fastening the galvanized chimney support to the wall. It took a little longer to plan out and prepare but the mounting was a piece of cake once the trim was finished.

Outside.jpg


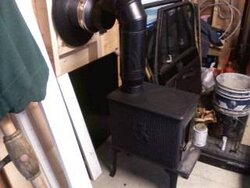
This is how the interior looks like once the thimble was finished and 12inches of insulated pipe came in through the wall from the chimney T...you can also see the reducer/adapter to standard stove pipe
Thimble.jpg
 
You can see that when I first came through the wall it was only an opening the size of the galvanized thimble...
0220001540.jpg


Once I marked out the dimensions which would keep the center of the trim on the center of the wall studs so that the chimney support would bolt into studs, I cut the vertical channels...
0221001538.jpg


Here is a picture of the framing and drip edge etc that I put up to weather proof the opening where the thimble comes out of the exterior wall.
0221001741.jpg


And here is the stove after I brought it home but it still had some visible surface rust as you can see by the orange tint
0209002010.jpg


I was very happy with the results after applying the stove polish...
0212002229.jpg


0219001851.jpg
 
Sounds like you are getting things together. This is only the second one of those stoves I've seen and I don't remember where I saw the first one except it was in someone's home. I hope it works out well for you.
 
Today I picked up a 5inch to 6 inch adapter so I was able to complete the interior setup. I also picked up a 12 inch section of insulated chimney pipe to go below the T and act as the clean out area for the creosote I hope I don't build up ; ). I don't have enough money to buy the entire exterior chimney in one swoop so I am going to buy the 36 inch chimney pipes as I can afford them and then get the through the roof kit once I get up to it (probably about 3 more sections first).

0227001914a.jpg
 
Backwoods Savage said:
Sounds like you are getting things together. This is only the second one of those stoves I've seen and I don't remember where I saw the first one except it was in someone's home. I hope it works out well for you.

Thanks man...I have not seen many of these stoves either, in fact the first one I saw was on this forum because I found the add on the internet for the stove so I did some searching and it brought me to this forum and some pics/posts about the stoves. I doubt too many of these stoves made it out of new England since the company was located here and was not around for too long.

Nate
 
Congrats on getting it done yourself. Looks good so far.
Don't forget to caulk along the vertical edges of your white trim boards where they meet the shingles.
Also, if the tail end of the those long pieces don't lap over the shingles, slip some flashing up behind them to shed water back onto the shingle surface below.
Good luck with the rest of the work.
 
elmoleaf said:
Congrats on getting it done yourself. Looks good so far.
Don't forget to caulk along the vertical edges of your white trim boards where they meet the shingles.
Also, if the tail end of the those long pieces don't lap over the shingles, slip some flashing up behind them to shed water back onto the shingle surface below.
Good luck with the rest of the work.

Thanks man...there is plenty more left for sure.

I only put in four of the eight bolts on the chimney mounting bracket...I have to pull everything back off because I am going to put another piece of trim horizontally like the upper horizontal piece. When I do that I am going to put a piece of drip edge under each of the vertical trim boards to protect the shingles because as you stated, the trim is sub flush to the shingles. I will also put in a drip edge under the lower horizontal trim board to protect the center shingles. This should be pretty weather proof by the time it is finished.

One observation I made about the chimney mounting setup is that it does create a splash situation because any rain or water shed from the roof will land on the flat chimney mount and splash on the wall...I hate splash!
 
Here are some updated pics...I now have drip edge installed over all necessary spots and I finished up the clear silicone so the entire mounting setup is officially weatherproof...time to go vertical!

wall2.jpg


wall3.jpg


wall1.jpg
 
Getting there. The top trim board looks a little close, but maybe not. Could just be the camera angle. Is the upper white trim board 2" away from the snout of the tee?
 
Argh I'm jealous. I'm still waiting for the township to approve mine.

I also really like those stoves, I keep wanting to buy one simply for the art value and ram it in the far too small fireplace.
 
I am seriously thinking about getting a Jotul 602 simply for the top exhaust feature...I found one local which I am working on and if it works out then I may have an Energy Harvesters for sale : (

I have come to the realistic conclusion that I probably will not be able to find a top exhaust energy harvesters for a reasonable price...I need to scoot the stove closer to the wall and cut down on the amount of direction changes which the rear exhaust is causing in my stove pipe setup.
 
Have to admit that having 3 - 90s before going vertical is not going to help draft. How tall will the flue be outside?
 
oh god don't tempt me
 
BeGreen said:
Have to admit that having 3 - 90s before going vertical is not going to help draft. How tall will the flue be outside?

I should have about 20 feet of vertical chimney outside
 
That's not bad. At least you have a fighting chance.
 
Based on the pictures, I have a couple of questions/comments:

1. The stove looks really classy, but small. What size dwelling are you anticipating heating, with it?
2. I've heard some folks say that the more 90º angles you have, the more the potential for Flue burnouts
in those angles, over time. I don't know how valid that is, but I'm concerned for you, with the number
of angles I see there.
3. The framing looks like you've put lots of thought into this, and they look well made.

I'm certainly no "expert" nor do I have more than one season of burning under my belt, so my observations/questions should be taken with a grain of salt.

-Soupy1957
 
I think I'll have ample draft (wont ever know until its burnt) but I would feel a lot better eliminating one of the 90s but using a top exhaust stove. I really love the Energy Harvesters but the current stove pipe setup in the house leaves something to be desired.
 
soupy1957 said:
Based on the pictures, I have a couple of questions/comments:

1. The stove looks really classy, but small. What size dwelling are you anticipating heating, with it?
2. I've heard some folks say that the more 90º angles you have, the more the potential for Flue burnouts
in those angles, over time. I don't know how valid that is, but I'm concerned for you, with the number
of angles I see there.
3. The framing looks like you've put lots of thought into this, and they look well made.

I'm certainly no "expert" nor do I have more than one season of burning under my belt, so my observations/questions should be taken with a grain of salt.

-Soupy1957

Soupy,

Good to hear from another CT resident! I have some responses to your comments/questions below.

1. The stove is small and so is the dwelling...It is a small 2 story cottage built on a private CT lake and is only 15x16 per story so ca. 500 square feet. The stove may actually be too big for the building as far as heat output.
2. I am certainly looking for alternates to the current amount of 90 angles but even if they did burn out over time its simply 6" stove pipe and the entire setup from the stove to the chimney is probably only about $30.00 so I could replace it every year if need be.
3. I did put a lot of thought and work into the framing so that the chimney would be as sturdy and weather proof as possible. The New England winters we see put anything outdoors to the test and I did not want to be working on this again any sooner than I had to. I was very close to building a masonry chimney instead but being as small as it would be and the expansion/contraction of a very small single flu chimney I thought it best to go with a stainless chimney where cracking and damage from frost would not be an issue.

Thanks for your comments!

Nate
 
I wonder how many people actually have problems with their stove pipe burning out, my stove pipe on my old stove was over 30 years old and it looked new when we replace the stove this past spring, if I could have I would have used it on the new stove but it was the wrong size.
 
Jonsered said:
I think I'll have ample draft (wont ever know until its burnt) but I would feel a lot better eliminating one of the 90s but using a top exhaust stove. I really love the Energy Harvesters but the current stove pipe setup in the house leaves something to be desired.

The 2 90s coming off the stove could be replaced by a pair of 45's. Set the stove sideways to reduce protrusion into the room. If proper wall shielding is used, 1" air gap behind it, and 1" open at top and bottom, then the stove could be as close as 18" to the wall.
 
It's only 90s, 15s and 30s which are approved nowadays. (And you're not allowed to combine a 15 and a 30).

I only know because I wanted to use 45s in my setup and ended up submitting plans slightly moved around with 30s.
 
the 15/30 degree elbow rule only applies to the class A pipe, not the connector pipe.
 
BeGreen said:
the 15/30 degree elbow rule only applies to the class A pipe, not the connector pipe.

Learn something new every day!
 
Picked up my craigs list Jotul 602 last night!!!!!!!! It is going to be much better suited with the top exhaust option and the overall size considering the small building it will be in (2 story cottage 15 x 15 per story).

I am VERY excited about it.
 

Attachments

  • New Jotul 2.jpg
    New Jotul 2.jpg
    12.7 KB · Views: 527
  • New Jotul.jpg
    New Jotul.jpg
    12.2 KB · Views: 535
Status
Not open for further replies.