Insulating 18th century stone house

  • Active since 1995, Hearth.com is THE place on the internet for free information and advice about wood stoves, pellet stoves and other energy saving equipment.

    We strive to provide opinions, articles, discussions and history related to Hearth Products and in a more general sense, energy issues.

    We promote the EFFICIENT, RESPONSIBLE, CLEAN and SAFE use of all fuels, whether renewable or fossil.
  • Hope everyone has a wonderful and warm Thanksgiving!
  • Super Cedar firestarters 30% discount Use code Hearth2024 Click here
Status
Not open for further replies.

Ashful

Minister of Fire
Mar 7, 2012
20,075
Philadelphia
Carry-over from this year's BK thread:

The house is late 1700's with a couple of later additions. Yours? Even with the additions, our place is small, but drafty! Any recommendations on insulating the place? I read your thread on your outbuilding, but I'm more referring to the stone house. I have no intention of tearing the plaster down beyond the ceiling which I did on the main room to expose the wood joists and give the illusion of more space- the ceilings are only about 6'6". Love the house, but could do without the drafts. I am sure you understand.
Will answer later today!
 
Hi Ed,

So, my take on 18th century houses is a little different than I've treated the several 19th century houses in which I've lived. So few good houses were built prior to 1800, which haven't been messed up by one recent owner or another, that when one exists I always favor leaving it as original as possible. Also, I've seen problems with mold, from folks who try to insulate 18th century walls, due to the moisture that is constantly moving thru them. Remember, most houses built in the 18th century used mud for bedding mortar, and I'm not using the word "mud" as slang for portland or lime morter, it was literally mud dug up from the back yard. As a result, there's usually a lot of moisture pushing up thru those walls, looking for a way out to the super-dry interior of your heated home in winter.

For these reaons, my plaster-on-stone walls remain completely un-insulated. That's my price to pay for the unique experience of living in a historic house. My attic is (mostly) insulated, as that can be done easily enough without permanently messing up the house. Likewise, my barn was framed in and spray-foamed, knowing that this structure wasn't something anyone was going to return to original in the future.

This isn't all bad, I think. Those stone walls may make your home more expensive to heat in the shoulder seasons, when you need BTU's and others may not hear their boiler run at all. But when we get heat waves and polar vortexes, those massive stone walls are a fantastic buffer, knocking the peaks off those weather extremes. I suspect our heating requirements change very little year to year, following the average seasonal temperatures, indifferent to the number of heat waves of polar plunges we may experience in a given year.

So, what can be done without messing up those plaster walls? Storm windows and metal weather stripping on every window, for sure. Likewise, interlocking metal weather stripping on every door. Do what you can to minimize drafts, and don't sweat the radiant losses of those walls, too much!
 
  • Like
Reactions: Easy Livin’ 3000
We have a 1815, 4000 sq ft, brick National Register federal house.
When we bought it, a strong wind just blew the heat right out of it.
We've made no attempt to add insulation to the walls but the first job was to add high grade interior double pane storm windows to every window.
This shut down the drafts dramatically and left the original windows in place for cosmetic and aesthetic value.
We then spent a healthy sum on high insulation value, well sealed doors that were visually identical to the originals.
I then borrowed an IR camera and went after after the "low hanging fruit" of air leaks and heat loss areas.
This effort over a couple of years dropped our oil furnace consumption from 2000 galls to circa 750 galls.
The house still looks the same but is dramatically more thermally efficient.
It is important to realize that insulating these old houses is subject to the Law of Diminishing Returns.
It is going to be difficult to make further gains that are economic.

Ashful is correct that the thermal mass of the structure is a great buffer against thermal cycles such as polar vortices and heat waves.
Our heating requirements do tend to follow seasonal temperatures but with about a 1 month lag.
 
Last edited:
Thanks Ashful and Redbarn. And thanks Ashful for moving this off the BK thread, I know I was taking it off track.

I appreciate my neighbors' and old house brothers' encouraging words. The walls are indeed 18" thick mud mortar PA field stone, covered by stucco. The one upgrade the previous owners made to the house were the windows. They are modern and tight, so those are good (and I am grateful!). I'm working on getting the storm doors and doors weatherstripping up to snuff, should have that in hand shortly. The last items of relatively low hanging fruit are the attic, the cellar/crawlspace, and the cellar door.

The attic floor is insulated, but not well, and the whole floor is boarded over, so I'll need to pry them up and replace/augment whatever is there. I think the two biggest problems will be the perimeter where the joists meet the walls, and the stairway. Our stairway is stacked in the center of the house, so its a big uninsulated hole in the attic floor down to the doorway onto the second floor. I may make some lightweight insulated panels that we can drop into the opening at the top to seal this up during the winter, and that should be pretty easy.

I started working on the crawlspace when we had that cold spell recently because I could feel bad drafts coming in some spots. That required some excavation (it is tight down there!) and I used the Roxul at the rim joists as a temporary measure (I had lots left over from the recent chimney liner/block off plate install. I am strongly considering closed cell spray foam for the rim joist.

The cellar door was rotten when we moved in, and the retaining walls on either side of the stairs in bad shape. I fixed the retaining walls, but did not get the hatch door rebuilt and installed yet. Currently there is just a tarp over some boards to cover the opening in the ground. Once that is done and tight, it'll help the draft on the north-east side of the house

I may need to consult with some experts on the attic and cellar/crawlspace, I'm thinking at least the perimeters would benefit from some spray foam. Those cold drafts are highly motivating!
 
The attic floor is insulated, but not well, and the whole floor is boarded over, so I'll need to pry them up and replace/augment whatever is there.
You may be able to install packed cellulose without removing all the boards. This would provide air sealing and some thermal insulation though maybe not enough depending on your joist depth.
 
Last edited:
I cannot stress enough how cost effective it is to use a data driven approach to the problem of insulating an old house.
There is an entire industry devoted to separating you from your $$ with methods of "improving" the heat losses of an old house.
If external IR pictures are not feasible (although a Seek camera system is getting affordable),
then buy a $20 heat gun and make a map of each room and attic with the relative temperatures.
This can be tedious but it really identifies where the worst losses are.
Fixing or improving these gives a real gain quickly.
Some heat losses are just beyond economic repair, but if the easy losses are fixed first, the house comfort improves dramatically.
 
Instead of just a hatch door, could you cover the opening in the wall from the inside of the cellar, temporarily with sheet plastic?
 
I'm never in favor of spray foaming walls and ceilings of old houses, knowing the useful life of any insulation is short in comparison to the centuries these houses can stand, and spray foam is such a mess to remove. But, I am coming around on its use for sills and rims, where we're looking at small areas, and unrivaled performance benefits. I have plans to spray foam the sill plate area in the basement of our 1890's addition, when we get to renovating that part of the house.

Semipro beat me to it on the cellulose. Might be ideal for your attic floor.
 
I cannot stress enough how cost effective it is to use a data driven approach to the problem of insulating an old house.
There is an entire industry devoted to separating you from your $$ with methods of "improving" the heat losses of an old house.
If external IR pictures are not feasible (although a Seek camera system is getting affordable),
then buy a $20 heat gun and make a map of each room and attic with the relative temperatures.
This can be tedious but it really identifies where the worst losses are.
Fixing or improving these gives a real gain quickly.
Some heat losses are just beyond economic repair, but if the easy losses are fixed first, the house comfort improves dramatically.
+1 on this.
I'd also caution anyone using these sorts of diagnostics to be careful with interpretation.
An example: IR imagery shows that cold air is leaking in through an electrical outlet. You seal it up but have your really addressed the air leakage issue? Its likely that the air that was leaking in there just leaks in under the baseboard or around interior window trim instead. I believe you're chasing your tail addressing leaks inside unless interior wall coverings were installed to be airtight, which is unusual in the US. You're much better off going outside to find holes in the exterior air barrier. You may need to pressurize the house a bit to do this. Yes, this can be tougher to do but in the end I believe the return on your investment of time and money is higher.
I believe air leaks are better found with an IR camera from the exterior on a cold night. Thermal leaks (insulation) can be done from inside or out.
 
  • Like
Reactions: Redbarn
Instead of just a hatch door, could you cover the opening in the wall from the inside of the cellar, temporarily with sheet plastic?
Great idea, Velvetfoot! I didn't mention it before, but when it got down to 6 and windy the other night, I couldn't take the draft (the area in question is at the opposite end of the room from the stove, about 30' away), so we scrounged up an old shower curtain, and found some thin narrow boards, screwed them down to anchor the plastic, and did exactly as you suggested. We won't be using that door again until spring.
 
I have access to a FLIR and have used it extensively on the house.
I would also like to try a smoke test sometime where a smoke generator is used inside and the house is pressurized with a fan. You do this during the day and video the outside of the house to record where the smoke is exiting.
 
I'm never in favor of spray foaming walls and ceilings of old houses, knowing the useful life of any insulation is short in comparison to the centuries these houses can stand, and spray foam is such a mess to remove. But, I am coming around on its use for sills and rims, where we're looking at small areas, and unrivaled performance benefits. I have plans to spray foam the sill plate area in the basement of our 1890's addition, when we get to renovating that part of the house.

Semipro beat me to it on the cellulose. Might be ideal for your attic floor.
Yep, I feel the same way about the spray foam. The most recent addition of the house seems to date back to the mid-20th century, and that is where the worst air infiltration is at ground level in the crawl space, and most likely candidate for the spray foam. I saw a do it yourself kit at the HD (anyone have any experience with it?) that I might try. There really doesn't seem to be another option in that part of the house because of clearance, and the large iron pipes that carry the hot water to the radiators will be in the way for anything else. That part of the house is stick built, and certainly lacks the charms of the stone part, so I am less apprehensive to use it . We have not noticed infiltration in the stone portion of the house, where the cellar is, apart from the cellar door that I mentioned before.

I think the attic has something in it already, probably cellulose, but I am sure it has settled, I won't know until I pry up a board or two. Should there be a sheet of plastic over or under the cellulose between the joists when I get in there, or does moisture need to escape up?
 
I cannot stress enough how cost effective it is to use a data driven approach to the problem of insulating an old house.
There is an entire industry devoted to separating you from your $$ with methods of "improving" the heat losses of an old house.
If external IR pictures are not feasible (although a Seek camera system is getting affordable),
then buy a $20 heat gun and make a map of each room and attic with the relative temperatures.
This can be tedious but it really identifies where the worst losses are.
Fixing or improving these gives a real gain quickly.
Some heat losses are just beyond economic repair, but if the easy losses are fixed first, the house comfort improves dramatically.
I hear you loud and clear about being separated from my $$, Redbarn! So we will do it ourselves, and I guess we do enjoy challenges (even as they pile up). I have the heat gun, and have been using that some, but will do more. We even bought some incense to try to follow the drafts- low tech! We may eventually get an IR picture in the future. In the meantime, there are still plenty of opportunities that are very obvious that we can work on.
 
  • Like
Reactions: Redbarn
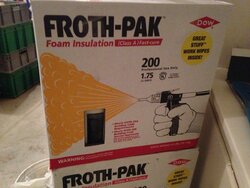
On the DIY foam kits, a pro who did a spray foam job for me used a portable kit on one part of the job. Essentially two cardboard boxes with disposable bottles in each, that reminded me of gas grill bottles, and a disposable hose and gun set. I was very impressed with this kit, and decided I'd use it myself for the sill job, when the time came. I will hunt down the info on it in the next day, to post here.
 
On the DIY foam kits, a pro who did a spray foam job for me used a portable kit on one part of the job. Essentially two cardboard boxes with disposable bottles in each, that reminded me of gas grill bottles, and a disposable hose and gun set. I was very impressed with this kit, and decided I'd use it myself for the sill job, when the time came. I will hunt down the info on it in the next day, to post here.
Yep, that's the one I saw. Look forward to seeing your thoughts.
 
Found it!

[Hearth.com] Insulating 18th century stone house
 
Thinking out loud here.... wondering if you could spray a relatively thin coat of foam on your stone walls and then apply board foam to that to create a nice flat surface and reduce overall costs.
Unless costs have decreased drastically applying foam using a Froth-Pak is quite a bit more expensive per R-value than foam board.
I like your idea, get the continuous air infiltration barrier with the froth, the extra R values, lower cost, and flat surface of the board. Any concern with the irregular space that is sure to be created as the froth expands before applying the board?
 
Not sure of the home depot stores by you guys but my local home depot is renting flir cameras now.

53 bucks for 4 hours
75 for the day
 
Thinking out loud here.... wondering if you could spray a relatively thin coat of foam on your stone walls and then apply board foam to that to create a nice flat surface and reduce overall costs.
I haven't done that. But what I have done is to cut foam board to loosely fit a joist bay, tack it in place, and then spray foam the perimeter for an air-tight fit.
 
Ed, where in SE PA are you? I have a FLIR.
 
Status
Not open for further replies.