Keystone rockin' mad heat!! (With pics.)

  • Active since 1995, Hearth.com is THE place on the internet for free information and advice about wood stoves, pellet stoves and other energy saving equipment.

    We strive to provide opinions, articles, discussions and history related to Hearth Products and in a more general sense, energy issues.

    We promote the EFFICIENT, RESPONSIBLE, CLEAN and SAFE use of all fuels, whether renewable or fossil.
Status
Not open for further replies.

Woody Stover

Minister of Fire
Dec 25, 2010
13,121
Southern IN
Well, that may be over-stating it a bit; It's a little early to say if the stove is tossing really nutty heat. Two nights ago, it got down to 30* here, and that'll be the coldest it gets for several days. It's doubtful weather I'll get a chance to see how the stove does when temps are low. Right now, I can engage the combustor, cut the air all the way back, and still maintain 70*. Loads easily go ten hours with plenty of coals left to re-load.
So, Keystone operators, what do you do when you need a lot of heat out of this stove? What about a fan to pull off more heat? I'm curious as to how others run the stove to get max heat out of it when needed.

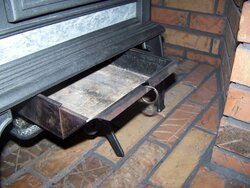
In case anyone is curious, here's how it went down:
Hearth install. I took out my old liner, a 6" rigid pipe snap-together stainless setup with two adjustable elbows at the bottom, top-venting the Dutchwest which sat back in the fireplace. The two-elbow setup resulted in two 80* turns, more or less.
For the new liner, I went with 16' of 6" Homesaver 304 heavy-duty roundflex, insulated with 1/2" Saf-T-Wrap, top plate, clamp, storm collar and chimney cap. A tee at the bottom rear-vents the Keystone, which has a 7-to-6" reducer on the flue collar. The liner is also supported at the bottom of the tee, so I'll have to move that to brush the chimney.
If you're contemplating applying insulation to a flex liner the long way, get someone to help you or grow a couple extra hands. :lol:
I enlisted the help of my nephew to pull the insulated liner, with tee attached, up through the exterior fireplace chimney which has a 13x13" O.D. clay liner. That went fairly smoothly, but the Roundflex + wrap is heavy. Then we proceeded to lift the 440# Keystone off the pallet and into position on the hearth. The old man still has a little bit of POWAH in reserve, if needed. :cheese: I found out that SS sheet metal screws don't work too well for connecting hard stainless pipe; It tends to shear the threads off the screws. I'll probably replace those at the end of the season with SS nuts and bolts.
Looking at the inside of the stove, I saw this:
Looks like the cement is a little sparse where the door side of the stove meets the back. There's probably some cement in that seam, but seeing this wasn't confidence-inspiring, nonetheless. I slapped a little more cement along the seam.

With the stove connected, I lit my first break-in fire later that night. The manual said to burn "a series of low to moderate fires." I happened to look at the Hearthstone manuals and they seemed to be more conservative, saying to shut down the stove when the stones were "warm to the touch, not hot." Well, I could only touch my stone for about a second. It was closer to hot than warm. Maybe Hearthstone has a different break-in procedure due to differences in construction, or maybe they want to make absolutely sure you don't get the stove too hot, seeing as how stone temp lags behind firebox temp...
I had to go to work, so I couldn't run my break-ins as quickly as I would have liked. Room temps were around 60* for a couple of nights, necessitating the application of another layer of clothing. :)
The low break-in fires really gunked up the glass, and I didn't want to burn the new stove hot enough to burn the black stuff off at this early stage. I ended up cleaning the glass with vinegar, as suggested by snowleopard in a thread I read. Worked well. Then after I got the combustor lit off, I got a cool-looking solid wavy sheet of flame all the way across the top of the glass. It was gorgeous to look at. I could get off to the side and see the peaks and valleys in this solid sheet. Problem was, it was sucking up the airwash; Below the flame, the glass got rather dirty again. Some of that may be due to wood that isn't as dry as it could be.
The combustor lights off almost instantly, which is nice. With the magnetic thermo that was included, so far I've gotten stovetop temps of 470 on the stone above the combustor, 350 back in the left-hand corner, and about 450 on the tee surface, about a foot back from the stove. I'll get a flue probe thermo, a combustor probe, and maybe an IR thermo, shortly.
I like the design of the stove. Everything looks heavy-duty.
In talking with my folks, who grew up in New York state, my mom mentioned that they used to put warm soapstones in their beds to keep the tootsies warm, and my dad said that they had a soapstone cooker in the basement, I assume to keep heat out of the kitchen on hot summer days.
I think the Keystone will do the job in our 2-room, 980 sq.ft. space. I may have to seal a couple of the bigger air leaks in the house to be able to hold temp when it drops to single digits outside. I'll make a preemptive strike on these in the off season this year.
I can't kill the fire in this stove, even with the air cut back all the way. Apparently I'm getting plenty of draft through the 7-to-6" reduction with 16' of stack.
Now to get the Ash and some Dogwood for next season split and stacked, and work on some Red Oak for the following year... :)
 
Your going to love that stove. I found to get the most heat out of the Keystone you need to keep a good flame and red coals in the box. Usually a tad over #1 gives me a good hot fire and the flames snuff out a little below #1. A small air adjustment goes a long way in this stove.

You may find the glass gunks up with a new stove for the 1st few fires as the moisture is driving out of the stone. Sometimes I also get some soot on my glass if I burn down below .75, but it burns right off if you turn it up.

Your picture of that seam you slapped on more cement looks just like mine. Maybe there is a gasket in there instead of cement?

Are you still getting flame with the air shut all the way down? You should have more control. If I shut mine off the box goes black but you can still see a little red in some coals on the bottom next to the ash grate. There is a small hole in the back of the ash pan housing that lets a bit of air up through the grate to help with complete combustion. I've tried plugging it but found the stove burns better with it open.

Keep us posted on how she works out.
 
Thanks for the tips, Todd!
I've also seen that once you get close to the fire you want, small tweaks on the air have large effects.
I'm getting a little bolder in firing the stove a little hotter, so the glass is a bit better than it was. Along the top of the glass, a strip down the middle and a circle at the bottom of the glass are clear enough so that I can see what's going on inside.
Right now, it's lit off and I've got intermittent ignition flame in the top of the box (been slowly cutting air to keep the flame moderate, at .75 now.) A couple of times I've seen ignition behind the baffle screen. I'm assuming that this little bit of intermittent flame close to the cat isn't anything to be concerned about. It's not like raging yellow flames are shooting into the face of the combustor...
No, there's no flame with the air cut back all the way, just a combustor burn. Still getting a little smoke burn in the top of the box, top of air lever almost to 0. Flue 325, top middle stove (above cat) 450, right rear corner probably ~325. I know, I'm a sissy. :lol:
But it's already 72* in here...gettin' a little warm!
Yeah, I figured that like many stoves, you wouldn't be able to shut the air all the way off...
I haven't sat on the couch for a while but I have been the last few nights, just watching the stove burn. :)

Oh, I'd forgotten that I snapped a couple of pics of the solid wavy ribbon of flame that I described earlier. The pics don't do it justice; You can't see the subtle variations in hue or the depth of the furrows in the ribbon. Ribbon was slanted back at a 45* angle.

http://i1108.photobucket.com/albums/h407/2bnator/086.jpg

http://i1108.photobucket.com/albums/h407/2bnator/087.jpg
 
Thats the perfect flame for the Keystone - when it looks like that I know I am getting the good heat. Otherwise the past few days around here have been high 20's at nite high 40's in day. I just keep a couple small pieces burning all day and maintain about 300 to 400 degrees and at nite load it up fully and come down in morning with enough to start the small cycle again - house stays 70 to 74 all of the time
Love my Keystone and cant wait to see how it works with a new liner for the chimney installed
 
Nice looking flames. I see the same thing when I turn it down to a low burn. Another thing I have found that makes dirty glass is turning it down too much too soon. I like to engage at a little over #1 and burn it hot for 15-30 minutes before turning it down slowly to a low burn.

I filled her up last night with 6 splits of Oak at 10pm, now it's almost 10am and the stove top is at 250 and the fire box still has a good chunk of wood in the back. Probably won't need the stove today since we are suppose to have a nice sunny day around 40.
 
Hey Woody, I am just breaking in my fireview and was told after the fact, not to get stovetop over 250 and do not engage cat during first three break in fires. :mad: I had already engaged the cat and got mine up to 325 at that point but he said its still ok, just not recommended. I just thought I'd throw that in. The manual is pretty sketchy about breakin's.
 
kayakkeith said:
Thats the perfect flame for the Keystone - when it looks like that I know I am getting the good heat...cant wait to see how it works with a new liner for the chimney installed
When's the liner happening, this summer?


Todd said:
Nice looking flames. I see the same thing when I turn it down to a low burn. Another thing I have found that makes dirty glass is turning it down too much too soon. I like to engage at a little over #1 and burn it hot for 15-30 minutes before turning it down slowly to a low burn.
The glass is getting a little clearer. I'm hoping that next year, when my wood is seasoned better, I'll have cleaner glass. I burn off the moisture in the wood with a pretty lively fire, but I suspect that even though the wood isn't hissing, it's still giving off more moisture than properly seasoned wood. I've been burning the Battenkiln Ash...it's below 20%, but hisses a bit at first. I've also got some Shingle Oak that was stacked in June, and it's fairly dry. Maybe burning a couple loads of that would clear up the glass further, since Oak burns hotter.
Tonight I engaged, then kept some flame going. A little too much I guess; The baffle screen started glowing, and it looked like the front edge of the scoop was about to. :eek:hh:


RandyG said:
Hey Woody, I am just breaking in my fireview and was told after the fact, not to get stovetop over 250 and do not engage cat during first three break in fires. :mad: I had already engaged the cat and got mine up to 325 at that point but he said its still ok, just not recommended.
Yeah, I ended up running mine a little hotter than I would have liked at first. But there's no cement popping out of the seams, so I guess it's all good... :coolsmile:
 
If your wood is hissing it's not quite dry enough and you should burn a little longer in the bypass mode before engaging. Try to get yourself a year or two ahead on your wood supply and you will have good dry wood.
 
Todd said:
If your wood is hissing it's not quite dry enough and you should burn a little longer in the bypass mode before engaging. Try to get yourself a year or two ahead on your wood supply and you will have good dry wood.
I don't engage if I can still hear any hissing, but I'm sure there's still excess moisture coming out, even though I can't hear it hissing.
I plan to burn seasoned wood from here on in. :coolsmile:
First in line is some down Ash, which should be good in eight months...
 
You have a great stove.

You might want to adjust the airwash plate a bit and see if that helps with the glass. My Keystone was blacking the glass pretty good when I first installed it and adjusting the airwash plate helped.

The other thing I did was install a new insulated liner.

But, prior to the new liner, I wasn't giving the stove enough air to do it's thing. I was trying to get red coals, orange cat and no flame and my heat output suffered along with the clean glass. I finally decided if I was going to have a stove that looked like a fireplace, then I wanted to see some flames. I opened the damper a bit more and the heat output improved, the glass got cleaner and my stove tops shot up over 500 degrees. The new liner just made that stuff better without having to open the damper as much.

Again, nice looking stove.

Good luck,
Bill
 
leeave96 said:
You might want to adjust the airwash plate a bit and see if that helps with the glass. My Keystone was blacking the glass pretty good when I first installed it and adjusting the airwash plate helped.
Huh. I had no idea that the airwash was adjustable.
Tonight I put just a few small Oak splits in the stove and flamed it up a little more. The area of black glass had shrunk slightly the previous night, but now it covers only 1/4 of the glass. I'll clean the glass agian, which I gave up on a few days ago, and see how it goes. Failing that, an adjustment of the airwash plate may be in order. Thanks for the heads-up on that, Bill!

leeave96 said:
I was trying to get red coals, orange cat and no flame and my heat output suffered along with the clean glass. I finally decided if I was going to have a stove that looked like a fireplace, then I wanted to see some flames. I opened the damper a bit more and the heat output improved, the glass got cleaner and my stove tops shot up over 500 degrees.
I had some decent flame going in there last night, but with the combustor engaged, the flame had the baffle screen glowing. Have you seen this? Nothing to be concerned about, is it? It only dropped to 38* last night, but colder weather I'll probably be trying to get a lot of heat out of of the stove to hold temp in this partly-insulated space. I only had the stone over the combustor up to 450; The rest of the top was maybe 350 or so.
I've also had to adjust the air as the wood dries out to keep a constant low flame going. With seasoned wood, I think I could get to equilibrium quicker. Having dry wood will be a new experience for me. :lol:
 
I haven't found the baffle screen glowing to be a problem. I do watch out for massive flames trying to get sucked in the cat, but the cat is well protected and haven't seen any damage to it so far.

Bill
 
There should be a 1/4" gap for the air wash. Use a 1/4" drill bit up in there and run it across the whole length of the glass. I also had some problems with my first Keystone and found the gap off on one side. There are two bolts that hold and adjust the air wash plate, pretty easy fix.
 
Is that set in your fireplace? from your picture it looks like an insert.
 
Todd said:
There should be a 1/4" gap for the air wash.
Where did you find that out, Todd? I've poked around the "repair and maintenance" info on the Woodstock site, but haven't come across that particular nugget...
Can I get a service manual for this stove? That would be great.

weatherguy said:
Is that set in your fireplace? from your picture it looks like an insert.
My Dutchwest sat back in the fireplace, top-vented, but the Keystone is rear-vented hearth mount. Only the flue collar breaks the plane of the fireplace. I'm in the process of getting a couple of good hearth shot pics to post. Time to read the camera manual and see if I can do more than point-and-shoot (and flash) with it... :)
 
Look on page 29 on trouble shooting dirty window.

It reads:

Check air gap at top of stove window
inside stove. There should be 1/4†gap
between glass and edge of cast iron. A
smaller gap may cause window to soot.

Bill
 
I bet Bill has that page memorized from his earlier troubles with his dirty glass. :lol: I think the main reason for Woody's problem is his wood supply, it will get better next year.

Any of you guys have problems removing the ash pan when it's hot? Sometimes it can be a PITA especially wearing those bulky welder gloves. I eliminated this by installing a key ring in the hole of the ash pan so I have something better to grab onto.
 

Attachments

  • 100_1451.jpg
    100_1451.jpg
    62.1 KB · Views: 592
Todd said:
I bet Bill has that page memorized from his earlier troubles with his dirty glass. :lol: I think the main reason for Woody's problem is his wood supply, it will get better next year.

Any of you guys have problems removing the ash pan when it's hot? Sometimes it can be a PITA especially wearing those bulky welder gloves. I eliminated this by installing a key ring in the hole of the ash pan so I have something better to grab onto.

The only time I have trouble getting the ash pan out is if I have just raked the coals and it is hot. More than the ash pan deforming from the heat, is that an ember will fall half way through the floor grate and the ash pan bump up against it while taking it out. What I do now is rake the coals and ashes around and empty the ash pan later - maybe the next day. Just because it's full doesn't mean I have to empty it right away and so I don't. This works great.

Also what I use to pull the pan is the door opening tool. I use the 'Y' and put the tip of it into the hole that you put the ring on. It is enough to grab the ash pan and slide it out.

Another thing I do when raking the ashes is to jiggle the ash pan when it is full up to the ash pan floor slits. This makes the ash spread/fall out into the sides of the pan.

Keystone is a great stove.

Thanks,
Bill
 
leeave96 said:
Todd said:
I bet Bill has that page memorized from his earlier troubles with his dirty glass. :lol: I think the main reason for Woody's problem is his wood supply, it will get better next year.

Any of you guys have problems removing the ash pan when it's hot? Sometimes it can be a PITA especially wearing those bulky welder gloves. I eliminated this by installing a key ring in the hole of the ash pan so I have something better to grab onto.

The only time I have trouble getting the ash pan out is if I have just raked the coals and it is hot. More than the ash pan deforming from the heat, is that an ember will fall half way through the floor grate and the ash pan bump up against it while taking it out. What I do now is rake the coals and ashes around and empty the ash pan later - maybe the next day. Just because it's full doesn't mean I have to empty it right away and so I don't. This works great.

Also what I use to pull the pan is the door opening tool. I use the 'Y' and put the tip of it into the hole that you put the ring on. It is enough to grab the ash pan and slide it out.

Another thing I do when raking the ashes is to jiggle the ash pan when it is full up to the ash pan floor slits. This makes the ash spread/fall out into the sides of the pan.

Keystone is a great stove.

Thanks,
Bill

I tried the tool thingy too but it didn't work for me, still got stuck. I also found the jiggle system works great to spread the ash. I like to keep the ash to a minimum in the fire box for more capacity so I empty the ash every other day.

Just loaded the stove after 13 hour low burn. Actually had to burn the coals down a little before loading. :cheese:
 
leeave96 said:
Look on page 29
DOH! I guess I need to read the manual cover to cover three times, like RandyG was advised to do for his Fireview. :)

Todd said:
problems removing the ash pan when it's hot? I eliminated this by installing a key ring
I haven't been burning 24/7 so I've just been pulling the pan when it's cold, bare hands. I'll remember the ring thing for later, if needed.
 
In regards to heat, this is what I have found with my stove:

Air setting of 0 - 3/4 gives high stove top temps
Air setting of 1 1/4 + gives high firebox temps
Air setting of 3/4 - 1 1/4 gives the most overall heat output

I get the best heat output when there is just a little flame in the firebox - usually around an air setting of 1. Below that the cat does most the work and the stove top temps are nice and high, but the walls of the firebox aren't all that hot and you are losing significant heat transfer from them.
 
goofy said:
In regards to heat, this is what I have found with my stove:

Air setting of 0 - 3/4 gives high stove top temps
Air setting of 1 1/4 + gives high firebox temps
Air setting of 3/4 - 1 1/4 gives the most overall heat output

I get the best heat output when there is just a little flame in the firebox - usually around an air setting of 1. Below that the cat does most the work and the stove top temps are nice and high, but the walls of the firebox aren't all that hot and you are losing significant heat transfer from them.

Yep, I found about the same thing here. If you snuff out the flame the cat turns beet red and stove top temps can climb up over 600 while the rest of the stove is relatively cooler. More flame and red coals equals more overall heat output but less burn time. If i'm looking for a long 12 hour burn I go .5-.75, 8 hour burn is about #1 and a hot burn of 4-6 hours is about #1.25.
 
Looks great there woody, just like a Woodstock ad. It even has the signature keystone right over the stove.
 
Nice looking install Woody. Maybe you could have Woodstock cut you out a chunk of soapstone for that keystone above the stove?
 
Status
Not open for further replies.