PE Super Insert. Opinions/Info?

  • Active since 1995, Hearth.com is THE place on the internet for free information and advice about wood stoves, pellet stoves and other energy saving equipment.

    We strive to provide opinions, articles, discussions and history related to Hearth Products and in a more general sense, energy issues.

    We promote the EFFICIENT, RESPONSIBLE, CLEAN and SAFE use of all fuels, whether renewable or fossil.
I see what your saying. Strange they would make it that way. Seems like you have it solved. Get that puppy on, get the insert in, and get her heating. I really like the Duraliner rigid, cleans very easily. Easy to sweep also. The flex at bottom has more resistance, but nothing major.
 
  • Like
Reactions: Squisher
I really appreciate everyone's input. It's been invaluable to me in progressing with this.

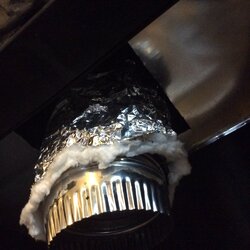
I have another question? I've attached the adaptor and pulled things almost all the way back up. I've made up a quick and dirty block off plate and am wondering, if I'm going to stuff the entire smokechamber/damper area with roxul and stuff roxul around the top before sealing the top plate on if I need to have a 'sealing' block off plate or if I more just need it to hold the insulation up? This is an interior chimney and I'm now fully insulated top to bottom on the pipe.

Here's what I've got so far.

IMG_1147.JPG
 
Heat loss is less of an issue with an insulated liner in an interior chimney. I think you'll be ok to skip it with the roxul packing. A portion of the minor heat loss will be returned to the house envelope.
 
  • Like
Reactions: Squisher
Sounds good. That's what I was kind. Of thinking. I could mess around and probably build a much slicker block off plate now that I have this one. But I will need more materials. If a sealed plate is much more efficient I don't mind doing that.

But I have lots of roxul on hand and could easily stuff up the whole smoke chamber.
 
The plate is better at making a tight seal and for keeping the insulation in place, but I don't think you would notice a notable heating increase like it can make in some exterior chimney setups.
 
  • Like
Reactions: Squisher
The plate I made fits tight everywhere except for the square opening I made for the liner to come through. Which I made a little to large IMO. I'm just going to go ahead and stuff the roxul and screw my plate in place. I've only got a hour or so of free time left today and then family/farm duties will need tending to.

Thanks again.
 
I hear the miss'us foot tapping.
 
  • Like
Reactions: Squisher
Roxul is nasty for the lungs, the plate also helps keep fibers from the roxul from entering the house air space. Also keep in mind, although it may or may not matter with your system being insulated, fiberous insulation does not stop air flow, so theoretically, your be keeping more heat in the living space.
 
  • Like
Reactions: Squisher
Okay. Roxul is stuffed and the block off plate is in. I'm thinking of simply sealing it with aluminum tape around the edges and where the liner goes through? I'm wondering if that's going to be to high of temps for the aluminum tape though?

I've also marked my top plate and I'm going to cut it and bend it to fit over the top tile that exits the chimney. Besides that and putting the cap and storm collar on it's just hook up time I think? Gotta see about moving this stove myself without doing anything stupid. Lol.
 
The tape mail fail in time. It would be fairly easy to make a 2pc enclosure to go over the existing hole left aroung the liner. You can screw it with self tappers into the block off you installed. I sealed the gap around the liner with stove door gasket, thanks to Brother Bart's advice. I did my first one by myself, powered it into the living room, then furniture dolly to the hearth. To get it in the hole, some pcs of metal or piping, dowels etc help to roll it back in place. I just slid mine on the hearth. The Summit is a heavy mfo.
 
  • Like
Reactions: Squisher
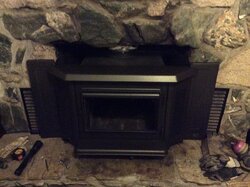
Fantastic luck. A buddy stopped by and asked me what I was doing. He he he. I told him I hadn't been certain but now I knew exactly what 'we' were doing. Three minutes to plunk it into place with a extra set of hands.

IMG_1155.JPG
 
Tomorrow will be its day. I want to button things up up top first.
 
Send family out shopping when you do and open some windows. If you can put a fan in one exhausting the fumes.
 
  • Like
Reactions: Squisher
I've got the morning here to get the last things together and should be able to burn it while my wife is out and my daughter is at school.

I'm redoing the door gaskets this morning and I've read in the manual about them warning to not overtighten the glass. But when I removed the glass from the door the retainers were super tight. I guess seized. Any torque recommendations on the window retainers?
 
I was fearful of breaking the glass when I replaced mine, but also did not want it to be leaking. I tightened the screws about as tight as I do anything else, but didn't overcrank them, as I have done with other projects in the past. You really are just looking for pressure of the clamps against the metal trim pcs. Let your instincts guide you, when they tell you it is tight enough, leave it at that, or maybe another 1/4 turn and be done.
 
  • Like
Reactions: Squisher
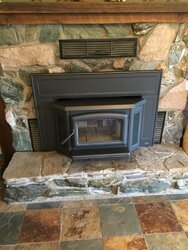
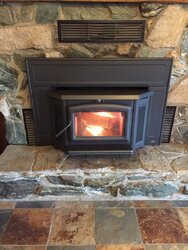
Well here it is all together.

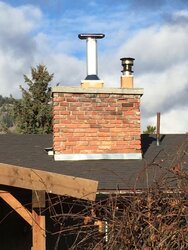
And the outside. Yes yes I know my chimney is rough. Hopefully next summer I'll get a chance to rebuild it.

50206078062__1CDD0560-4526-4FDD-A28B-D98513944647.JPG IMG_1136.JPG

First fire is about to take off!
 
  • Like
Reactions: gregbesia
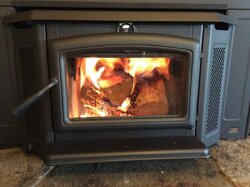
And finally. Flame. Seems to be working well so far! Lol.
50206192950__F2A2A1D8-6D32-4358-A63E-4B444619C6F7.JPG
 
Yay! Looks pretty spiffy all cleaned up with the new paint job. Nice hearth too.
 
  • Like
Reactions: Squisher
Thanks. I'm very pleased with how it's come out. So far I'm impressed with the size of the firebox on this. It really looks like it's going to be a formidable heater.

The hearth needs a good cleaning now. And it's inspired us to make it a little more of the focal point of the room.

Fun times. I'm just enjoying that new stove smell. Bleagh. Sitting by the door with the fan running. Luckily it's fairly mild out.
 
Besides the paint I regasketed the door and the glass and replaced the flame shield. I also put a new handle on to match the black. The fan all checked out ok, just needed a good cleaning. When I slow it down with the adjustment I can hear a slight 'hum'. Don't know if that's normal or not? I haven't run it yet while burning just noticed it while testing it to see if it worked.
 
Yes, ours hums slightly too, more noticeable at low speed. I think that's normal.

How much flue height did you end up installing? How is it drafting?
 
  • Like
Reactions: Squisher
I've got 15' 2" in pipe. Minus 1.5" per union x 4 = 6". Plus 3" for stove adapter. With the angle in of flex. I've got to be right around 14 1/2' vertical from the stovetop. The duraliner worked out fantastic for getting me a extra few feet of stack by using their extendacap kit. Otherwise I'd have had to anchor a flex liner and transition to class a to do the same.
 
So far the draft is fantastic. Right off the bat once the wood caught I was able to close the door and off four smallish splits and a firestaeter it's cruised that little magnetic thermometer up to about 250f. I'm about to throw on a couple bigger splits and turn things down after a little bit and see what sort of secondaries I can get.

I've got two screen doors wide open though and a fan venting too.
IMG_1163.JPG
 
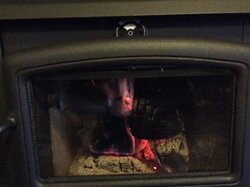
Curious anyone's thoughts on what sort of temps I should be seeing on that magnetic thermometer in the middle of the door? I recall in another thread a member seeing around 800 there and that being quite a concern.

I've got to say I'm in the 600-650 range right now and the box looks tame? I've got the air cut right back and the blower on high.

IMG_1164.JPG