Any Tips on removing a frozen Auger Motor shaft Set Screw from Collar?

  • Active since 1995, Hearth.com is THE place on the internet for free information and advice about wood stoves, pellet stoves and other energy saving equipment.

    We strive to provide opinions, articles, discussions and history related to Hearth Products and in a more general sense, energy issues.

    We promote the EFFICIENT, RESPONSIBLE, CLEAN and SAFE use of all fuels, whether renewable or fossil.
Status
Not open for further replies.

Don2222

Minister of Fire
Feb 1, 2010
9,117
Salem NH
Hello

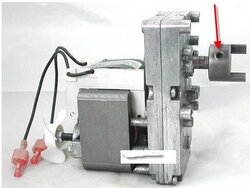
I am working on a top feed pellet stove that has a frozen allen head set screw that holds the auger motor shaft on the auger. See pic below of similar set screw.

So any tips on freeing the screw without breaking of course?

My friend suggested this:

1. Using a stainless steel bristle brush to brush the sides of the screw that stick out of the collar.
http://www.sears.com/shc/s/p_10153_12605_00910044000P?prdNo=2&blockNo=2&blockType=G2
See small brush in $2.00 kit > http://www.harborfreight.com/6-piece-detail-brush-set-93610.html
2. Spray penetrating spray such as PB Blaster to seep in. Let soak for a couple hours.
See > http://www.amazon.com/Blaster-16-PB-Penetrating-Catalyst-oz/dp/B000I2079E
3. If needed heat collar with Map Gas torch.
http://www.homedepot.com/h_d1/N-5yc...d=10053&langId=-1&keyword=torch&storeId=10051
4. Instead if a simple 5/32" allen wrench use a 5/32" allen socket for 3/8" ratchet drive for more torque.

Also banging the screw and collar. The vibration may help to loosen the set screw.


Any other suggestions? -- click on pic to enlarge and see red arrow below.
 

Attachments

  • AugerMotorRedArrow.jpg
    AugerMotorRedArrow.jpg
    46.5 KB · Views: 718
Penetrating oil, heat, and time. A good quality Allen wrench, one that fits well, not a cheapie. An Allen socket would probably fit better, along with more torque.
 
The tips you were given should do the trick. If the unfortunate happens and the Allen strips, don't run for the Vicegrips. The rounded off inside will make an excellent guide for drilling and extracting.
 
when I had trouble getting one apart, it was easier/better/cost effective to cut the collar and replace it for 6 bucks
if the screw is frozen and you have to drill it might damage the collar anyway
and it could save your sanity
 
I ran across this once and had to drill out the set screw and then tapped the hole to the next size bigger.
 
PB Blaster. Let it sit overnight and wet. Usually works.

Heat. Even a propane torch will get it hot enough. Amazing how the heat frees fasteners up.
Once temp is reached it just loosens up.

As said above, a good firm fitting wrench is key. No slippage.

Worst case.....
A Dremel with a cut-off wheel will split the collar easily.

Just takes a bit of time and careful persistence.

---Nailer---
 
A straight shank of allen wrench in the screw driven in like a punch will loosen it. Support the shaft with an anvil type weight on the other side, so it is solid, and drive the set screw in a few times. They are usually loose after that.
 
Shock always gets em moving. A brash hammer or punch and a few wacks after the oil has been applied. I sometimes try to tighten the set screw a little, Then go the loosie goosie route. I have only had to drill a couple out and like the others. The set screw's allen head makes a nice drill guide. But use a lefty drill bit and it also helps loosen while drilling. ;)
 
If the shaft has a flat area, the set screw is tight against this flat area, use a puller to pull the coupling half off the shaft without trying to loosen the set screw. After the coupling half has been removed from the shaft, it's quite possible you will be able to remove the set screw without drilling or if you have to drill, it will be much easier. I'm betting that the set screw is cracked where the allen wrench is inserted caused from overtightning the set screw.
 
Worse case, use a left handed cobalt steel drill bit after following the other suggestions. They are usually available at automotive store or at multiple locations on the web. By drilling counterclockwise the bit tends to loosen up the set screw and usually they spin out before you are done drilling. Worse case is you wipe out the threads and then just drill and tap another hole in the collar if you can buy a new one.
 
  • Like
Reactions: Defiant
Hello

Using the info above:
See pics in link below
>> https://www.hearth.com/talk/threads...stove-hopper-fire-weird-auger-jam-help.86187/
I wire brushed the set screw and put the PB Blaster penetrating oil on and soaked it over night!
Then I purchased the 5/32" allen socket in a set for $12 for a 3/8" ratchet.
The next morning with that additional torque with the 3/8" ratchet I popped it very easily!
The motor came right off, then after unbolting the auger plate that came off, then the auger had to be carefully unscrewed from the hopper.

The hopper fire did indeed completely melt the bushing. This bushing holds the auger up off the auger bushing plate and above the back sheet metal piece in the hopper. Also there was no brass bushing on the tip so I added that also.

So after installing the bushings the auger turned fine manually and then with the motor back on the auger ran fine with the AC test cord. My friend fired up the unit and it worked fine! !
 
  • Like
Reactions: Defiant
Hello

Using the info above:
See pics in link below
>> https://www.hearth.com/talk/threads...stove-hopper-fire-weird-auger-jam-help.86187/
I wire brushed the set screw and put the PB Blaster penetrating oil on and soaked it over night!
Then I purchased the 5/32" allen socket in a set for $12 for a 3/8" ratchet.
The next morning with that additional torque with the 3/8" ratchet I popped it very easily!
The motor came right off, then after unbolting the auger plate that came off, then the auger had to be carefully unscrewed from the hopper.

The hopper fire did indeed completely melt the bushing. This bushing holds the auger up off the auger bushing plate and above the back sheet metal piece in the hopper. Also there was no brass bushing on the tip so I added that also.

So after installing the bushings the auger turned fine manually and then with the motor back on the auger ran fine with the AC test cord. My fiend fired up the unit and it worked fine! !
Another happy ending:cool:
 
You can learn alot from people that like to burn things...
 
Status
Not open for further replies.