Hearth Install Pics *stove pics added* 10/22

  • Active since 1995, Hearth.com is THE place on the internet for free information and advice about wood stoves, pellet stoves and other energy saving equipment.

    We strive to provide opinions, articles, discussions and history related to Hearth Products and in a more general sense, energy issues.

    We promote the EFFICIENT, RESPONSIBLE, CLEAN and SAFE use of all fuels, whether renewable or fossil.
Status
Not open for further replies.

bsj425

Burning Hunk
Jul 17, 2011
172
North Pole Alaska
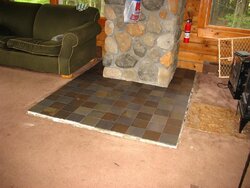
So finally got around to starting our install ( I know a little late should of did it in the summer ) but better late than never especially since it is in the teens now and snowing off and on. But had some time today to get it started. Got the frame done. Tomorrow I will put the plywood and durrock on and hopefully the tile done on sunay so we can start with the stove.. The stove we got requires a very low R value underneath just ember protection really. We didnt need a hearth since we have tile on a slab but we like the astetics of the raised hearth and feel it will draw attention to the stove.

DSC00038.gif


DSC00042.gif


DSC00041.gif


Test fit all the pics for now camera died.

For the "joists" I put them 12 inches apart on center. A little over kill but I figure this thing will be heavy when finished + the stove so you caant really overbuild.

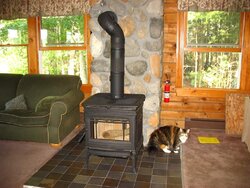
the only question I really had was do you guys screw them into the walls at all or leave them free standing? I have heard a few stories of the stoves or hearth creaping around and I figured a few long screws into a couple studs in the wall will anchor it in place cant hurt anything i suppose. But if I anchor it I need to do it before I cover it tomorrow.


Also I am cutting out the trim where it sits so it will be flush on the wall that was just a crude test fit.

Any tips on the tiling as well the only other tile work I have done was about a 2ftx6ft kitchen backsplash

also is the cable chord fine there? or do you think It can melt it should be fine I would assume since the blower chord goes right up to the stove.

I know alot of questions but this is my first wood stove and install so I want to do it right. The stove will be professionally installed by a sweep for homeowners insurance reasons so I want to make sure my part ( the hearth ) is good
 
I would definately anchor it down.......for the exact reasons you mentioned....nothin wrong with a little overkill....I am building a hearth for my NZ3000 right now too, and let me tell you, when I get pics of it on here, we'll talk about some overkill....lol....looks good so far good luck with yer project...
 
and looking at yer pics I would consider removing the trim and getting it tight against the drywall.....for ember and hot coal protection.......
 
I don't think you will need to anchor the hearth down. By the time you finish it will be pretty heavy. The cable cord should be ok, just let it drop right down to the hearth level once the hearth is installed. Just honor or exceed the stove clearances and it should be fine.

Time to add your new stove to your signature. I'm curious to see how it works out for you.
 
bsj425 said:
also is the cable chord fine there?

"Clearance to Combustibles" is a term that incorporates all things burnable. If you keep that cable wire the appropriate distance from the stove (again, your clearance numbers), you are good to go.

Ya might as well screw the framing to the wall. It will just make everything that much more solid.
 
Jags said:
bsj425 said:
also is the cable chord fine there?

"Clearance to Combustibles" is a term that incorporates all things burnable. If you keep that cable wire the appropriate distance from the stove (again, your clearance numbers), you are good to go.

Ya might as well screw the framing to the wall. It will just make everything that much more solid.

I agree Jags....esp. if he is going to tile it.....might as well be in a good fixed position
 
Thanks for the comments . I am going to cut the trim out so it sits flush I believe I mentioned it in the original post and The cable will be well within the clearences for combustibles especially if we keep the side heat shields on. Again I already know these answers but this is my first stove and a little re assurance is always nice dont want to go burning the house down.

Oh and the stove we got is a Heatilator Eco Choice WS22. They are made by quadrafire. We got it because of the huge firebox with the nice big viewing window. Also there have been a few very good local reviews/reccomendations on it thus far.
 
bsj425 said:
Thanks for the comments . I am going to cut the trim out so it sits flush I believe I mentioned it in the original post and The cable will be well within the clearences for combustibles especially if we keep the side heat shields on. Again I already know these answers but this is my first stove and a little re assurance is always nice dont want to go burning the house down.

Oh and the stove we got is a Heatilator Eco Choice WS22. They are made by quadrafire. We got it because of the huge firebox with the nice big viewing window. Also there have been a few very good local reviews/reccomendations on it thus far.

Congrats on the new stove and we look forward to your posts with construction pics in them.
 
Good start on the hearth! I agree with BG with all that weight it isn't going anywhere.. If you're really worried place a little silicone under the frame or acrylic caulk and it won't go anywhere..

Ray
 
Random thoughts . . .

I would guess that the weight of both the hearth and the stove should be fine by itself . . . in my own case I did not anchor my hearth to the floor or wall and there has been zero movement . . . but that said . . . if it makes you feel better the cost to do so is pretty cheap.

I was going to mention cutting the trim . . . until I re-read your post . . . you definitely want to have this sit up tight against the wall.

I wouldn't worry about the cable . . . especially if it's outside of the clearance requirements.

Tips on tiling . . . only did a bit . . . but a few things I learned from my own experience or others' mistakes: 1) Dry fit your tile first to make sure it looks the way you want it to. 2) Flex Bond is good stuff for hearths. 3) Make sure you clean up your grout and remove the haze -- co-worker learned this after not doing so . . . had to re-do his entire kitchen floor.
 
So an update. Got called into work for overtime on my off day so work slowed this week but I did get the layers of plywood and cement board on and secure and got all of the tiling and trim ready to go for tomorrow morning.

DSC00051.jpg


This thing is HEAVY witout the tile I cant imagine when it is all tiled up with the mortar and everything definatly am going to move it into place BEFORE tile and will need some help I thought I was going to blow my hernia out just lifting it to get it out of the way in the garage.. And the front panels are trimed flush with the top they were not in the pic I just snapped a quick one.

This is to scale and what it should look like..


hearth-1.png


oh yeah I need to hurry and get this done we got a bunch of the white stuff the week with overnights hovering around 0 deg.

313187_10150339016877266_507287265_8376794_1368073239_n.jpg


I dont know why it looks like one side is longer in the pics must be the angle but the dimensions are listed on the drawing.
 
nice septic! hahahahah
 
I know I hate those damn tubes ! They will be completely covered with snow in a couple more weeks. Oh well the price you Pay to be out of town with no neighbors
 
bsj425 said:
I know I hate those damn tubes ! They will be completely covered with snow in a couple more weeks. Oh well the price you Pay to be out of town with no neighbors

Your almost there! I have to say, with some significant snow outdoors and temps hanging out around 0 at night, that's plenty of incentive to make this project get finished soon. Stop back here with some pics when you finish, looking good!
 
The hearth is coming along nicely! Man I can't imagine it being that cold with snow already! My hearth tiles are made to look like rusty metal and your cad pic is similar.. I really love the shades in these tiles and got them dirt cheap.. Look forward to seeing the hearth tiled and grouted..

Ray
 
raybonz said:
The hearth is coming along nicely! Man I can't imagine it being that cold with snow already! My hearth tiles are made to look like rusty metal and your cad pic is similar.. I really love the shades in these tiles and got them dirt cheap.. Look forward to seeing the hearth tiled and grouted..

Ray

I'm with Ray, I love those rusty colors, that is gonna look great....yer doing a nice job, that stove will be a centerpiece.....BTW I am jealous, wish we had snow like that here in PA....I'm startin to get the snowmobile bug......can't wait to get mine out this winter!!
 
Told ya it was going to be heavy. Once in place that hearth is not moving without a lot of persuasion.

The W22 has remarkably close corner clearances. Did you get the blower option for it?
 
Thanks for all of the compliments the tiles are the same style as the floor tiles just a shade or two darker. The border pieces are 2inchesx12inches and the center tiles are 6x6. The front will have just a row of yhe 6x6 tiles with a nice trim piece along the bottom where it meets the floor. Now off to rent the tile saw and get this started!
 
BeGreen said:
Told ya it was going to be heavy. Once in place that hearth is not moving without a lot of persuasion.

The W22 has remarkably close corner clearances. Did you get the blower option for it?

I know with the heat shields you and double wall you can go all the way to 3 inches the drawing has it at 3.5 but I will probably pull it out to about 4 or 5 depending on how it looks set up on the hearth. The blower was thrown in for free when I got the stove. The place I got it from has the ws22 hooked up on the showroom and the blower seemed loud so who knows how much it will actually be on since it is right next to my TV.
 
The blower may have been on high speed. Usually they aren't too bad at low to medium speed. Let us know what you think.

I'm very curious about this stove. Please keep us posted on how it works out for you. This is the first install we've seen that I recall. I have been looking at their manual and it is excellent. One of the best illustrated and informative documents I have seen with a stove. Hope that reflects well on the way the stove works out for you.
 
I can vouch for that aspect the maunal is very well written everything from the install to starting the first fire to maintainence its all there with detailed instructions and pictures. For the standard features you cant beat it for the price imo. I love the step top design that should really put out some heat I will take some pics of the beast and update (suprised those werent the first pics I put up)

Stove Porn yeah!

DSC00067.jpg


DSC00065.jpg

secondary tubes

DSC00062.jpg


Dont know why the handle and door pins look gold must of been the flash but they are nickle colored.

A little dusty from the work in the garage with the hardibacker but she will be cleaned up nicely when it is put in place.
 
Scotty Overkill said:
raybonz said:
The hearth is coming along nicely! Man I can't imagine it being that cold with snow already! My hearth tiles are made to look like rusty metal and your cad pic is similar.. I really love the shades in these tiles and got them dirt cheap.. Look forward to seeing the hearth tiled and grouted..

Ray

I'm with Ray, I love those rusty colors, that is gonna look great....yer doing a nice job, that stove will be a centerpiece.....BTW I am jealous, wish we had snow like that here in PA....I'm startin to get the snowmobile bug......can't wait to get mine out this winter!!

This is the hearth I built this summer.. I got the 6x6 porcelain tiles for 25 cents each on clearance so $1.00 per sq. ft (originally $9.99 per sq. ft.)..

Ray
 

Attachments

  • 2011 06 26 004 (Medium).jpg
    2011 06 26 004 (Medium).jpg
    126.1 KB · Views: 997
  • 2011 07 22 001 (Medium).jpg
    2011 07 22 001 (Medium).jpg
    154.6 KB · Views: 1,022
  • Like
Reactions: rideau
bsj425 said:
these are the tiles we have

DSC00070.jpg

Those are wicked nice tiles and will look great on your hearth! Similar to what I used on mine..

Ray
 
First time I've ever heard of that stove. Had to go and check out the specs from Heatilator. Dang, I can't think of another woodstove with such tight CTC's. It looks to me like a no-nonsense heating machine...but then, I'm kinda partial to steel stoves. :) Looking forward to reading about how it performs for you. Rick

ETA: Love the tile.
 
Status
Not open for further replies.