B
BrianK
Guest
Hi folks,
I've been reading the forums since starting to look at stoves last fall. I'm not a complete neophyte to wood burning. We heated my parent's home with a Buderus wood boiler for ten years when I was a kid, and I spent a lot of time cutting, splitting, stacking, stoking, etc., but that was thirty years ago.
I was on a tight budget, so I started searching Craigslist and other local online sources such as PennsWoods.net for used wood burners. When I stumbled across a wood stove in my price range, I'd research it (to death) here and elsewhere. I pretty quickly decided I wanted a soapstone wood stove. Frankly, my wife and daughter wanted a fireplace (fireplaces are so much more "romantic") and they rebelled at the thought of a big black hunk of steel or iron in our living room.
When I started showing them photos of soapstone stoves, they softened in their opposition to a woodstove considerably. But they still wanted an open, crackling fire.
The week before Christmas, I found a blue Woodstock Fireview only 45 miles away. The gentleman bought it ten years ago and used it only occasionally to heat a family room. He removed it and put in gas logs, and was asking $1000.
I bought it for $950 in very nice condition, loaded it up, and ordered a new cat from Woodstock over the cell phone while driving it home. I ordered the Woodstock rear shield and stack shield after analyzing my install.
A local chimney sweep gave me an estimate of $3200 to install a class A chimney, which seemed outrageous, so I picked up all the Supervent parts last week at Lowes. I printed out Menard's price list, and Lowes matched it all (~$1000 total). A friend who works in HVAC volunteered to help me install it, and I checked with my homeowners insurance to make sure I wasn't running afoul of my carrier.
I set up the scaffold Saturday morning, had all the parts ready, and my friend and I started assembling the flue Saturday at 2:30pm. We were done with the major work by 5:30. We have a two and a half story house, went up four feet from the back of the stove with black pipe, 2 feet horizontal black pipe, through the wall with the Supervent through wall kit, up two 36" segments, offset 30 degrees to get around a 2 foot overhang, another 36" segment as a diagonal, another 30 degree offset back to vertical and a final 36" above the overhang, with a rain cap. My HVAC buddy knew how to tie everything in properly at the roof line.
After triple checking everything, I realized vertical stove pipe clearances were fine, but my horizontal section of stove pipe was only 16" from my ceiling. So I attached the stove stack shield to that section which came with the stove rear shield I bought from Woodstock.
We went ahead and made our first burn Saturday evening around 8:00.
This thing is awesome! And its so comfortable, easy to run, and "pretty" that my wife and daughter have decided they really like it after all.

We have an oak wood products manufacturer locally, and they sell the ends they cut off for firewood, so I picked up a large utility trailer load (6 1/2' x 10' with 2' sides, almost a cord) of "ends" two weeks ago. Its all kiln dried small stuff, 2x2, 3x3, 4x4, in lengths ranging from 3 to 12 inches. I built a 4'x4'x7' bin in my basement inside my old house's coal chute and loaded it in:

This wood burns really nice, and leaves behind very little ash. A friend also gave me a cord of nicely cut and small split mixed oak, white ash, walnut and cherry. Half of it was seasoned a year, the other half six months. The year old wood also burns nicely, but not as clean and hot as the kiln dried wood.
The stove heats up to any temp I want it to using the draft. Once I accidentally left the draft open too long, and it got up to 700. Its dead simple keeping it running constantly 450-550. At night I set it between 0 and 1, and its still 300 in the morning, with enough coals to start another fire. The flue hasn't gone over 450 (and only got that high once when I accidentally left the draft open too long and the top of the stove hit 700) and generally sits on or below the line separating "creosote" and "burn zone/comfortable" at 250-275.
I didn't do any "break in" burns as the stove was used for ten years. Maybe I should have?
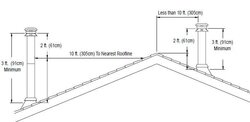
My primary concern is the height of the class A chimney above my roof line, and the 30 degree offset. I only went three feet above the roofline, which is 4/12 pitch, and the chimney is already 4 inches out from the roof due to the spouting. I received two different "professional" opinions, on the necessary height above my overhand. One said 3ft, one said 5ft. However, I have a leftover 36" section of Supervent which I am considering adding. (We didn't take down the scaffold yet.)
The Supervent instructions stated to never use an offset on an exterior application. However, the certified chimney installer included a 30 degree offset in his estimate, the same as we did. Is there a reason not to do a 30 degree exterior offset?
The stove has good draft, no back puffing, lights and burns easily, responds to draft adjustments quickly, and is heating this 1600 sq ft house just fine.
Considering all the problems I read about wood stoves online, this just seems too easy, and I'm wondering what I'm missing.
I suspect the biggest contributor to our "success" so far is this load of kiln dried hard wood, and this sweet little Fireview stove.
I've been reading the forums since starting to look at stoves last fall. I'm not a complete neophyte to wood burning. We heated my parent's home with a Buderus wood boiler for ten years when I was a kid, and I spent a lot of time cutting, splitting, stacking, stoking, etc., but that was thirty years ago.
I was on a tight budget, so I started searching Craigslist and other local online sources such as PennsWoods.net for used wood burners. When I stumbled across a wood stove in my price range, I'd research it (to death) here and elsewhere. I pretty quickly decided I wanted a soapstone wood stove. Frankly, my wife and daughter wanted a fireplace (fireplaces are so much more "romantic") and they rebelled at the thought of a big black hunk of steel or iron in our living room.
When I started showing them photos of soapstone stoves, they softened in their opposition to a woodstove considerably. But they still wanted an open, crackling fire.
The week before Christmas, I found a blue Woodstock Fireview only 45 miles away. The gentleman bought it ten years ago and used it only occasionally to heat a family room. He removed it and put in gas logs, and was asking $1000.
I bought it for $950 in very nice condition, loaded it up, and ordered a new cat from Woodstock over the cell phone while driving it home. I ordered the Woodstock rear shield and stack shield after analyzing my install.
A local chimney sweep gave me an estimate of $3200 to install a class A chimney, which seemed outrageous, so I picked up all the Supervent parts last week at Lowes. I printed out Menard's price list, and Lowes matched it all (~$1000 total). A friend who works in HVAC volunteered to help me install it, and I checked with my homeowners insurance to make sure I wasn't running afoul of my carrier.
I set up the scaffold Saturday morning, had all the parts ready, and my friend and I started assembling the flue Saturday at 2:30pm. We were done with the major work by 5:30. We have a two and a half story house, went up four feet from the back of the stove with black pipe, 2 feet horizontal black pipe, through the wall with the Supervent through wall kit, up two 36" segments, offset 30 degrees to get around a 2 foot overhang, another 36" segment as a diagonal, another 30 degree offset back to vertical and a final 36" above the overhang, with a rain cap. My HVAC buddy knew how to tie everything in properly at the roof line.
After triple checking everything, I realized vertical stove pipe clearances were fine, but my horizontal section of stove pipe was only 16" from my ceiling. So I attached the stove stack shield to that section which came with the stove rear shield I bought from Woodstock.
We went ahead and made our first burn Saturday evening around 8:00.
This thing is awesome! And its so comfortable, easy to run, and "pretty" that my wife and daughter have decided they really like it after all.
We have an oak wood products manufacturer locally, and they sell the ends they cut off for firewood, so I picked up a large utility trailer load (6 1/2' x 10' with 2' sides, almost a cord) of "ends" two weeks ago. Its all kiln dried small stuff, 2x2, 3x3, 4x4, in lengths ranging from 3 to 12 inches. I built a 4'x4'x7' bin in my basement inside my old house's coal chute and loaded it in:
This wood burns really nice, and leaves behind very little ash. A friend also gave me a cord of nicely cut and small split mixed oak, white ash, walnut and cherry. Half of it was seasoned a year, the other half six months. The year old wood also burns nicely, but not as clean and hot as the kiln dried wood.
The stove heats up to any temp I want it to using the draft. Once I accidentally left the draft open too long, and it got up to 700. Its dead simple keeping it running constantly 450-550. At night I set it between 0 and 1, and its still 300 in the morning, with enough coals to start another fire. The flue hasn't gone over 450 (and only got that high once when I accidentally left the draft open too long and the top of the stove hit 700) and generally sits on or below the line separating "creosote" and "burn zone/comfortable" at 250-275.
I didn't do any "break in" burns as the stove was used for ten years. Maybe I should have?
My primary concern is the height of the class A chimney above my roof line, and the 30 degree offset. I only went three feet above the roofline, which is 4/12 pitch, and the chimney is already 4 inches out from the roof due to the spouting. I received two different "professional" opinions, on the necessary height above my overhand. One said 3ft, one said 5ft. However, I have a leftover 36" section of Supervent which I am considering adding. (We didn't take down the scaffold yet.)
The Supervent instructions stated to never use an offset on an exterior application. However, the certified chimney installer included a 30 degree offset in his estimate, the same as we did. Is there a reason not to do a 30 degree exterior offset?
The stove has good draft, no back puffing, lights and burns easily, responds to draft adjustments quickly, and is heating this 1600 sq ft house just fine.
Considering all the problems I read about wood stoves online, this just seems too easy, and I'm wondering what I'm missing.
I suspect the biggest contributor to our "success" so far is this load of kiln dried hard wood, and this sweet little Fireview stove.
")