Pellet Stove Pipe Install question?

  • Active since 1995, Hearth.com is THE place on the internet for free information and advice about wood stoves, pellet stoves and other energy saving equipment.

    We strive to provide opinions, articles, discussions and history related to Hearth Products and in a more general sense, energy issues.

    We promote the EFFICIENT, RESPONSIBLE, CLEAN and SAFE use of all fuels, whether renewable or fossil.
Status
Not open for further replies.

Brokenwing

Feeling the Heat
Feb 11, 2012
448
Northern Maryland
install 2.jpginstall 3.jpginstall 4.jpginstall 1.jpg

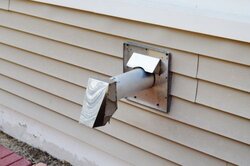
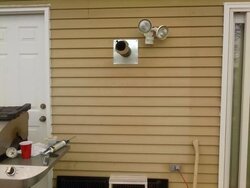
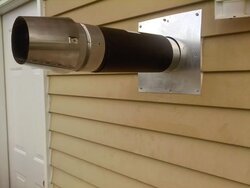
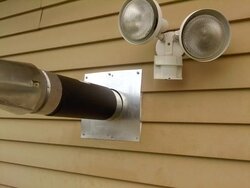
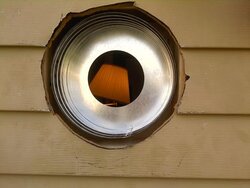
Well today we got started on the install. The pipe went together but I noticed a problem after we were done and I wanted to see what you all thought. When we cut the hole through the house we thought we had the holes dead even, after we framed it out, well aparently the holes were off. After we got the pipe installed I noticed the pipe was angled up some, so I put a level on it, and It is pitched up about 1/2 to 3/4 of a inch. It does not look bad, but Im worried about rain getting down inside the pipe, plus Im picky when I do work it has to be perfect or I am not happy. The stove guys are coming to do a inspection, but I wanted to see what you all thought, since I have never tackled a job like this before.
 
You dont want the vent to be level. You should have 1/4" rise per foot. So a 1/2" over 2 ft is perfect.

If you have 3 ft of horizontal (w/ 1/2" rise) then thats still better than level or even worse, going down grade. .

Looks good. Are you gonna put high temp RTV around the vent (gap around the thimble)? I would do any gaps around the vent and around the thimble itself (inside and out).

Is the vent hooked to the stove?? Where are the stove pics? Gonna be chilly here in Ohio tonight. But the Woodstove was started mid-afternoon and its almost 74° in here now. No Pellet stove needed around 40° outside temp..

Congratulations. . .
 
One thing I'd like to suggest is to swap out that "nozzle" type cap for one that is more like a "hood" and faces downward. I'm concerned that the wind will blow straight back down that pipe and backflow the exhaust.

At the very least, put a 45 degree elbow on it so it faces downward. Both of these will also help with your water concerns
 
You dont want the vent to be level. You should have 1/4" rise per foot. So a 1/2" over 2 ft is perfect.

If you have 3 ft of horizontal (w/ 1/2" rise) then thats still better than level or even worse, going down grade. .

Looks good. Are you gonna put high temp RTV around the vent (gap around the thimble)? I would do any gaps around the vent and around the thimble itself (inside and out).

Is the vent hooked to the stove?? Where are the stove pics? Gonna be chilly here in Ohio tonight. But the Woodstove was started mid-afternoon and its almost 74° in here now. No Pellet stove needed around 40° outside temp..

Congratulations. . .

I have Rutland RTV sealent around the vent gaps. According to Selkirk directions you dont need it between each pipe connection, but they reccomend it, so I have high temp at each joint. The vent is hooked to the stove, and tommorow I will install the dryer vent kit I bought since the manual states this stove must have a oak. I will get some pictures up for ya tommorow, thanks for your help. I guess the pipe outside will have to grow on me, since it tilts up, and my friend that helped me said it looks like a flame thrower coming out of the house lol.
 
One thing I'd like to suggest is to swap out that "nozzle" type cap for one that is more like a "hood" and faces downward. I'm concerned that the wind will blow straight back down that pipe and backflow the exhaust.

At the very least, put a 45 degree elbow on it so it faces downward. Both of these will also help with your water concerns
I will call Sean tommorow and tell him I want to return that cap. This could be fun I had the stove for a couple months now, but it took Selkirk three tries to get me the right parts. I have so many parts here at the house that are wrong I dont know what im going to do with them. I have 5 foot section of 3 inch gas pipe, a extra 4 inch thimble, 3 ft of 4 inch pipe, and a extra 4inch 90 that they did not tell me to return. Anyway is this what you are suggesting. Thanks for your advice I greatly appreciate it.

http://www.dynamitebuys.com/store/cart.php?m=product_detail&p=6510
 
I have the Selkirk DT venting (OAK integrated in one pipe with the exhaust vent) and have no problems with "blowback" and it is on the horizontal like yours. Mine also points in the direction of the prevailing winds in the winter. I like how the outdoor air is preheated. When running on stove temp 4 (medium) the vent coming through the wall is real COLD and where it goes into the stove it is real HOT. I wonder though with my type of venting if the exhaust gases would cool down too much on longer runs?

I'd upload a photo but can't figure it out with the new forum format....
 
I will call Sean tommorow and tell him I want to return that cap. This could be fun I had the stove for a couple months now, but it took Selkirk three tries to get me the right parts. I have so many parts here at the house that are wrong I dont know what im going to do with them. I have 5 foot section of 3 inch gas pipe, a extra 4 inch thimble, 3 ft of 4 inch pipe, and a extra 4inch 90 that they did not tell me to return. Anyway is this what you are suggesting. Thanks for your advice I greatly appreciate it.

http://www.dynamitebuys.com/store/cart.php?m=product_detail&p=6510

Is that VP pipe or DT pipe? Looks like VP, then you could use the cap in your link if you feel its needed.
For DT pipe I think all they offer for horizontal termination is a jet cap.
 
I have a horizontal termination (can snap pic later), and have no issues with blowback either.

If you were to do anything, I would buy a 45° (as imacman suggested) before you buy another termination cap. Also a 45° is a little cheaper than a new cap.

That cap you have is designed to help pull the exhaust out better by utilizing the venturi effect IIRC. I believe Smoke Show has a cap like yours also (maybe??) On a horizontal termination.

The 45° is like $39 compared to the cost of the cap (if you were to do anything)

(Edit: Smoke showed up!!)
 
  • Like
Reactions: smoke show
That cap you have is designed to help pull the exhaust out better by utilizing the venturi effect IIRC.

It does really push the exhaust away from the house. It entrains air in from the back side of the nozzle. Good design for getting unwanted gases far away from the building. That's why they use it in some lab exhaust fans on the roof.
 
I have a horizontal termination (can snap pic later), and have no issues with blowback either.

If you were to do anything, I would buy a 45° (as imacman suggested) before you buy another termination cap. Also a 45° is a little cheaper than a new cap.

That cap you have is designed to help pull the exhaust out better by utilizing the venturi effect IIRC. I believe Smoke Show has a cap like yours also (maybe??) On a horizontal termination.

The 45° is like $39 compared to the cost of the cap (if you were to do anything)

thumb.jpg
 
  • Like
Reactions: DexterDay
Nice work Brokenwing. Looks good. I agree with Imacman here.

If the Jet cap gives you trouble change it to the hood pointing down or add the 45 degree elbow. Keep an eye out on the wall for soot staining too. I had mine like that and the wall was fine until I burned Infernos for a month and then my wall started turning black. So I swapped out the system and put on the Hood. No problems now. Also added an ash bucket.

For sealing the gap between the thimble and pipe, I used the GE silicone for windows. Works wells. The tube says temperature range of minus something to 400 degrees. Has held up well all winter. Here's the link to the product. They sell individual tubes too.

http://www.homedepot.com/webapp/wcs...ping-_-googleads-_-pla-_-100663324&ci_gpa=pla
 
My installation. It also has a little screen underneath that you can't see but in the off season you reverse it and put it over the hole so no critters can crawl in.
DSC_0001.JPG
 
man I sure wish I had the cable for the digi camera I would show you guys my install job and what I had to do to get the pipe up and away... I did on purpose tho make the 1/2 inch per ft rise on the horizontal for aid in natural drafting.

Your install looks good, but I agree... dont like the flame thrower hoodie
 
Well thanks for all the pics, and advice I will have to order a 45. I called the hearth dealer and they will be here on Thursday, im so excited to fire this thing up for the first time. I installed the oak today, I will get more pictures up I promise.
 
Status
Not open for further replies.