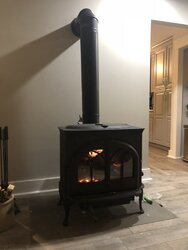
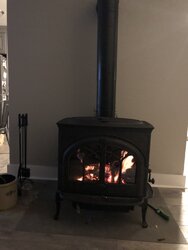
Jotul F600 rebuild

  • Active since 1995, Hearth.com is THE place on the internet for free information and advice about wood stoves, pellet stoves and other energy saving equipment.

    We strive to provide opinions, articles, discussions and history related to Hearth Products and in a more general sense, energy issues.

    We promote the EFFICIENT, RESPONSIBLE, CLEAN and SAFE use of all fuels, whether renewable or fossil.

Brolley

New Member
Feb 8, 2015
25
Center Valley, Pa
Finally getting around to rebuilding my F600 that I bought used about 8 months ago. I'm replacing the entire secondary air manifold, baffle plates, insulating blanket, door glass and all gaskets. I have all the parts on hand and pulled the stove top plate for easy access. My question is about caulking. I scraped the old caulking away from the burn plates inside the stove and any areas where is was cracked or chipping away. Now 8 months later I'm ready to get back at it. Is there anywhere that should not be caulked? Like around the bottom of the air manifold plate that bolts to the back wall of the stove under the secondary air manifold. I don't want to block any air passages. I seem to think that this area was not caulked before. I can post pics if necessary.
Thanks in advance.
Brad
 
Hi Brolley- Yes caulk with furnace cement all seams that you can. Put a seal on the secondary air manifolds connection to the back interior of the stove too after you bolt them up. Make sure your top plate gasket is in good condition and I'd dab furnace cement on all four corner seams at the top where they meet, a common place for your stove to pull in extra air. Do not put cement under the door glass gasket, that will create hard spots for pressure points that will bring problems. Don't forget to check the ash door gasket too, another air leak source. Good luck with her, great stove...
 
Hi Brolley- Yes caulk with furnace cement all seams that you can. Put a seal on the secondary air manifolds connection to the back interior of the stove too after you bolt them up. Make sure your top plate gasket is in good condition and I'd dab furnace cement on all four corner seams at the top where they meet, a common place for your stove to pull in extra air. Do not put cement under the door glass gasket, that will create hard spots for pressure points that will bring problems. Don't forget to check the ash door gasket too, another air leak source. Good luck with her, great stove...
Perfect.... Thanks stovelark! Seems you are pretty familiar with this stove. So a more in depth question for you. At the rear of the stove, the center plate that covers the secondary air passage from outside the stove to the manifold (the one that's bolted in place)... should I caulk all the way around that? And the 2 plates on either side... caulk all the way around them?
I'm really getting to know this stove by rebuilding it! I will be replacing all gaskets including top plate, smoke outlet, ash door, front doors, glass and side door.
Thanks for your help.
 
Last edited:
If memory serves, they might have gasket on the backside of those plates (to allow for expansion and still to seal), but it sure doesn't hurt to add a bit of furnace cement to their edgings...
 
No gaskets that I know of... none listed on the parts diagram. Tonight I am going to install the plates. I will caulk the center one because it is part of the secondary air passage. The ones on either side will go without caulk and be held in place by the manifold.
 
No gaskets that I know of... none listed on the parts diagram. Tonight I am going to install the plates. I will caulk the center one because it is part of the secondary air passage. The ones on either side will go without caulk and be held in place by the manifold.

Hey brolley!
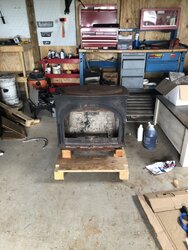
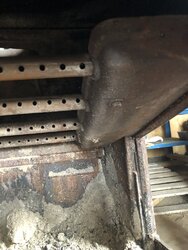
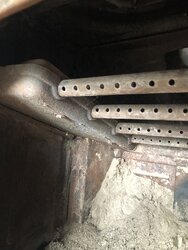
Just bought a 2008 f600 that I’m going to restore also. So I figured I would resurect this thread! I bought the stove for 300 bux! Previous owner was very wealthy, and from the looks of the burn tubs, ,ash pan, and grate this stove had a handful of fires in its life time. I broke a leg moving it but other than that it’s in good shape ! Just have to take care of the rust and throw some new gaskets on the glass and doors. Going to sand and paint the baffle plates (I know it won’t last but they are rusted pretty bad that they tore the insulating blanket when removing.

I was going to scrape and ophso the inside of the stove to help cut down on the rust continuing on.

Questions:
Should I break the stove down further ? I mean the burn tubes still look factory when u put a spit shine on it. The inside of the box bolts looks rusty and I plan to use this stove this winter and don’t want to make a project $ that doesn’t need it. I already need to buy the legs and rear heat shield for the unit.

Does moving the stove around break the cement up in the seams of the stove ? Could I get away with just wirewheeling everything I can reach and then apply some extra to the inside ?

Any idea on a source for legs ? The last three number on them I believe are 303
 

Attachments

  • 1BF64BD9-C9AA-49F6-B19B-B6B470C70F9E.jpeg
    1BF64BD9-C9AA-49F6-B19B-B6B470C70F9E.jpeg
    170.4 KB · Views: 1,435
Also excuse the messy garage, I’ve been working on my house for the last 6th months and my tools are spread all over the place
 
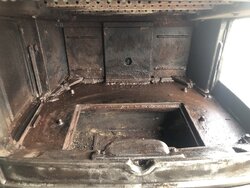
Some other shots of the stove !
 

Attachments

  • D292A357-BBC9-44B7-8C6C-CFC6A4A54E8D.jpeg
    D292A357-BBC9-44B7-8C6C-CFC6A4A54E8D.jpeg
    138.4 KB · Views: 1,491
  • 13F7DF5C-32F6-4988-9E45-4057E435A6B1.jpeg
    13F7DF5C-32F6-4988-9E45-4057E435A6B1.jpeg
    128.2 KB · Views: 2,035
Why is it so rusted?
I can’t say I agree with he statement that the stove only had a handful of fires in it, but pics don’t always do justice.
First glance it looks like the back plate is cracked.
I would tear it down as far as you can. It is still a ten year old stove.
 
Most
Why is it so rusted?
I can’t say I agree with he statement that the stove only had a handful of fires in it, but pics don’t always do justice.
First glance it looks like the back plate is cracked.
I would tear it down as far as you can. It is still a ten year old stove.

Most of the rust simply can be rubbed off with a finger, no real flaking. It was in a 200 year old house in ct being remodeled. The insurance company wouldn’t let them keep the stove unless they changed it from a flat roof. The ashes are way up in the back because leaned the stove over to remove the legs, heat shield etc
 
Joedel, it sounds like you may have scored nicely. Interior surface rusting is normal. I would clean it up, vacuum out the interior and wire brush the exterior. Maybe wipe it down with alcohol and give it a fresh coat of stove paint. You could spray a little mineral or cooking oil on the interior but it's not necessary. Other than that, if nothing is amiss, just enjoy your new found bargain. Sounds like you may have stole that nice stove.
 
Hi Joedel- You got a great deal it looks like. The matte black leg is about 20 bucks, easy to get. Didn't see the air slider, is it out? Condition looks good, check gaskets, small fires at first again, let the stove get used to heat and make sure the integrity of the stove is good. Looks like you did great...
 
Hi Joedel- You got a great deal it looks like. The matte black leg is about 20 bucks, easy to get. Didn't see the air slider, is it out? Condition looks good, check gaskets, small fires at first again, let the stove get used to heat and make sure the integrity of the stove is good. Looks like you did great...

Thanks ! Yeah I took the slider out to clean it up then placed that cover back on when i painted the outside so I didn’t hit the lever.
A rear heat shield , new insulating blanket, and a gasket kit and some legs are in route. Just have to hit the doors with a fresh paint job then gasket them. Anyone use the cement that come with his jotul kit ? Should I buy a better cement to hold them.
 
Not sure what's in the kit. New Jotuls use silicone I believe.
 
I would use the Jotul cement that comes with the kit. Stove looks good cleaned up!

If it is any help, here's my thread that talks about the rebuild.

If you have to replace the insulating blanket, I found that you could just sneak the new top insulating blanket up through the front, folded in thirds to the center, and then reach up and unfold it while it is place.

https://www.hearth.com/talk/threads...sembly-repair-or-replace.161230/#post-2208956


Any advice on aligning the front doors ? I finally have the stove in place, and starting to put in the new door gaskets. I used the 3/8 door gasket for the outside and the middle as per instructions. I noticed the top of the doors didn’t fit well together. It also failed a bill test. I also noted that it was hitting the air control knob when opening and closing. I won’t be using the front doors, but still there is the need for them to fit snug. I tried to play with the door bolts and adjusting the doors higher to clear the knob,but that ended up making the top gap even larger.... and ideas / advise for putting the front doors on and alignment of them ?
 
Can they be leveled with a thin washer on the top or bottom hinge?
 
Last edited:
Can they be leveled with a thin washer on the hinge?
I’m not sure , the hinge stays attached to the wood stove, the doors attaches to those hinges with two bolts. I would say there is about 1/2” of play when the bolts are loose. Where the right stoping point is ‍♂️
 
And shes finally installed and doing some break in burns !!! Thanks for the help everyone !!!
 

Attachments

  • 5702013C-D0B3-4F4B-B295-CC5B9E533A58.jpeg
    5702013C-D0B3-4F4B-B295-CC5B9E533A58.jpeg
    66.5 KB · Views: 1,073
  • BA38DAF5-B176-4F4B-B8CC-902C12F879CC.jpeg
    BA38DAF5-B176-4F4B-B8CC-902C12F879CC.jpeg
    58.3 KB · Views: 1,019
The doors I was able to level and pass a bill test by leaving the door fasteners loose, shutting the door of the stove, have my wife push into the doors, then i tightened the door bolts from the side with open ended wrench.
 
Progress!
 
Stove looks great !


Sent from my iPad using Tapatalk
 
i am probably picking up one of these from the original owner who bought it in 2000, is there anything different about a model made in 2000 vs 08?
 
i am probably picking up one of these from the original owner who bought it in 2000, is there anything different about a model made in 2000 vs 08?
In my rebuild thread, I noted that there seemed to be 2 generations of the manifold. Mine is an older model without the front bolt:

"You can then easily access the bolts holding the manifolds in place. On mine (older) there is a single bolt per side into the back plate. (I did notice that the new manifold casting--marked with the same part number--has provision for a front bolt on each side as well. I debated drilling and tapping a hole, but I was worried that the casting was not thick enough--the back section is quite thick where the bolt goes, so I assume they beefed up the front for the extra bolts as well."

As for the rest--I have not noticed any other changes.