Wood Stove amateur installation. Need help

  • Active since 1995, Hearth.com is THE place on the internet for free information and advice about wood stoves, pellet stoves and other energy saving equipment.

    We strive to provide opinions, articles, discussions and history related to Hearth Products and in a more general sense, energy issues.

    We promote the EFFICIENT, RESPONSIBLE, CLEAN and SAFE use of all fuels, whether renewable or fossil.

Ed Snyder

New Member
Nov 18, 2017
26
South Daytona
Hi Ladies and Gentlemen,
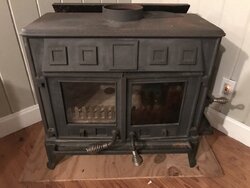
I’m reaching out for help here, as I can’t find any locally. I live in central Florida which isn’t exactly a thriving market for this sort of thing. This is my first house I’ve had that doesn’t have a fireplace and I figure a wood stove will satisfy my needs. I found one on Craigslist and I liked the look of it so I jumped in. At first I was gonna just install it in my porch room since most the year it wouldn’t get used. But now that the temps are dropping and I’m thinking about my electric bill soaring from our electric heat pump, it’s a no brainer that I want it in the house. I’m gonna install this myself.

Main questions I have:
Do I need to do a building permit etc?
Can I safely just set this on the floor? (Tile on concrete slab)
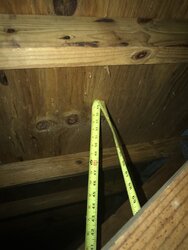
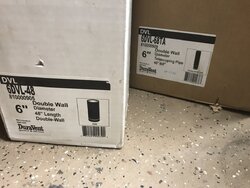
Is there a good kit that includes all the parts to get from the drywall ceiling out the roof?
I’m trying do do this cheaply so money counts.
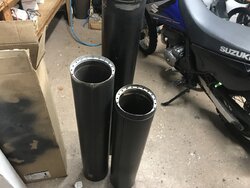
I’m including pics of everything I have.
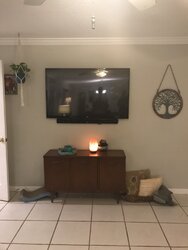
It’s currently sitting in my porch room, but it’s gonna go where the tv pic is(tv is getting moved)
Thanks in advance for any help, Ed
 

Attachments

  • A5BC0943-523F-4D13-820C-DEB30931AFAA.jpeg
    A5BC0943-523F-4D13-820C-DEB30931AFAA.jpeg
    129.4 KB · Views: 355
  • 634721E8-9F66-40FD-90C4-0F961FC9498B.jpeg
    634721E8-9F66-40FD-90C4-0F961FC9498B.jpeg
    139.1 KB · Views: 329
  • 521F69CE-8C75-423A-89F7-20BCED0BA01F.jpeg
    521F69CE-8C75-423A-89F7-20BCED0BA01F.jpeg
    55.9 KB · Views: 393
  • 35804429-C2A0-4C6B-BA06-D6DFDF27E701.jpeg
    35804429-C2A0-4C6B-BA06-D6DFDF27E701.jpeg
    108.2 KB · Views: 442
  • 5C9DDDC0-C7DF-4126-B3C2-9D60D30A9C43.jpeg
    5C9DDDC0-C7DF-4126-B3C2-9D60D30A9C43.jpeg
    160.8 KB · Views: 320
That is a good spot for a wood stove, you can install it right on that tile floor. I don't think you are going to use it too much there in central Florida, but, what the heck?
 
That is a good spot for a wood stove, you can install it right on that tile floor. I don't think you are going to use it too much there in central Florida, but, what the heck?

Thanks, I appreciate the reply. Our cold fronts in November and December are cold enough, and January and February are brutal power bills running electric heat. Last year January and February cost me over $500 in power bill. Other than that though you’re right, it won’t see much use. But dang I miss having a fire when it’s cold.
 
Your heat is electric? Then, by all means, install that wood stove!
 
Seeing all kinds of prices out there.
Is this gonna cost under $300 or over $1000?
 

Attachments

  • B6340B16-72D4-409D-80E4-689964F2BCCA.png
    B6340B16-72D4-409D-80E4-689964F2BCCA.png
    41.2 KB · Views: 162
  • BCBF5BAD-D4EC-468E-829C-2E38BA778B94.png
    BCBF5BAD-D4EC-468E-829C-2E38BA778B94.png
    26 KB · Views: 180
You need some of the other guys to chime in with the install tech tips. I'm sure some of them will give you some good advice.
 
Well I think this is going to be the furthest southern install hearth has helped so far this season. I'm going to write in number order to help, also for other to read it like a list incase I missed something. Also to answer about permits, honestly you will have to check with the local authorities on that, obviously your insurance company may want to see some type of build permit and inspection, but there maybe local codes as far chimney bracing to due to you living in hurricane country.

1. Do you have a stove manual for this particular stove? This is important for the 1st step.. determining your install location, certain stoves have certain clearances to combustibles, if there is no stove manual or the stove isn't ul tested then the stove will have to be installed per the nfpa guild line of a minimum of 36" to any combustibles on all sides, so the back of the stove and the sides of the stove will have to be a minimum of 36" you can install wall shielding to reduce this clearance by half. As far is the hearth since the plan is on top of tile over concrete slab there is no requirement, if your on the porch the you may need to install some type of hearth pad with a R rating to meet the requirements of the stove.

2. What type of house do you have? single story, bungalow, ranch, two story ect.. and type of roof, this will give an idea to best run the chimney, typically the easiest and best is to buy the "through the roof kit" so you get a ceiling support box, attic insulation shield, roof flashing and a cap. You install the stove, run the black pipe to the support box then run class a chimney pipe the rest of the way. This also maybe the best for you case since it wont get really cold out and having a good draft could be difficult to get, you will also want a minimum of 14ft from stove top to chimney cap of chimney to have a decent draft especially when temps are in the 40's and 50's.
The second kit is a through the wall kit, you install the stove, run the black pipe then into a piece of class a chimney pipe that goes through the wall to a clean out T on the outside then go straight up with class A.

3. Both chimney's will have to follow the 2-3-10 rule - chimney top will need to be 2ft higher than the peak of the roof if centered towards the middle of the home, or 3ft higher than any slope / point within 10ft of the cap.

4. Dry wood - cant say this enough, especially for florida area, a couple things with dry wood, obviously it burns the best, secondly you reduce smoke which will reduce creosote build up, but also keep the neighbors happier since woodstoves are not common in you area. I takes wood once split and stacked about 1-2 years to "season" or be dry enough to burn >20% moisture content.
 
Thanks so much for the fast reply, and all the info. I’m out hunting tonight, but I plan on posting pics of my roof, attic, and ul sticker if there is one in the morning. I decided that I’m definitely gonna go the permit route to make it official. Thanks again
Ed
 
A proper chimney system can cost $600 to $2k depending on what you need...and $600 would be sale prices at a northern store called Menards...great prices on Supervent class A chimney parts/kits...can you order something from Lowes or Menards...not sure what you would have around for supply house type places...those tend to run a little more anyways...
 
I self installed mine through the wall. If your roof is right above, that's how I would do it. Mines a 2 story townhouse.

I saw kits all over from supervent and similar for through roof installations ranging from 2-400 depending on the caps / spark arrestors / roof supports/ etc.


I'd get a rough idea on where you want the stove sitting, line up the pipe, and make sure there's no joists / rafters in the way. For the 3 wall pipes running through the roof, you need a minimum 2 inches of non combustible material clearance. Most wall / roof thimbles keep you clear so you will be fine there.

If there is a rafters, you will need to move the stove or move the pipe. Most times you can keep the stove where you want it and use a couple 45 degree pipes to adjust some. That said, I was told the least amounts of bending is best for draft purposes.

Hopefully someone else chimes in too. Lol.


Sent from my SM-N950U using Tapatalk
 
What kind of stove is it, and when was it built?
If it was built before 1993 it is called a "non EPA" stove. These old time stoves are good stoves, and are more forgiving about going through a wall. Because if it goes through the wall, there will be two 90 degree bends in the pipe. These bends slow down the draft. These old stoves will work OK with two 90 degree bends in the pipe.

If it was built after 1993 it is probably an "EPA approved" stove. These newer stoves are more efficient but need a good draft. With the EPA approved stoves, you usually need a pipe run straight up through the ceiling, with no bends in it, in order to get a good draft.
 
I self installed mine through the wall. If your roof is right above, that's how I would do it. Mines a 2 story townhouse.

I saw kits all over from supervent and similar for through roof installations ranging from 2-400 depending on the caps / spark arrestors / roof supports/ etc.


I'd get a rough idea on where you want the stove sitting, line up the pipe, and make sure there's no joists / rafters in the way. For the 3 wall pipes running through the roof, you need a minimum 2 inches of non combustible material clearance. Most wall / roof thimbles keep you clear so you will be fine there.

If there is a rafters, you will need to move the stove or move the pipe. Most times you can keep the stove where you want it and use a couple 45 degree pipes to adjust some. That said, I was told the least amounts of bending is best for draft purposes.

Hopefully someone else chimes in too. Lol.


Sent from my SM-N950U using Tapatalk

Wayne thanks so much for the info, you’re reply sure takes the edge off this conversation. I was getting cold feet, (no pun intended), thinking about spending $600 on the chimney kit.
 
What kind of stove is it, and when was it built?
If it was built before 1993 it is called a "non EPA" stove. These old time stoves are good stoves, and are more forgiving about going through a wall. Because if it goes through the wall, there will be two 90 degree bends in the pipe. These bends slow down the draft. These old stoves will work OK with two 90 degree bends in the pipe.

If it was built after 1993 it is probably an "EPA approved" stove. These newer stoves are more efficient but need a good draft. With the EPA approved stoves, you usually need a pipe run straight up through the ceiling, with no bends in it, in order to get a good draft.

Not sure on the year model. It’s a Dovre 300hsb.
It’s gonna have to go out the roof because it’s in the very center of my house. I’m trying to avoid bends but I might have to use a 45 to get past a truss. I’ll upload some pics here in a bit. Thanks again, this forum is a wonderful resource
 
Ok guys, let me just say I really appreciate everyone pitching in here. It’s nice to have backup on this mission.

This is my house, the chimney needs to come out of the roof 16in this side of the ridge vent. It will be above where the left side of the left porch window
3B7DAE47-4098-4EC0-BAC7-CED6C8668393.jpeg


Here’s the stove location

4ADFC8C9-7FAC-4074-BCE7-5B0CBF3E81BC.jpeg


Here’s attic pipe location. If you look at the tape measure spanning the trusses, 62 leaves the stove too far from the wall, 67 would be perfect if that’s possible?(need help here)
The flashlight in the second pick is roughly where the hole will be, 11in from that big duct
130D2A12-B11C-4902-B8C5-85143FB97ED4.jpeg

221AD5E1-84CC-4536-9208-61AD3C006FB9.jpeg
 

Attachments

  • BE181907-26F3-4BBF-B030-8A1AD053B20B.jpeg
    BE181907-26F3-4BBF-B030-8A1AD053B20B.jpeg
    83.5 KB · Views: 120
Finding different kits. Not sure all the upsides and downsides to these kits. A little guidance on watching out for possible pitfalls would be nice.
7FC7FB85-F191-4C4C-B4BA-5554EA609218.png


Or this one


794855C1-2D6F-4101-9669-A78C2CF1BD32.png
 
You will be in good shape, going through the ceiling, with maybe one 45. Any stove should draw well with that kind of pipe.
 
So your rafters are 24" on center? if that the case you can frame a box for the ceiling support and get it near 64" What does the stove manual say as far as real wall clearance? BTW, both kits will work great, just make sure if you get a super vent ceiling kit, that you use super vent class a pipe, same with dura products. The black pipe should not matter though
 
So your rafters are 24" on center? if that the case you can frame a box for the ceiling support and get it near 64" What does the stove manual say as far as real wall clearance? BTW, both kits will work great, just make sure if you get a super vent ceiling kit, that you use super vent class a pipe, same with dura products. The black pipe should not matter though

Thanks!
1F239024-AEB7-40A8-BE11-50FE9AE9FD36.jpeg

This is what I’m working with. I guess I’ll just order one of those kits then and see how it goes.
Unless anyone chimes in and talks me out of those.
 
Is that black pipe I have safe to go into the attic or do I need something else for in the attic?
You need class a chimney in the attic to. You can only run black pipe to the ceiling where you will transition to chimney pipe that will fun all the way out.
 
Thanks, wasn’t sure about that. So this class a pipe is only in the attic, or does it go out the roof too?
Sorry probably seems like a dumb question but I can’t figure that part out.
It was about 55in to the roof decking from the drywall in the attic, so how does getting the exact length you need go?
Thanks
Ed
It has to be class a from when it passes through a ceiling or wall untill the chimney ends above the roof.
 
Does the class a pipe connect to the box on the ceiling, or does it just pass through the box and connect to the black pipe?
That depends on the chimney system you choose. Most sit in the support box with an adapter sticking down through that the pipe is attached to