New living room and Jotul F500 Oslo rebuild

  • Active since 1995, Hearth.com is THE place on the internet for free information and advice about wood stoves, pellet stoves and other energy saving equipment.

    We strive to provide opinions, articles, discussions and history related to Hearth Products and in a more general sense, energy issues.

    We promote the EFFICIENT, RESPONSIBLE, CLEAN and SAFE use of all fuels, whether renewable or fossil.

goofa

Burning Hunk
Oct 7, 2012
154
Central New York
Hello all. Glad to be back. I have been away from burning wood as my household heat source due to my poor masonry chimney. I have been in the process of remodeling our old garage and have converted it into a new living room with a corner hearth. I had gotten a lot of great info here in the past regarding our hearth build project. We had original purchased a used Castine that we were going to use in this new living room but decided we wanted to go with the Oslo for more heating capabilities. We sold the Castine a few years back and continued on our remodeling project.
Last winter i stumbled across a used black painted Oslo for $350 that i scooped up. It seems to have been neglected and abused but from all of the info on here i decided it was not a bad deal. The stove is a current model Oslo from what i assume as it has the permanent ash door handle and it "had" the vermiculite baffle. After close inspection and cleaning of the stove I have concluded that it needs a new air chamber kit, new gaskets, a side door knob, vermiculite baffle, top insulation, new rear heat shield and it needs cleaning and needs to be repainted. The stove does not have any cracks, but the ash grate seems to be warped but i have decided its not terrible and can be flipped over. The furnace cement in the gaps is all deteriorated. So i guess i have a few questions....
- Any suggestions on cleaning and repainting would greatly be appreciated?.. (using Jotul Iron paint as we liked that "unusual" color of the Castine)
- As for the furnace cement deteriorated in the gaps, is it suggested to fully disassemble the stove and clean and reassemble with new furnace cement. If so tips and suggestions? ...or just re apply new furnace cement as best as possible while its still assembled?
- Any suggestions or tips on connecting the stove to the newly installed supervent class A chimney. Chimney is all done and goes straight through the roof. approximately 7' from stove to ceiling and there is 9' of chimney pipe. Will be using supervent double wall stove pipe, 24' piece and telescopic piece. My issue is the the DSP does not seem to fit the flue collar on the stove. Will a stove pipe adapter take care of this issue, I have one ordered.
Thank you in advance for all of the knowledge and information on this site.
Pics coming soon.... hopefully to Pay-It-Forward to all others looking for help/advice.....
 
Last edited:
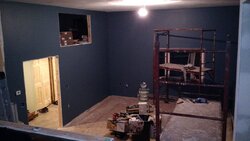
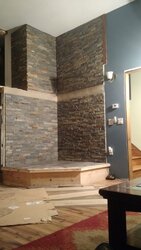
Start of project.. 4 years ago slow process
 

Attachments

  • Camera - 83-PANO.jpg
    Camera - 83-PANO.jpg
    85.7 KB · Views: 321
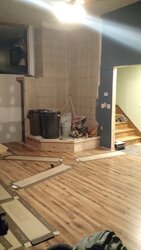
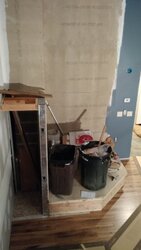
status last year at thanksgiving after paint
 

Attachments

  • IMG_20160112_062937913.jpg
    IMG_20160112_062937913.jpg
    119.2 KB · Views: 332
  • IMG_20160117_182247477.jpg
    IMG_20160117_182247477.jpg
    69.9 KB · Views: 348
  • IMG_20160117_182543098.jpg
    IMG_20160117_182543098.jpg
    61.3 KB · Views: 332
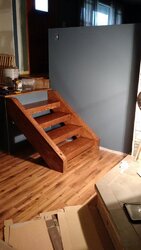
4'x12' mortised larch stairs
 

Attachments

  • IMG_20170628_194411112 (1).jpg
    IMG_20170628_194411112 (1).jpg
    80.8 KB · Views: 260
  • Like
Reactions: Joyboy
After stone and tile install last spring
 

Attachments

  • IMG_20170121_184120679.jpg
    IMG_20170121_184120679.jpg
    81.9 KB · Views: 258
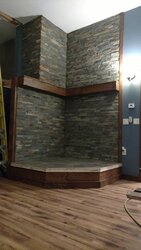
After trim install. Trim is old hemlock siding, planed stained and poly'd.... ?repurposing? lol
 

Attachments

  • IMG_20170808_210600131.jpg
    IMG_20170808_210600131.jpg
    80.5 KB · Views: 261
Last edited:
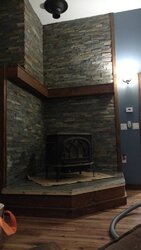
Current view with stove in place to assist with proper chimney install location. More stove pictures to come... Stove is in as purchased condition. Will do a better job documenting stove rebuild as it will not take 4 years....I hope....
 

Attachments

  • IMG_20171015_202325088.jpg
    IMG_20171015_202325088.jpg
    74.6 KB · Views: 296
  • Like
Reactions: webfish
Looks great! Is that wood storage on the left side of the hearth?
 
looks great!
 
Yes it is wood storage. Hopefully be able to hold 3-4 days worth of firewood
 
  • Like
Reactions: WoodyIsGoody
Hello all. Glad to be back. I have been away from burning wood as my household heat source due to my poor masonry chimney. I have been in the process of remodeling our old garage and have converted it into a new living room with a corner hearth. I had gotten a lot of great info here in the past regarding our hearth build project. We had original purchased a used Castine that we were going to use in this new living room but decided we wanted to go with the Oslo for more heating capabilities. We sold the Castine a few years back and continued on our remodeling project.
Last winter i stumbled across a used black painted Oslo for $350 that i scooped up. It seems to have been neglected and abused but from all of the info on here i decided it was not a bad deal. The stove is a current model Oslo from what i assume as it has the permanent ash door handle and it "had" the vermiculite baffle. After close inspection and cleaning of the stove I have concluded that it needs a new air chamber kit, new gaskets, a side door knob, vermiculite baffle, top insulation, new rear heat shield and it needs cleaning and needs to be repainted. The stove does not have any cracks, but the ash grate seems to be warped but i have decided its not terrible and can be flipped over. The furnace cement in the gaps is all deteriorated. So i guess i have a few questions....
- Any suggestions on cleaning and repainting would greatly be appreciated?.. (using Jotul Iron paint as we liked that "unusual" color of the Castine)
- As for the furnace cement deteriorated in the gaps, is it suggested to fully disassemble the stove and clean and reassemble with new furnace cement. If so tips and suggestions? ...or just re apply new furnace cement as best as possible while its still assembled?
- Any suggestions or tips on connecting the stove to the newly installed supervent class A chimney. Chimney is all done and goes straight through the roof. approximately 7' from stove to ceiling and there is 9' of chimney pipe. Will be using supervent double wall stove pipe, 24' piece and telescopic piece. My issue is the the DSP does not seem to fit the flue collar on the stove. Will a stove pipe adapter take care of this issue, I have one ordered.
Thank you in advance for all of the knowledge and information on this site.
Pics coming soon.... hopefully to Pay-It-Forward to all others looking for help/advice.....

Nice looking renovation beautiful job it must be satisfying to see it all come together!
I rebuilt a 2002 Oslo and based on what I remember I would say don't bother disassembling the stove, The cracked cement that you can see is only superficial and the cement in the middle of the joint is probably still doing it's job.
Run it for a season and see how works if it burns too hot check for leaks.
The cemented joints of the secondary air system are usually the first ones that need redoing and you'll know they need it if you are doing everything right but still not seeing much secondary flame action. Enjoy the fire!
 
Now this is making me a bit nervous that only one comment on rebuilding this Oslo.
 
The cemented joints of the secondary air system are usually the first ones that need redoing and you'll know they need it if you are doing everything right but still not seeing much secondary flame action.

So with installing the new air chamber kit what needs to be cemented, the two main joints that fit into the rear of the stove?
 
That's right but the part that it bolts to [tube frame holder] might need recementing as well, and also the chamber [air manifold] behind the fire brick that channels the air up to the secondary air tubes. If you unbolt these parts and they fall off easily then you'll know it needs to be redone.
 
Last edited:
I'm sorry toploader that may have come off wrong. Not discrediting your statement or knowledge at all. I hope you didn't take it that way. Was just thinking the more comments/suggestions the merrier. Thank you so much for your suggestions as they are greatly appreciated!
 
I'm sorry toploader that may have come off wrong. Not discrediting your statement or knowledge at all. I hope you didn't take it that way. Was just thinking the more comments/suggestions the merrier. Thank you so much for your suggestions as they are greatly appreciated!
I understand and no offence taken at all. I just meant that there are a lot of knowledgable people here who wouldn't let you get sent down the garden path but might not comment otherwise. That said it does seem a little quiet around here.
 
Ok so I have been super busy with work and processing firewood. I think I have missed my opportunity to paint the stove for this year. Average daily highs for the next 10 days are in the 40s maybe low 50s. As mentioned by manufacturer and on the forum, painting needs to be done in a well ventilated area. Therefore I think I'm out of luck for painting this year. Any thoughts/recommendation. I've pondered the thought of just doing the repairs and running the stove as is for this year and painting next summer when conditions are more acceptable. Any thoughts on this? Thanks
 
If the painting has to wait until next year that shouldn't matter other than the hassle factor. Painting should be done at a temp over 60ºF.
 
Begreen, I'd rather it didn't wait until next year but the weather and ventilation factor don't seem to allow for it this year.
 
If you paint the stove inside the house with brush on paint as a one time thing I can't see that being a problem. Also if the paint is not too bad you can go over it with fine steel wool and then use stove polish. Buff it well and it will look great. I know it's not for everyone but stove polish is all I use because it doesn't smoke as much as a fresh paint job and it is easily touched up to freshen the look of stove, you can even give it a bit of a shine if you buff it well. Polish or paint it's going to smoke for the first couple of fires but much less so with polish.
 
Toploader, that thought had crossed my mind... But can you paint at a later date after using the Polish? I had bought a couple cans of the Jotul iron spray and we're pretty set on that but I have seen the Polish before. It does look pretty nice and would work great for this year... But again can you print after it has been polished before?
 
Toploader, that thought had crossed my mind... But can you paint at a later date after using the Polish? I had bought a couple cans of the Jotul iron spray and we're pretty set on that but I have seen the Polish before. It does look pretty nice and would work great for this year... But again can you print after it has been polished before?
Yes no problem you can clean off the polish easily with acetone on a rag [wear rubber gloves] then give it another going over with steel wool and the paint will adhere. You don't need to use much polish to spruce it up.
 
Awesome! Thank you so much.