PelPro stove installed 16" from wall; should be 3". What can we do?

  • Active since 1995, Hearth.com is THE place on the internet for free information and advice about wood stoves, pellet stoves and other energy saving equipment.

    We strive to provide opinions, articles, discussions and history related to Hearth Products and in a more general sense, energy issues.

    We promote the EFFICIENT, RESPONSIBLE, CLEAN and SAFE use of all fuels, whether renewable or fossil.

OakForestToast

New Member
Jan 4, 2021
10
MI
Hi and thanks in advance for any insights and ideas shared here!

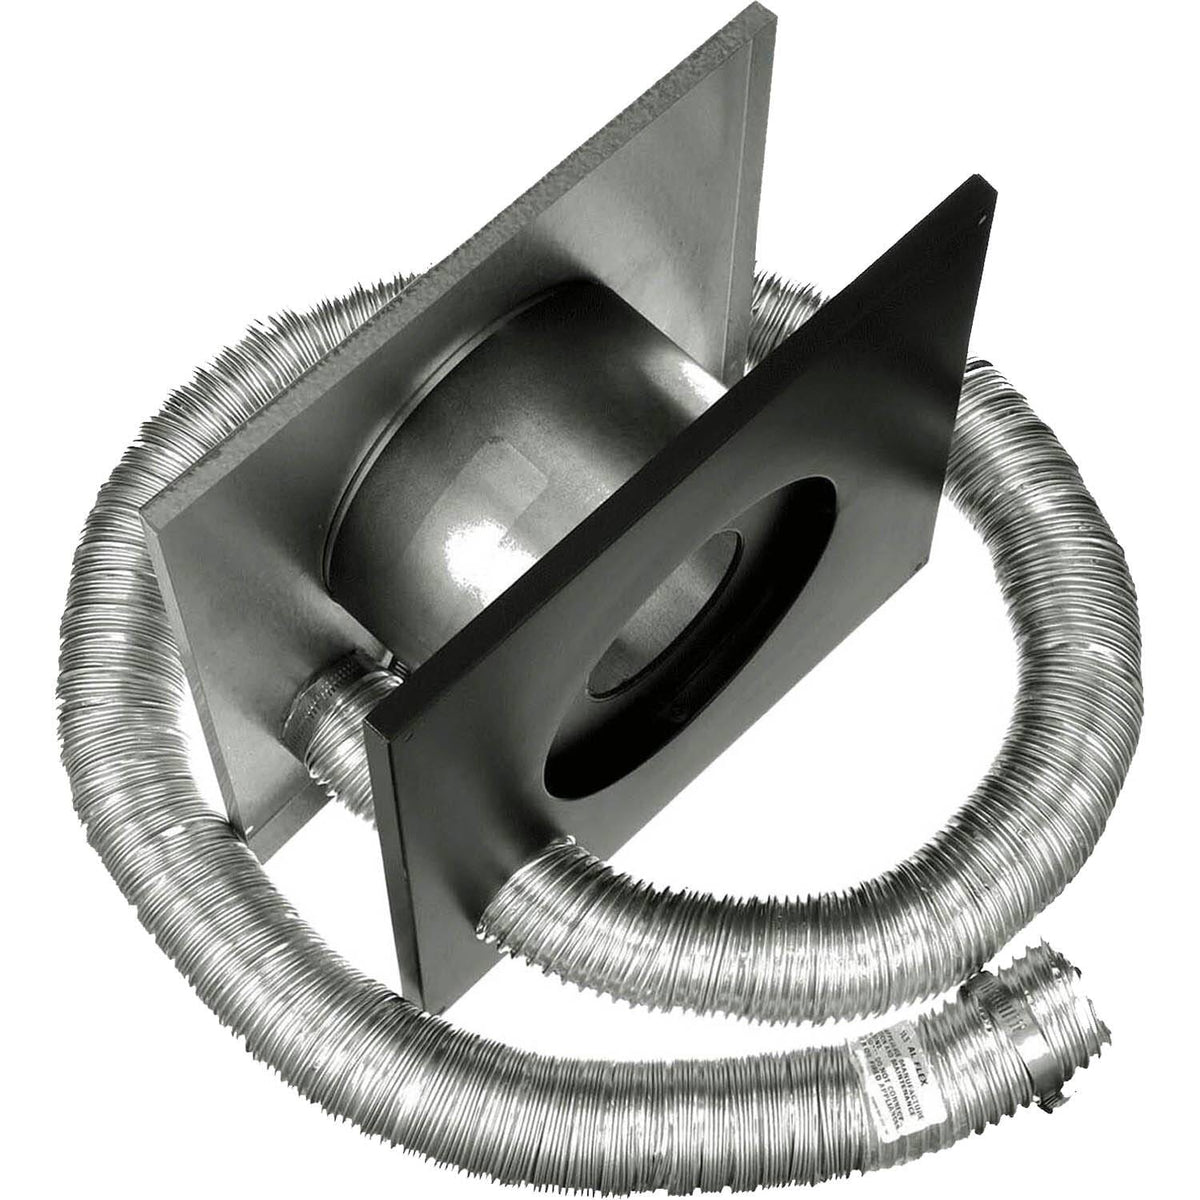
We had a PelPro pellet stove installed in a corner of our living room. This was a new installation - no pellet or wood burning stove had ever existed before. Link to manual: https://downloads.hearthnhome.com/i...ET_FS_PPC90_TSC90_INSTALL_OWNERS_7093_600.pdf

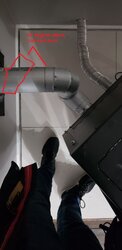
PelPro says the back corners of the stove need to be at least 3" away from the walls. The stove can be piped horizontally out of the wall and that's what the installer did.

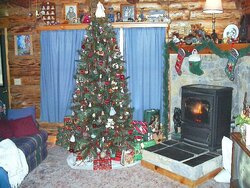
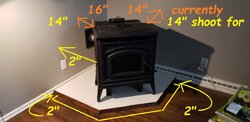
As you can see in the photos I've uploaded, looking at the front of the stove the left rear corner is about 16" away from one wall, and the right corner is about 14" away from the other wall. This means there is less than the suggested 6" of hearth in front of the stove. It also means the stove feels like it's sitting in the middle of our living room. Apologies - that's an exaggeration; I'm aggravated by this install.

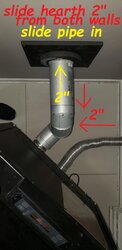
Our goal is to get the stove as close to 3" from each wall as we can so that it's centered on the hearth, tucked into the corner and we have 6" (or more) of hearth at the front of the stove.

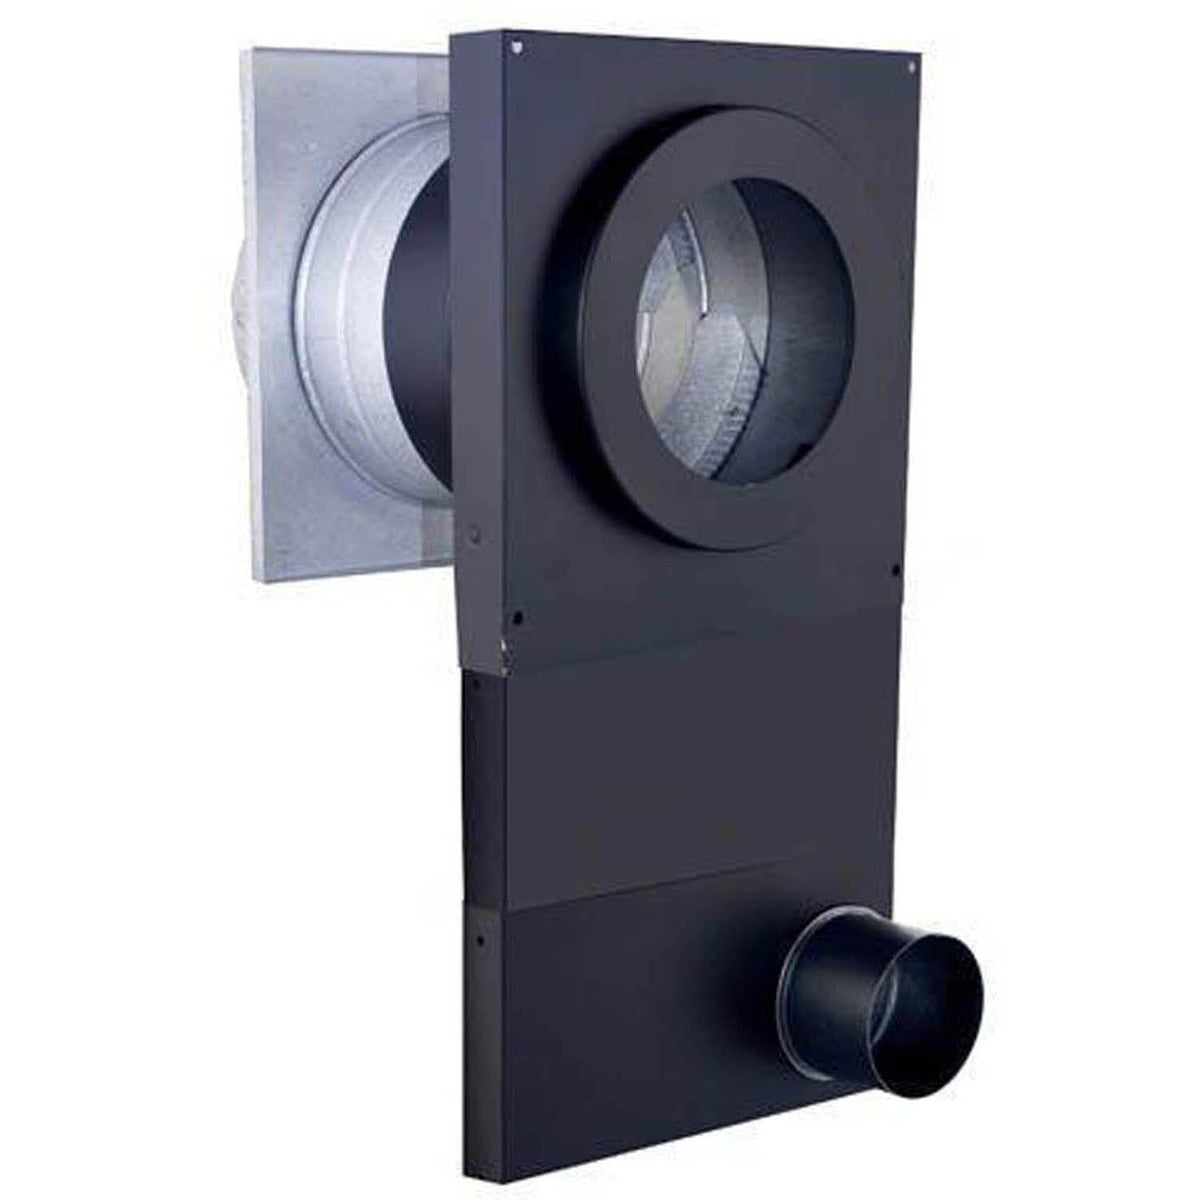
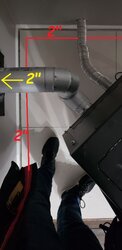
How can we get this thing closer to the back corner? If we swap in a 6" pipe in place of the 12" pipe that comes out of the wall and connects to the 90-degree pipe that connects to the clean-out T, could we push the stove back about 6"? Or would we need to add a second 90-degree pipe so that our pipe run from the wall would be 6" pipe to 90-degree pipe to 90-degree pipe to clean-out T?

Really appreciate any help thinking this through! Thank you!

image (12).png image (11).png 20210103_175244.jpg 20210103_175320.jpg 20210103_175304.jpg 20201212_153808.jpg
 
The pipe that comes out of the wall thimble is probably 18”- 24” long. shortening that pipe will move the stove to the left. But it looks like you would have to move the thimble to get where you want the stove. The measurements in the book are minimum clearances. you want a little more than minimum to allow for maintenance and cleaning
 
Last edited:
On another point.
I do not see a surge protector !!
Welcome to the forum
 
  • Like
Reactions: vinny11950
The pipe that comes out of the wall thimble is probably 18”- 24” long. shortening that pipe will move the stove to the left. But it looks like you would have to move the thimble to get where you want the stove. The measurements in the book are minimum clearances. you want a little more than minimum to allow for maintenance and cleaning

Thanks for your reply @Ssyko. The pipe that is attached to the thimble is 12" long. The hearth that the stove is sitting on is made up of four 24"x24" porcelain tiles. If you look at the photo that is shot from above the stove, you'll see that the pipe makes it to about the halfway point of one of those 24" tiles.

I get what you're saying about the stove moving to the left if we shorten this pipe to 6". That would be an improvement! What if we lost the 12" pipe, moved the stove back toward the corner, and instead of a straight pipe coming out of the wall we added a 90-degree pipe and connected that up with the 90-degree pipe that is connected to the clean-out T? Could that work? Is that too many bends?

Appreciate your help - thanks!
 
On another point.
I do not see a surge protector !!
Welcome to the forum

@johneh - we have a surge protector! We only just had this installed and then had to wait on a replacement part to make it to us - the stove arrived with the control board fritzed out. We turned it on to make sure it WOULD turn on, and then shut it down and unplugged. Once we solve our issue with placement and re-piping we'll get proper with surge protection. Definitely! Thanks for your response!
 
  • Like
Reactions: Ssyko
Well the thimble is just a hole and if it was properly installed (no joints in the thimble) that pipe is at least 18” long. It has to go through the wall in one piece. The only way i see the stove back further is to move the thimble further towards the corner. They should have placed stove where you wanted then gone straight out with a 45 out the wall
 
Once you cut the hole, the position is set. Like Ssyko said, to move the stove back you would have to move the thimble and the hole back too. That would mean patching the hole that is there now and then making another hole.

However, you have to do research on your wall. Is the current hole in between studs or did they cut a stud to get the thimble in there? Or maybe they had to put the thimble there because they didn't want to cut into the studs. Or maybe there is another reason why they did it that way (code related). You also have to consider your insurance here. Most insurance companies want the stove installed by a licensed installer. If you go about changing the install, you probably need another licensed installer to help you or you risk giving the insurance company a way not to pay a claim.

What's on the outside of the wall?

Also, it doesn't look like it is that far from the corner. And you have plenty of room to work back there. Just saying.
 
  • Like
Reactions: Ssyko
Well the thimble is just a hole and if it was properly installed (no joints in the thimble) that pipe is at least 18” long. It has to go through the wall in one piece. The only way i see the stove back further is to move the thimble further towards the corner. They should have placed stove where you wanted then gone straight out with a 45 out the wall

Ah ha -right. Sorry @Ssyko - wasn't thinking about all of the pipe going into/through the wall. We weren't there when the installer put this in and so - lesson learned.... We are in a pretty rural area of southwest MI and it took forever to find a licensed HVAC guy who would even take this project on. I guess maybe it's time to just let this go and live with the stove as is. At least it works now.

Thanks for taking the time to reply - I really do appreciate it.
 
  • Like
Reactions: Ssyko
Once you cut the hole, the position is set. Like Ssyko said, to move the stove back you would have to move the thimble and the hole back too. That would mean patching the hole that is there now and then making another hole.

However, you have to do research on your wall. Is the current hole in between studs or did they cut a stud to get the thimble in there? Or maybe they had to put the thimble there because they didn't want to cut into the studs. Or maybe there is another reason why they did it that way (code related). You also have to consider your insurance here. Most insurance companies want the stove installed by a licensed installer. If you go about changing the install, you probably need another licensed installer to help you or you risk giving the insurance company a way not to pay a claim.

What's on the outside of the wall?

Also, it doesn't look like it is that far from the corner. And you have plenty of room to work back there. Just saying.

Hi @vinny11950 - thanks for your response. The installer had to contend with our electric meter on the outside of the wall which is why he located the hole were he did -- just to the side of the electrical conduit and meter. He didn't want to go on the other side of the meter, closer to the corner of the hous, because he felt that the pipe on the inside of the house would be too close to the other wall. Had I have been there, I would have requested that he put the thimble hole up higher. The electrical conduit and meter are about 4' high on the outside wall so he could have gone up higher. He told me on the phone that he preferred to run a pipe straight out rather than run pipe up and then out.

We had a hard time finding anyone to do this install. I'm keeping my eyes and ears open for leads on other installers who can come out and redo this. The stove is not centered on the hearth, we don't have the 6" clearance at the front of the stove, and - yes - I'm too finicky! Really though, this is a large appliance in our living room. It being off makes a lot of the room feel...off. Sigh.

Thanks for your response! And if you know of any licensed installers working in southwest MI we're looking for a guy....
 
I am not sure this will work, but you could try something like the drawing attached. Excuse my poor MS Paint skills.

But if you put a 45 degree elbow on the main pipe that goes outside, you pull it out a little, then you could swivel the 90 degree connection you have and connect the two. Things to watch out for are: 1) make sure the new elbow connection does not go in the thimble; 2) the main pipe going outside is being pushed out, so you either live with it sticking out more or you get a shorter pipe if available; 3) stove draft may not like this, you have to check EVL drafting values - there is a formula but I can't find the link, maybe someone will post it.

Also, with all those joints inside the house, there is a good chance you will be hunting smoke leaks, and in a tight corner it will be a challenge.

Another option for the hearth pad is adding a few inches of hearth. you could easily build a tiled add on to the edge.

Good luck
 

Attachments

  • stoveadapter.jpg
    stoveadapter.jpg
    85.2 KB · Views: 298
  • Like
Reactions: tbear853 and Ssyko
I am not sure this will work, but you could try something like the drawing attached. Excuse my poor MS Paint skills.

But if you put a 45 degree elbow on the main pipe that goes outside, you pull it out a little, then you could swivel the 90 degree connection you have and connect the two. Things to watch out for are: 1) make sure the new elbow connection does not go in the thimble; 2) the main pipe going outside is being pushed out, so you either live with it sticking out more or you get a shorter pipe if available; 3) stove draft may not like this, you have to check EVL drafting values - there is a formula but I can't find the link, maybe someone will post it.

Also, with all those joints inside the house, there is a good chance you will be hunting smoke leaks, and in a tight corner it will be a challenge.

Another option for the hearth pad is adding a few inches of hearth. you could easily build a tiled add on to the edge.

Good luck

Thanks for this @vinny11950. I'm pretty handy and game for a challenge, but when it comes to fire in the house - I'm pretty quick to run toward a pro.

Your MS paint skills are fine! I had this same thought though I was wondering about a 90-degree connection. But I see what you mean about the 45 degree elbow connecting up with the 90.

I've read a bit about not having a lot of twists and turns in the pipe, more chance of leaks. I wouldn't attempt this on my own, but I will run this by a licensed installer once I find one.

Honestly, I'm wishing we had just run the pipe straight through the roof but we hesitated with that approach because the roof is new and we didn't want to risk leaks. If it's not one thing....

I'm really liking your idea to add some inches of hearth. Hadn't thought of that! Doh! Good one. Much appreciated.
 
  • Like
Reactions: Ssyko
Not a very good installer... One id be wondering what your hydro company is going to say with vent so close to their equipment. Why did the installer not take it out the same side as your air intake and use a wall thimble that did both exhaust and intake it would have brought things inline and could have gotten the stove almost back to its min clearance
 
  • Like
Reactions: Washed-Up
Post a picture sometime of the outside piping. You may appreciate the fact that there is space, sides and rear for future service.
As for the hearth pad , agree, you could extend it out more in front..
 
Not a very good installer... One id be wondering what your hydro company is going to say with vent so close to their equipment. Why did the installer not take it out the same side as your air intake and use a wall thimble that did both exhaust and intake it would have brought things inline and could have gotten the stove almost back to its min clearance

Hi @zrock, thanks for your response. The wall that doesn't have the thimble is the front of the house. We didn't want the pipe going out front. He piped it to vent out of the side of the house. I didn't know there are thimbles that do both intake and exhaust. When we find someone to come in and deal with round 2 of our pellet stove install I'll ask about this. Thanks for the info!
 
Post a picture sometime of the outside piping. You may appreciate the fact that there is space, sides and rear for future service.
As for the hearth pad , agree, you could extend it out more in front..

@gfreek - You have a point about being able to service this in the future. This stove is cast iron - 350 pounds without pellets in it. Skootching it away from walls so that you can get to things is....not easy. Will snap and share a photo of the outside piping. Curious what you all will think of the location of the vent given what @zrock wrote about the hydro company.
 
Hi @zrock, thanks for your response. The wall that doesn't have the thimble is the front of the house. We didn't want the pipe going out front. He piped it to vent out of the side of the house. I didn't know there are thimbles that do both intake and exhaust. When we find someone to come in and deal with round 2 of our pellet stove install I'll ask about this. Thanks for the info


That straight pipe going to thimble on the wall should go THROUGH the thimble with NO hidden joints inside. It should be no problem moving it 2" straight into the thimble other than what ever adjustments would be needed outside. This move centers the stove and it adds a little to that part of hearth extending out in front of the stove. If not close enough for your liking, put a small concrete bear statue on one side and maybe a tall lamp stand on the other side that's not made of flammable material to hide the stove pipe. I see they notched the hearth piece for base board heat leaving a very narrow channel along both walls, I would have made a spacer maybe 2" wide for the two wall sides, notched one for the base board heat, and put the hearth out 2" from each wall base. This will also add to your front hearth extension in front of the stove. Take a tape measure and sticks and measure out the moves and use your sticks to represent the changes and see if that gives you your clearances. There will be a time you'll be happy to have all 14" of room at those rear corners.
 

Attachments

  • 1 1.jpg
    1 1.jpg
    140.9 KB · Views: 516
  • 1 2.jpg
    1 2.jpg
    86.5 KB · Views: 238
  • 1.jpg
    1.jpg
    108.4 KB · Views: 260
  • Like
Reactions: vinny11950
@gfreek - You have a point about being able to service this in the future. This stove is cast iron - 350 pounds without pellets in it. Skootching it away from walls so that you can get to things is....not easy. Will snap and share a photo of the outside piping. Curious what you all will think of the location of the vent given what @zrock wrote about the hydro company.

I installed my stove with the minimum clearances because I wanted the least protrusion into an already small room. I’m a skinny little guy and getting behind the stove for service is definitely a challenge.

I’d take a look at the service manual and simulate servicing parts behind the stove. And seeing what you’re doing. Then decide if you really want to move it.
 
That straight pipe going to thimble on the wall should go THROUGH the thimble with NO hidden joints inside. It should be no problem moving it 2" straight into the thimble other than what ever adjustments would be needed outside. This move centers the stove and it adds a little to that part of hearth extending out in front of the stove. If not close enough for your liking, put a small concrete bear statue on one side and maybe a tall lamp stand on the other side that's not made of flammable material to hide the stove pipe. I see they notched the hearth piece for base board heat leaving a very narrow channel along both walls, I would have made a spacer maybe 2" wide for the two wall sides, notched one for the base board heat, and put the hearth out 2" from each wall base. This will also add to your front hearth extension in front of the stove. Take a tape measure and sticks and measure out the moves and use your sticks to represent the changes and see if that gives you your clearances. There will be a time you'll be happy to have all 14" of room at those rear corners.

Wow @tbear853 this is fantastic. Thank you so much! And LOL ==> "put a small concrete bear statue on one side and maybe a tall lamp stand on the other side". Duly noted and being considered. :)

I'm starting to get the sense that space to work should be kept in mind moving forward with any adjustments. Got it.
 
Me, I'd leave it right where it is. People set them too close top the wall and when maintenance time comes around (and it will) being close to the wall(s) will always pose an issue. I see you are in Michigan (like me), but where? Toledo has a good retail stove place with competent installers too. I've installed a few myself. Not difficult.

I'm late to the party but going over your pictures I see something I don't like at all... Your cleanout Tee is INSIDE and not outside. That in my humble opinion will be a BIG issue for you down the road because the first time you pull the lower cap to clean it, that pretty room with it's clean walls and floor are going to turn into a MESS. I would NEVER install a cleanout tee inside a dwelling, only outside, no exceptions, unless there was some glaring reason why it could not be outside.

Fly ash from any pellets stove is hugely messy to deal with. It's black and dirty and clings to walls like a magnet.

Plus being on the inside limits you from sucking the venting clear of ash deposits with a leaf blower. Needs to go outside.
 
Last edited:
Me, I'd leave it right where it is. People set them too close top the wall and when maintenance time comes around (and it will) being close to the wall(s) will always pose an issue. I see you are in Michigan (like me), but where? Toledo has a good retail stove place with competent installers too. I've installed a few myself. Not difficult.

I'm late to the party but going over your pictures I see something I don't like at all... Your cleanout Tee is INSIDE and not outside. That in my humble opinion will be a BIG issue for you down the road because the first time you pull the lower cap to clean it, that pretty room with it's clean walls and floor are going to turn into a MESS. I would NEVER install a cleanout tee inside a dwelling, only outside, no exceptions, unless there was some glaring reason why it could not be outside.

Fly ash from any pellets stove is hugely messy to deal with. It's black and dirty and clings to walls like a magnet.

Plus being on the inside limits you from sucking the venting clear of ash deposits with a leaf blower. Needs to go outside.

Hi @SidecarFlip - thanks for your response. We are in southwest MI very near the MI/IN border. Closest big town is South Bend, IN.

The installation manual has a lot of diagrams and all of them show the clean-out T inside of the dwelling, not outside. I believe you re the mess to come! But just saying, the guide suggests an interior install of the T. I posted a screengrab of a diagram from the guide - clearly shows this. Hmmmm......
 
  • Like
Reactions: Ssyko and tbear853
But just saying, the guide suggests an interior install of the T. I posted a screengrab of a diagram from the guide - clearly shows this. Hmmmm......
You did and I saw that, but got wrapped up in the moving question, I forgot to mention that yeah, the tee is not something I'd use inside my home. I know it's there now ... and so is the stove and hole in the wall, but I wouldn't use it. Just leave it be. You can remove the cap to let loose ash drop into a bucket, even stick a shop vac hose into to vacuum close stuff, but cover the floor and walls near by. About the only thing you could use in place of that tee is a 90 now.

What does the outside look like?
 
Last edited:
Guess the manufacturer of the unit wants you to destroy the interior of your house then. Putting a cleanout Tee inside is a no no unless it cannot be installed on the outside for some reason. Believe me, you leave it inside and the first time you pull the cap, you'll understand perfectly why it needs to be on the outside.

If it was mine, I'd leave the unit right where it is because you'll be under the cover panels at some point and sequestering ANY unit close to the walls will result in many cuss words on your part or the part of anyone cleaning or servicing the unit for you. Lots of threads on here of owners stuffing stoves into tight spots and then wondering how they will access the back and sides to service them... and they need regular servicing inside the cabinet or they will fail.

Not overly fond of the install anyway as it pertains to the venting. I would have come straight out of the stove exhaust to the wall thimble and outside with no elbows at all, just the adapter section and straight venting outside with the cleanout Tee on the outside acting as the vertical transition and a vertical with an elbow and cap. The more convoluted the exhaust venting is, the more internal restriction there is and that in itself is bad for a pellet burner.

I realize you already have the hole for the venting so you are 'stuck' so to speak. If it was mine, I'd raise the unit so the exhaust was in line with the wall thimble and move everything outside with a straight length of venting from the stove exhaust to the outside clean out tee.

In fact I'm sorry I didn't raise my unit when I first installed it over 15 years ago. The older I get the harder it is for me to get down on my knees and clean it out, which I do twice weekly. Would have been better to have the unit elevated so I would not have to do that.

My unit comes completely apart every spring, all the internal components get removed, motors oiled, combustion fan cleaned, exhaust plenum cleaned, gearboxes greased and outside venting taken apart and washed out and then I fog the interior of the stove with fogging oil to keep it from corroding. That way, the next fall it's ready to rock. Been doing that for 15+ years now. I've never replaced one component.

I happen to burn corn mostly but the principles remain the same.
 
  • Like
Reactions: tbear853
Guess the manufacturer of the unit wants you to destroy the interior of your house then. Putting a cleanout Tee inside is a no no unless it cannot be installed on the outside for some reason. Believe me, you leave it inside and the first time you pull the cap, you'll understand perfectly why it needs to be on the outside.

If it was mine, I'd leave the unit right where it is because you'll be under the cover panels at some point and sequestering ANY unit close to the walls will result in many cuss words on your part or the part of anyone cleaning or servicing the unit for you. Lots of threads on here of owners stuffing stoves into tight spots and then wondering how they will access the back and sides to service them... and they need regular servicing inside the cabinet or they will fail.

Not overly fond of the install anyway as it pertains to the venting. I would have come straight out of the stove exhaust to the wall thimble and outside with no elbows at all, just the adapter section and straight venting outside with the cleanout Tee on the outside acting as the vertical transition and a vertical with an elbow and cap. The more convoluted the exhaust venting is, the more internal restriction there is and that in itself is bad for a pellet burner.

I realize you already have the hole for the venting so you are 'stuck' so to speak. If it was mine, I'd raise the unit so the exhaust was in line with the wall thimble and move everything outside with a straight length of venting from the stove exhaust to the outside clean out tee.

In fact I'm sorry I didn't raise my unit when I first installed it over 15 years ago. The older I get the harder it is for me to get down on my knees and clean it out, which I do twice weekly. Would have been better to have the unit elevated so I would not have to do that.

My unit comes completely apart every spring, all the internal components get removed, motors oiled, combustion fan cleaned, exhaust plenum cleaned, gearboxes greased and outside venting taken apart and washed out and then I fog the interior of the stove with fogging oil to keep it from corroding. That way, the next fall it's ready to rock. Been doing that for 15+ years now. I've never replaced one component.

I happen to burn corn mostly but the principles remain the same.

Thankfully I’m good at working on cars where you can’t see, only go by feel. I can’t see directly behind my stove and sometimes it’s like being a contortionist for what I can see.

Totally agree about the cleanout outside if at all possible. Keep the mess outside. One reason for the pellet stove in the first place is it’s cleaner than firewood.

Only thing about raising the stove is you have to raise every pellet bag that much more to dump it in. Of course you burn a corn mix and likely not in bags by the time it’s ready to go in. Besides I like working on the floor. To each our own .
 
... etc ...
Not overly fond of the install anyway as it pertains to the venting. I would have come straight out of the stove exhaust to the wall thimble and outside with no elbows at all, just the adapter section and straight venting outside with the cleanout Tee on the outside acting as the vertical transition and a vertical with an elbow and cap. The more convoluted the exhaust venting is, the more internal restriction there is and that in itself is bad for a pellet burner.

I realize you already have the hole for the venting so you are 'stuck' so to speak. If it was mine, I'd raise the unit so the exhaust was in line with the wall thimble and move everything outside with a straight length of venting from the stove exhaust to the outside clean out tee.

In fact I'm sorry I didn't raise my unit when I first installed it over 15 years ago. The older I get the harder it is for me to get down on my knees and clean it out, which I do twice weekly. Would have been better to have the unit elevated so I would not have to do that. ... etc ...
I thought of that too.
... etc ...

Only thing about raising the stove is you have to raise every pellet bag that much more to dump it in. Of course you burn a corn mix and likely not in bags by the time it’s ready to go in. Besides I like working on the floor. To each our own .
Well, it's really not so bad if you are in the habit of throwing the bag up on your shoulder and you have a hearth to step up on. My wife brings them in holding the bag in like a hug though. I built this in '92, framed with 2x6s, plywood on top & bottom of hearth, plastic under it, slate on top, the sides are a light weight cast stone, non flammable. The two sides are framed with 2x4s, I built it in the center, slid into place to measure & mark my passage way out the side. Cut for the thimble after making sure no spikes would be hit with the saw chain. I cut pieces in basement as needed. Regular mortor holds stones to a lath mesh nailed to the wood. I'd say with the two layers plywood, the 2x6s, the slate and lath, a bit over 8" step up but I have plenty of room. It does make a warm place to sit with company if not wearing white pants.
 

Attachments

  • 14.JPG
    14.JPG
    157.3 KB · Views: 248