How to make a block-off plate


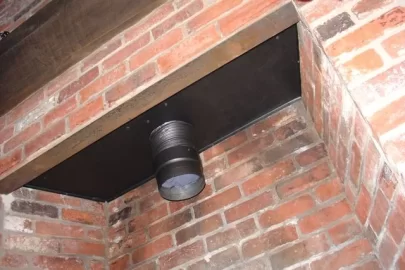
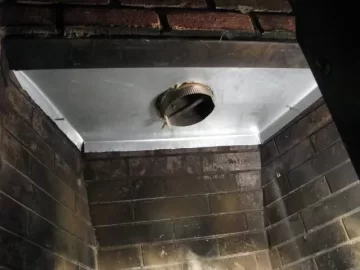
A block-off plate is particularly helpful with inserts installed in fireplace on exterior walls with exterior chimneys. Without one, the flue liner (which should be insulated) and the stove will try to heat the mass of masonry that is exposed to the outdoors. This can result in a significant cooling of the stove and large heat loss. A block off plate keeps the heat where you want it.
Step 1: If you haven't already done this, completely clean the chimney. This includes the smoke shelf behind the
Damper. Wire brush down the fireplace interior under the damper. You will be attaching metal to this surface.
Step 2: If the liner will not pass through the damper opening, remove the damper or cut out a section to allow the liner to clear the damper area unobstructed.
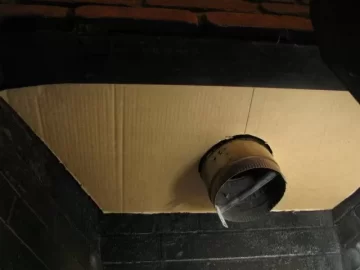
Step 3: Unless you are skilled at working with sheetmetal, make a cardboard template of the area you want to block below the damper. Don't worry if you don't get it perfect. Tape on sections to get a nice snug fit. When right it should stay in place.
 Step 4:
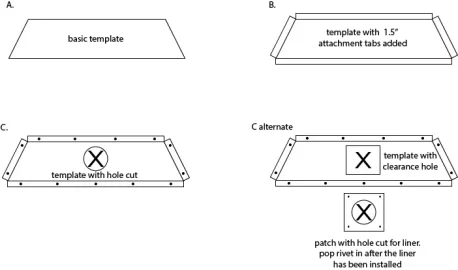
 Trace out the template on a flat sheet of 26-24 ga galvanized sheet metal. If your template did not include attachment flaps, add 1" to the perimeter of the template. These will get folded down at a 90 degree angle. Your sheet metal will look something like illustration B at this point.Bend the tabs at about 80 degrees. You want them to flare out slightly for good contact against the fireplace walls.

Click image to enlarge
Step 5: Install the liner if it is not already in. If the liner is coming down centered and straight and that lines up well with the stove flue collar, you can cut the hole for the liner. Make it 1/4" larger than the OD of the liner. (Illustration C) If the liner is coming into the firebox at an angle or you are concerned about fitting, you can cut a bit larger rectangular hole in the block-off plate, then cut a larger patch piece that has the hole for the liner. This will provide some adjustment room to get the liner aligned correctly with the stove. (C alternate)
Step 6: Drill screw clearance holes for attaching the blockoff plate to the fireplace. Put the plate up in place and mark the holes on the fireplace interior. Remove the plate when done marking holes.
Step 7: Drill masonry for tapcons or rawlplugs to hold the blockoff plate in the previously marked locations.Set the anchors.
Step 8: Stuff the area around the liner with Roxul (mineral wool) or kaowool (ceramic insulation). Have it come down low enough so that the blockoff plate will gently press up against the insulation when it is put back into place.
Step 9: Put a thin bead of silicone on the outside edge of the tabs.
Step 10: Install the plate and screw it in place with the anchors using sheet metal (pan head) screws.
Tip: If you are installing a freestanding stove in a large fireplace consider dropping down the blockoff plate to the lintel level and attach the back edge of the plate a couple inches lower than the lintel level. This will help prevent heat from being trapped in the smoke cavity above the stove.
Here are links to installations by hearth.com members with some great photos of how they did it:
Thread links with PICTURES:
http://www.hearth.com/econtent/index.php/forums/viewthread/11697/
http://www.hearth.com/econtent/index.php/forums/viewthread/67219/
http://www.hearth.com/econtent/index.php/forums/viewthread/9630/P15/
http://www.hearth.com/econtent/index.php/forums/viewthread/47057/
http://www.hearth.com/econtent/index.php/forums/viewthread/78544/
http://www.hearth.com/econtent/index.php/forums/viewthread/80548/
Helpful tips on working with sheetmetal:
http://www.hearth.com/talk/wiki/cut-sheet-metal-and-stove-pipe/
 Click image to enlarge


